In part 1 of this post we showed how to create a multi-platform Qt Quick application project in Visual Studio targeting Windows and Embedded Linux. We will now show how to run the application on an embedded device. We will then continue developing the project into the full embedded application that we set out to create. Finally, we will use the VS debugger to remotely debug the application's C++ and QML code.
Running on the embedded device
We've already shown how to cross-compile a "hello world" Qt Quick application created in Visual Studio. We will now see how to run that application on the Raspberry Pi. As we will be running in full-screen mode, we must first add some content to the application window.
main.qml
Window {

    visible: true

    title: qsTr("Hello World")

    Text {

        id: clock

        font.pointSize: 72

        Timer {

            interval: 1000; running: true; repeat: true

            onTriggered: clock.text = (new Date).toLocaleTimeString(Qt.locale("de_DE"), "hh:mm:ss");

        }

    }

}
Qt Quick "Hello World"
As before, select a Linux project configuration and press F7 to start the cross-compilation.
Visual Studio Build Output
1>------ Build started: Project: QuickMirror, Configuration: Debug_RPi x64 ------
1>rcc qml.qrc
1>Invoking 'mkdir -p $(dirname qml.qrc); mkdir -p $(dirname /mnt/c/Users/user/Source/Repos/QuickMirror/main.qml); mkdir -p $(dirname /mnt/c/Users/user/Source/Repos/QuickMirror/obj/x64/Debug_RPi/rcc/qrc_qml.cpp); (/home/user/raspi/qt5/bin/rcc /mnt/c/Users/user/Source/Repos/QuickMirror/qml.qrc --name qml -o /mnt/c/Users/user/Source/Repos/QuickMirror/obj/x64/Debug_RPi/rcc/qrc_qml.cpp)', working directory: '/mnt/c/Users/user/Source/Repos/QuickMirror'
1>Starting remote build
1>Compiling sources:
1>qrc_qml.cpp
1>Linking objects
1>QuickMirror.vcxproj -> C:\Users\user\Source\Repos\QuickMirror\bin\x64\Debug_RPi\QuickMirror.out
========== Build: 1 succeeded, 0 failed, 0 up-to-date, 0 skipped ==========
Cross-compiling Qt project in VS
We will now upload the application binary to the Raspberry Pi. The build output window shows the location of the generated binary (highlighted above).
Windows Command Prompt
C:\Users\user> scp C:\Users\user\Source\Repos\QuickMirror\bin\x64\Debug_RPi\QuickMirror.out pi@192.168.1.98:/home/pi/
pi@192.168.1.98's password:
QuickMirror.out 100% 465KB 1.6MB/s 00:00
C:\Users\user>
Uploading application binary to target device
To automatically copy the application file at the end of each build, the following command can be set in the "WSL Post-Build Event" property page (ATTN: this will save the device password in clear-text).
Project Properties > WSL Post-Build Event > Command Line
curl --insecure --user pi:<password> -T /mnt/$(TargetPath.Replace('\','/').Replace(':','').ToLower()) scp://<device-addr>/home/pi/$(TargetFileName)
Copy binary to device at the end of every build
Before starting the Qt Quick application we need to setup some required environment variables:
LD_LIBRARY_PATH
Path to installation dir of Qt binaries.QT_QPA_PLATFORM
Platform plugin.QT_QPA_PLATFORM_PLUGIN_PATH
Path to installation dir of platform plugins.QT_QPA_EGLFS_PHYSICAL_WIDTHQT_QPA_EGLFS_PHYSICAL_HEIGHT
Physical screen's width and height in millimeters.QML2_IMPORT_PATH
Path to installed QML modules.
Raspberry Pi Command Shell
pi@raspberry-pi:~$ export LD_LIBRARY_PATH="/usr/local/qt5pi/lib"

pi@raspberry-pi:~$ export QT_QPA_PLATFORM="eglfs"

pi@raspberry-pi:~$ export QT_QPA_PLATFORM_PLUGIN_PATH="/usr/local/qt5pi/plugins/platforms"

pi@raspberry-pi:~$ export QT_QPA_EGLFS_PHYSICAL_WIDTH="326"

pi@raspberry-pi:~$ export QT_QPA_EGLFS_PHYSICAL_HEIGHT="520"

pi@raspberry-pi:~$ export QML2_IMPORT_PATH="/usr/local/qt5pi/qml"

pi@raspberry-pi:~$ ./QuickMirror.out
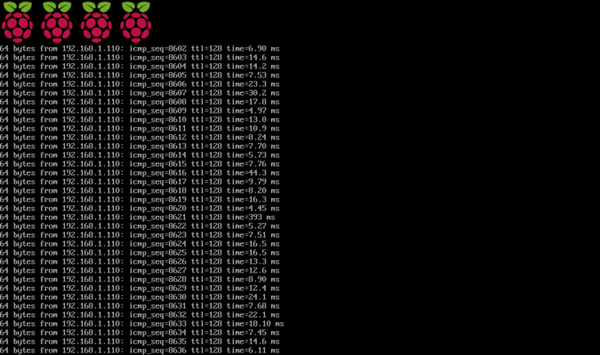
Raspberry Pi Display
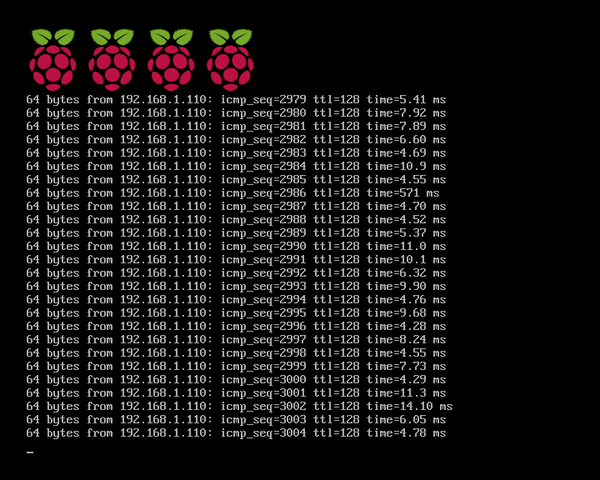
Running "Hello World" application in the Raspberry Pi
Developing the application
The requirements of our application include displaying the following information:
- Current time
- Current date
- Notable anniversaries
- Weather forecast
- Public transport next departures
- News
We will encapsulate each of these items into a dedicated QML type. For that we must first add a QML Module Definition (qmldir) file to the project:
- Select "Project > Add New Item.. > Qt > QML Module Definition".
- In the location field, indicate the path to the folder that will contain the QML files.
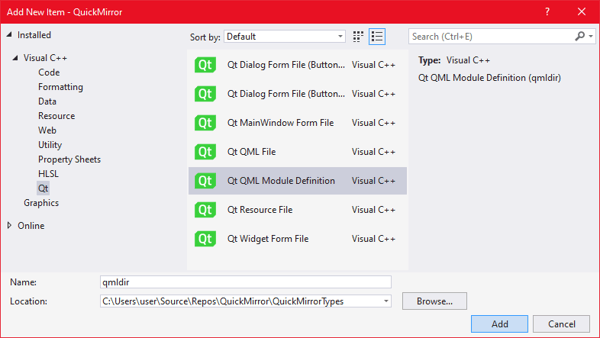
Adding a new QML module definition to the project
After pressing "Add", a qmldir file will become available in the project tree. We will use this file to define the mapping of each QML type to its corresponding source file.
qmldir
ApiCall         1.0 QuickMirror.ApiCall.qml
Calendar        1.0 QuickMirror.Calendar.qml
Clock           1.0 QuickMirror.Clock.qml
NewsTicker      1.0 QuickMirror.NewsTicker.qml
OnThisDay       1.0 QuickMirror.OnThisDay.qml
PublicTransport 1.0 QuickMirror.PublicTransport.qml
Weather         1.0 QuickMirror.Weather.qml
Mapping QML types to source files
To add a new QML source file to the project:
- Select "Project > Add New Item... > Qt > QML File".
- Set the location to the same directory where the
qmldirfile was created. - Set the QML file name.
- Press "Add".
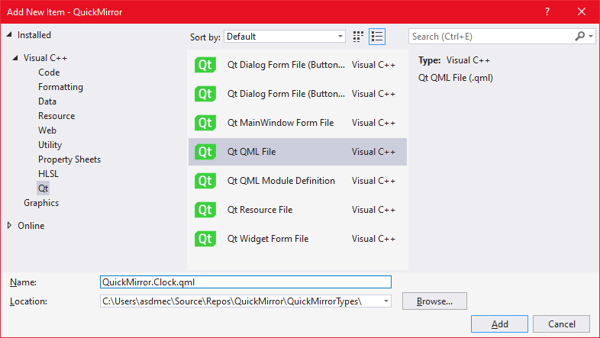
Adding a new QML file to the project
We will start by adding QML types for displaying the current time, current date and notable anniversaries. The Clock type will display the current time, refreshing every second.
QuickMirror.Clock.qml
Text {

    font.family: FontFamily_Clock

    font.styleName: FontStyle_Clock

    font.pointSize: 144

    color: "white"

    renderType: Text.NativeRendering

    antialiasing: false

    function refresh() {

        text = (new Date).toLocaleTimeString(Qt.locale("de_DE"), "hh:mm");

    }

    Component.onCompleted : refresh();

    Timer {

        interval: 1000; running: true; repeat: true        onTriggered: parent.refresh();

    }

}
Definition of the Clock QML type
The Calendar type will display the current date, cycling between various locales.
QuickMirror.Calendar.qml
Text {

    renderType: Text.NativeRendering

    id: calendar

    color: "white"

    font.family: FontFamily_Bold

    font.styleName: FontStyle_Bold

    font.pointSize: 72

    property var locales: ["en_US", "de_DE", "pt_PT"]

    property var localeIdx: 0

    function capitalize(s) {

        return s.replace(/(^|-)./g, function(c) { return c.toUpperCase(); });

    }

    function setNextLocale() {

        localeIdx = (localeIdx + 1) % locales.length;

    }

    function getCurrentText() {

        var date = new Date;

        var locale = Qt.locale(locales[localeIdx]);

        var calendarText = capitalize(date.toLocaleDateString(locale, "dddd, dd"));

        var monthShort = date.toLocaleDateString(locale, "MMM");

        var monthLong = date.toLocaleDateString(locale, "MMMM");

        if (monthLong.length <= 5) {

            calendarText += capitalize(monthLong);

        } else {

            calendarText += capitalize(monthShort);

            if (!monthShort.endsWith("."))

                calendarText += ".";

        }

        calendarText += date.toLocaleDateString(locale, " yyyy");

        return calendarText;

    }

    Component.onCompleted: {

        text = getCurrentText();

    }

    Timer {

        interval: 15000; running: true; repeat: true

        onTriggered: {

            setNextLocale();

            text = getCurrentText();

        }

    }

    Behavior on text {

        SequentialAnimation {

            NumberAnimation { target: calendar; property: "opacity"; to: 0.0; duration: 1000 }

            PropertyAction { target: calendar; property: "text" }

            NumberAnimation { target: calendar; property: "opacity"; to: 1.0; duration: 500 }

        }

    }

}
Definition of the Calendar QML type
Besides the date/time, our application will rely on Web API's for retrieving information. We will run curl in a separate process to connect to Web API's. The process creation will be handled by a C++ class named Process. The QML type ApiCall will then use a Process object to start curl with the necessary parameters and gather its output.
QuickMirror.ApiCall.qml
Item {

    property var url: ""

    property var path: []

    property var query: []

    signal response(var response)

    signal error(var error)

    Process {

        id: curl

        property var path: Q_OS_WIN ? "C:\\Windows\\System32\\curl.exe" : "/usr/bin/curl"

        property var request: ""

        command: path + " -s \"" + request + "\""

    }

    function sendRequest() {

        curl.request = url;

        if (path.length > 0)

            curl.request += "/" + path.join("/");

         if (query.length > 0)

            curl.request += "?" + query.join("&");

        curl.start();

    }

    Connections {

        target: curl

        onExit /*(int exitCode, QByteArray processOutput)*/ : {

            if (exitCode != 0) {

                console.log("ApiCall: exit " + exitCode);

                console.log("==== ApiCall: request: " + curl.request);

                return error("exit " + exitCode);

            }

            try {

                return response(JSON.parse(processOutput));

            } catch (err) {

                console.log("ApiCall: error: " + err.toString());

                console.log("==== ApiCall: request: " + curl.request);

                console.log("==== ApiCall: response: " + processOutput);

                return error(err);

            }

        }

    }

}
Definition of the ApiCall QML type
To create the Process C++ class:
- Select "Project > Add Qt Class > Qt Class"
- Set class name to Process
- Press "Add"
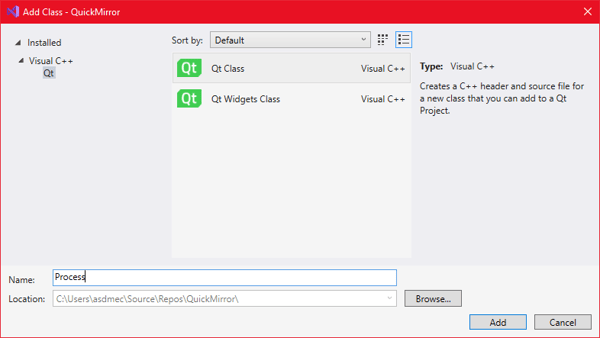
Adding a new Qt C++ class to the project
Process.h
class Process : public QProcess

{

    Q_OBJECT

    Q_PROPERTY(QString command READ command WRITE setCommand NOTIFY commandChanged)


public:

    Process(QObject* parent = 0);

    ~Process();


public:

    Q_INVOKABLE void start();

    void setCommand(const QString& cmd);

    QString command() const;


signals:

    void commandChanged();

    void exit(int exitCode, QByteArray processOutput);


protected:

    void onFinished(int exitCode, QProcess::ExitStatus status);

    void onErrorOccurred(QProcess::ProcessError error);


private:

    QString m_command;

};
Process.cpp
Process(QObject* parent) : QProcess(parent)

{

    connect(

        this, QOverload<int, QProcess::ExitStatus>::of(&QProcess::finished),

        this, &Process::onFinished);

    connect(

        this, &QProcess::errorOccurred,

        this, &Process::onErrorOccurred);

}


Process::~Process()

{

}


void Process::setCommand(const QString& cmd)

{

    if (cmd != m_command) {

        m_command = cmd;

        emit commandChanged();

    }

}


QString Process::command() const

{

    return m_command;

}


void Process::start()

{

    if (state() == ProcessState::NotRunning)

        QProcess::start(m_command);

    else

        qInfo() << "==== QProcess: ERROR already running:" << m_command;

}


void Process::onFinished(int exitCode, QProcess::ExitStatus status)

{

    emit exit((status == ExitStatus::NormalExit) ? exitCode : -1, readAll());

}


void Process::onErrorOccurred(QProcess::ProcessError error)

{

    qInfo() << "==== QProcess: ERROR " << error;

}
main.cpp
int main(int argc, char* argv[])

{

    qmlRegisterType<Process>("Process", 1, 0, "Process");

...
Definition of the Process class
The OnThisDay QML type will use an instance of ApiCall to retrieve a list of notable anniversaries and cycle through them every few seconds.
QuickMirror.OnThisDay.qml
Item {

    id: onThisDay

    clip: true

    property int viewportHeight

    property var events: []

    property var births: []

    property var deaths: []

    property int idxEventType: -1

    ApiCall {

        id: onThisDayApi

        property int month: 0

        property int day: 0

        property string eventType: ""

        url: "https://byabbe.se"; path: ["on-this-day", month, day, eventType + ".json" ]

        onResponse: {

            if ("events" in response) {

                events = shuffle(response.events);

                eventType = "births";

                sendRequest();

            } else if ("births" in response) {

                births = shuffle(response.births);

                for (var i in births)

                    births[i].year = "*" + births[i].year;

                eventType = "deaths";

                sendRequest();

            } else if ("deaths" in response) {

                deaths = shuffle(response.deaths);

                for (var i in deaths)

                    deaths[i].year = "<sup>†</sup>" + deaths[i].year;

                next();

            }

        }

    }

    function init() {

        events = [];

        births = [];

        deaths = [];

        idxEventType = -1;

        var today = new Date;

        onThisDayApi.month = today.getMonth() + 1;

        onThisDayApi.day = today.getDate();

        onThisDayApi.eventType = "events";

        onThisDayApi.sendRequest();

    }

    function next() {

        if (events.length + births.length + deaths.length == 0)

            return;

        var today = new Date;

        if (onThisDayApi.month != today.getMonth() + 1 || onThisDayApi.day != today.getDate())

            return init();

        onThisDayText.color = "white";

        idxEventType = (idxEventType + 1) % 3;

        var event;

        switch (idxEventType) {

            case 0:

                if (events.length == 0)

                    return next();

                event = events.shift();

                events = shuffle(events);

                events.push(event);

                break;

            case 1:

                if (births.length == 0)

                    return next();

                event = births.shift();

                births = shuffle(births);

                births.push(event);

                break;

            case 2:

                if (deaths.length == 0)

                    return next();

                event = deaths.shift();

                deaths = shuffle(deaths);

                deaths.push(event);

                break;

        }

        onThisDayText.text = event.year + " – " + event.description;

        showText.start();

    }

    Component.onCompleted: {

        init();

    }

    Timer {

        id: timerRetry

        interval: 10000; running: true; repeat: true

        onTriggered: {

            if (events.length + births.length + deaths.length == 0)

                init();

        }

    }

    SequentialAnimation {

        id: showText

        PropertyAction { target: onThisDayText; property: "y"; value: 25 }

        NumberAnimation { target: onThisDayText; property: "opacity"; to: 1.0; duration: 500 }

        PauseAnimation { duration: 3000 }

        NumberAnimation {

            target: onThisDayText

            property: "y"

            to: Math.min(-(25 + onThisDayText.contentHeight) + viewportHeight, 25)

            duration: Math.max(0, (Math.abs(to - from) * 1000) / 25)

        }

        PauseAnimation { duration: 3000 }

        NumberAnimation { target: onThisDayText; property: "opacity"; to: 0.0; duration: 1000 }

        onFinished: {

            onThisDay.next();

        }

    }

    Text {

        renderType: Text.NativeRendering

        id: onThisDayText

        wrapMode: Text.WordWrap

        font.family: FontFamily_Normal

        font.styleName: FontStyle_Normal

        font.pointSize: 40

        textFormat: Text.RichText

        color: "white"

        y: 25

        anchors.left: parent.left

        width: parent.width

        height: contentHeight

        opacity: 0

    }

    Rectangle {

        id: top

        anchors.top: parent.top

        anchors.left: parent.left

        width: parent.width

        height: 10

        gradient: Gradient {

            orientation: Gradient.Vertical

            GradientStop { position: 0.0; color: "black" }

            GradientStop { position: 0.5; color: "transparent" }

        }

    }

    Rectangle {

        id: bottomFade

        anchors.top: parent.top

        anchors.topMargin: viewportHeight

        anchors.left: parent.left

        width: parent.width

        height: 0.1 * viewportHeight

        gradient: Gradient {

            orientation: Gradient.Vertical

            GradientStop { position: 0.0; color: "transparent" }

            GradientStop { position: 0.5; color: "black" }

        }

    }

    Rectangle {

        anchors.top: bottomFade.bottom

        anchors.bottom: parent.bottom

        anchors.left: parent.left

        width: parent.width

        color: "black"

    }

}
Definition of the OnThisDay QML type
Now that we've defined some of the application's QML types, we will arrange them on the main QML file.
main.qml
import "QuickMirrorTypes"


Window {

    visible: true

    title: qsTr("Quick Mirror")

    Flickable {

        anchors.fill: parent

        contentWidth: mirror.width

        contentHeight: mirror.height

        Rectangle {

            id: mirror

            width: 1080

            height: 1920

            color: "black"


            Clock {

                id: clock

                anchors.top: mirror.top

                anchors.left: mirror.left

            }


            Calendar {

                id: calendar

                anchors.top: clock.bottom

                anchors.topMargin: -20

                anchors.left: mirror.left

            }


            Rectangle {

                anchors.top: calendar.bottom

                anchors.topMargin: -5

                anchors.left: mirror.left

                width: 800

                height: 2

                color: "white"

            }


            OnThisDay {

                id: onThisDay

                anchors.top: calendar.bottom

                anchors.left: mirror.left

                anchors.leftMargin: 10

                anchors.bottom: mirror.bottom

                width: 780

                viewportHeight: 260

            }

        }

    }

}
Main QML with Clock, Calendar and OnThisDay
Finally, the QML files and the qmldir file must all be added to the application's resource file:
- Double-click the QRC file in the project tree
- In the Qt Resource Editor window, press "Add > Add Files"
- Select all QML files and the qmldir file
- Press "Save" in the Qt Resource Editor
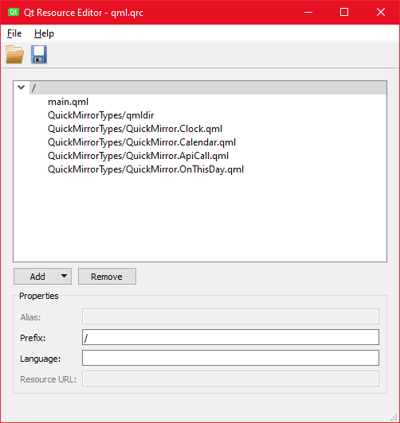
QML files and qmldir added to the resource file
After building and deploying we'll be able to start the application and see the information displayed.
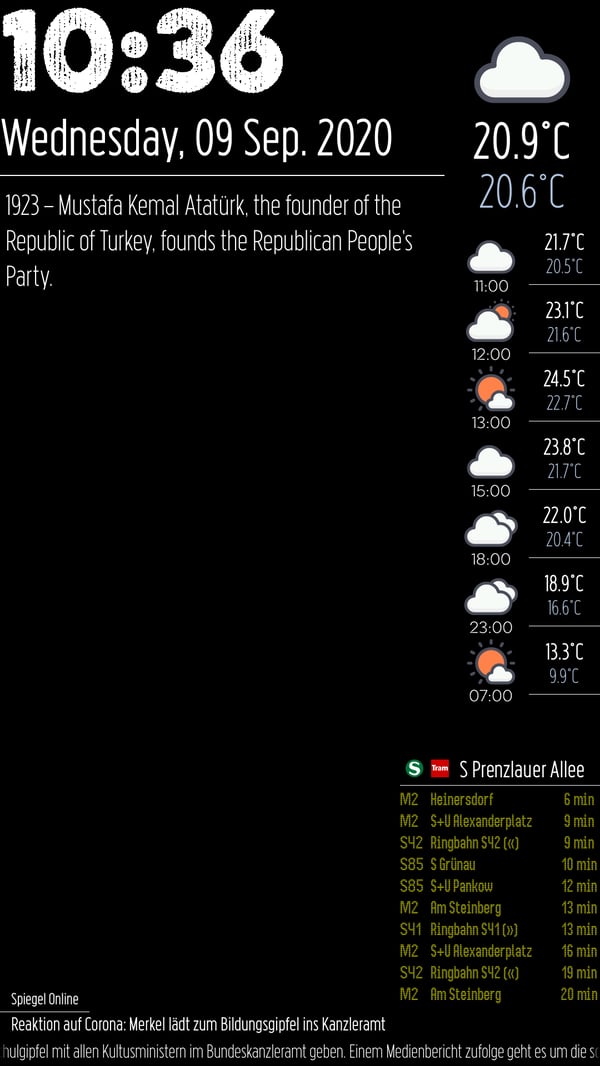
Raspberry Pi Display
Application running on the Raspberry Pi
Debugging in Visual Studio
VS supports debugging applications running on WSL through gdb. To debug while running on the Raspberry Pi we will launch the application using gdbserver and then configure gdb to connect to the device and start a remote debug session.

Remote debugging from Visual Studio using gdb and gdbserver
For this to work, the gdb installed in the WSL must support the target device architecture. A simple way to achieve this is to install gdb-multiarch. To ensure VS uses the correct debugger, we will create a symbolic link from gdb to gdb-multiarch.
WSL Command Shell
user@buildhost:~$ sudo apt-get install gdb-multiarch
...
user@buildhost:~$ cd /usr/bin
user@buildhost:/usr/bin$ sudo mv gdb gdb-bkup
user@buildhost:/usr/bin$ sudo ln -s gdb-multiarch gdb
user@buildhost:/usr/bin$ ls -go gdb*
lrwxrwxrwx 1 13 Sep 2 11:31 gdb -> gdb-multiarch
-rwxr-xr-x 1 8440200 Feb 11 2020 gdb-bkup
-rwxr-xr-x 1 15192808 Feb 11 2020 gdb-multiarch
user@buildhost:/usr/bin$
Replacing gdb with gdb-multiarch
To setup the remote debugging session in Visual Studio, two additional commands must be passed to gdb. This is configured in the "GDB Debugger" property page.
Project Properties > Debugging > Additional Debugger Commands
target extended-remote 192.168.1.98:2345
set remote exec-file /home/pi/QuickMirror.out

Additional gdb commands for remote debugging session
Before starting the remote debugging session, we must set the required environment variables and launch gdbserver on the device.
Raspberry Pi Command Shell
pi@raspberry-pi:~$ export LD_LIBRARY_PATH="/usr/local/qt5pi/lib"

pi@raspberry-pi:~$ export QT_QPA_PLATFORM="eglfs"

pi@raspberry-pi:~$ export QT_QPA_PLATFORM_PLUGIN_PATH="/usr/local/qt5pi/plugins/platforms"

pi@raspberry-pi:~$ export QT_QPA_EGLFS_PHYSICAL_WIDTH="326"

pi@raspberry-pi:~$ export QT_QPA_EGLFS_PHYSICAL_HEIGHT="520"

pi@raspberry-pi:~$ export QML2_IMPORT_PATH="/usr/local/qt5pi/qml"

pi@raspberry-pi:~$ gdbserver --once --multi :2345
Listening on port 2345
Starting gdbserver on the Raspberry Pi
Pressing F5 will start the remote debugging session.
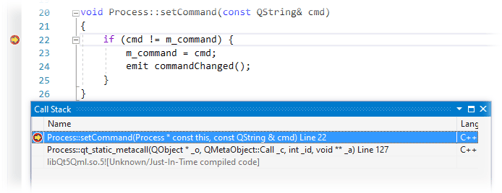
Stopped at breakpoint in C++ code during remote debugging
Remote QML debugging
It is also possible to debug QML code while running the application on the embedded device.
- Enable QML debugging in the Qt settings: Project Properties > Qt Project Settings

- Setup program arguments for starting a QML debug session
Project Properties > Debugging > Program Arguments
-qmljsdebugger=port:8989,host:192.168.1.98,block
Program arguments for starting a QML debug session
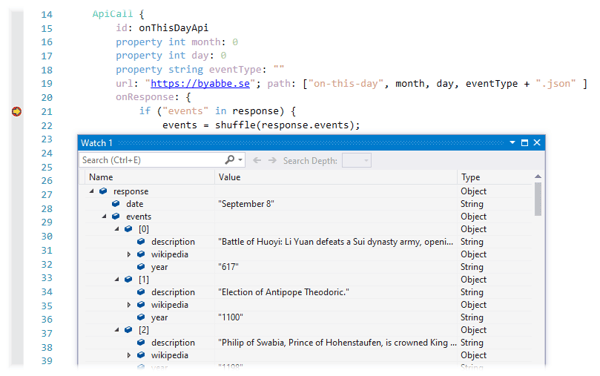
Stopped at breakpoint in QML code during remote debugging
Wrapping up
We've shown how to use the Qt VS Tools extension to create a multi-platform embedded application in Visual Studio with Qt Quick. This included:
- Creating a Qt Quick project from scratch
- Writing the application code in QML
- Cross-compiling the application
- Deploying and running on the embedded device
- Remote debugging of C++ and QML code in Visual Studio
The project, including all source code, is available at: https://github.com/micosta/quickmirror.
Our application running on the embedded device
Thank you for reading and for your interest in Qt and the VS Tools extension. If you have any questions or suggestions, please leave a comment below.