Annotations are a way to mark and comment on test results. Annotations expand on the feature set of comments in that they are much more visible: You can filter tests by annotations, they are tracked in the statistical view of the history, and they can override results. Annotations are versatile and customisable, so you have much freedom in how exactly you want to use them.
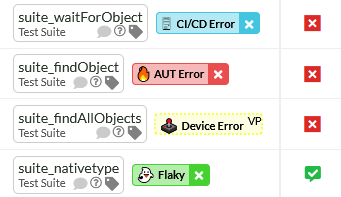
Annotations are a combination of labels and comments. This is how annotations are shown on the explore page.
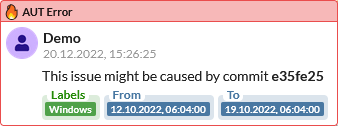
And this is how annotations are shown on the verification page.

Annotation Use Cases
There are no default annotation types added by us, you are completely free in how you want to use annotations. Here are some possible use cases, but you are not limited to these use cases and might have other ideas or processes that you can model using annotations.
Categorizing Error Types
When errors occur during your testing, you might want to keep track of the causes of these errors, so that you know which areas need the most improvements. Possible annotation types might be errors caused by the CI/CD system, issues with the test scripts, actual bugs in the application under test, issues with the device or browser you are testing on, and so on.
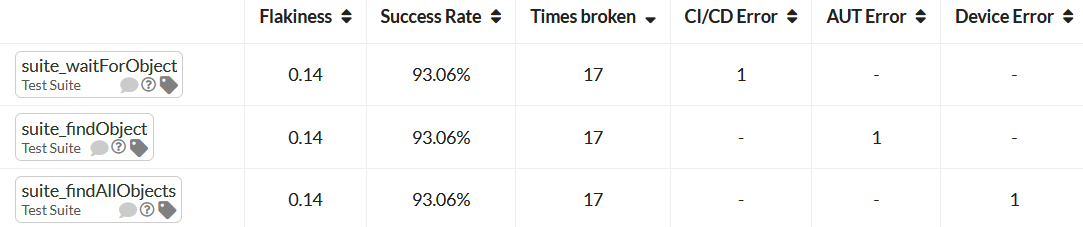
Each annotation used is also tracked in the statistics view on the history page, so you can determine the ratio of the number of times a test failed in total and the number of times the failure was caused by any of the causes you created annotations for.
Tracking Issue Severity
Next to the causes you might also want to keep track of the severity of encountered issues. In this case, you would create an annotation type for each severity level you have defined. You can also add multiple annotations to tests, test runs, and events, so you can also track both severity and error categories.
Assigning Responsibility
When tests fail, you might want to mark which team or person should investigate, and fix, specific failures. In this case, you would create an annotation type for each person or team involved.
Overriding Results
When you have a lot of tests, it is sometimes not an option to re-run the entire test suite when failures occur. In these cases, you might only want to re-run tests that failed. You might want to upload the tests that you ran again into the same batch as the initial test runs to get a complete picture and see all tests passed. In the past, this did not work because the initially failed tests were still counted as a failure and therefore the batch was still shown as a failure. Annotations can be configured to override results to solve this issue.
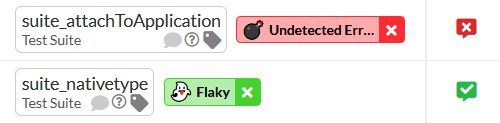
Another use case for result overrides is flaky tests. When you have many failures, it might be difficult to decide which tests to focus on first. If you have flaky tests, it might be best to focus on other test results first. With annotations, it is possible to override the results of flaky tests and temporarily ignore them.
We created new result icons to reflect any manual result adjustments, because it was important for us to make sure that you can still determine whether a passing or failing result state was achieved by manually adjusting the results via annotations.
Adding Annotations
Annotations can be added to tests, to test runs, and to events. That means annotations offer full flexibility and every individual result item can be annotated. You can use the tag icons next to the test names and results to open the annotation dialog.
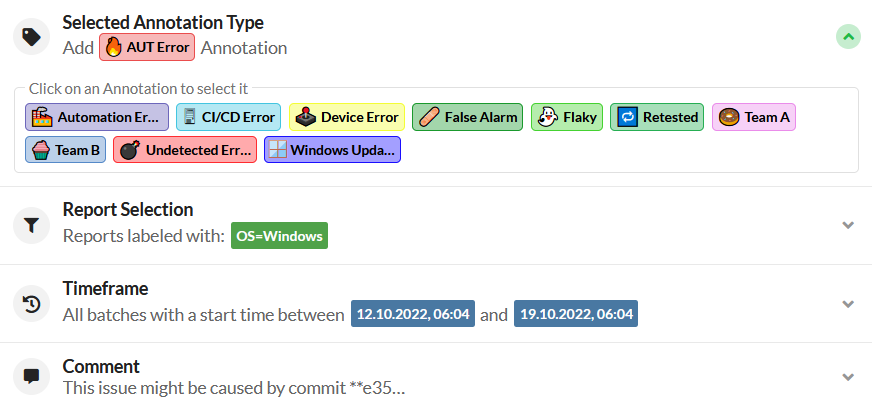
In the annotation dialog, the first thing you need to specify is the type of annotation you want to add.
Then you can decide whether the annotation should apply to all reports of a batch or whether it should only apply to specific reports and configurations. To limit the annotation to specific reports you can simply click on the report labels you want the annotation to be limited by.
By default, an annotation will apply only to the batch you are currently browsing. You can use the Timeframe setting to extend this to all batches without restriction, or you can set a timeframe which that will match all batches that have a start time that falls in that timeframe.

Optionally you can also add a comment to the annotation. This, helps others to understand why you chose to mark the test with a specific annotation. The annotation system is deeply linked with the comment system so these comments will be visible within the comments dialog of a test, and within the tooltip we provide for each annotation.
Defining Annotation Types
Annotation types can be defined within the Annotations tab inside the Global Settings.

Each annotation type has three properties that you need to define, and that will help you identify the annotations when they are used. The name, the icon, and the color.
Annotations are labeled with the Annotation Name. This name is also displayed within the annotation tooltip. It is best to pick a short name that accurately describes the purpose of the annotation. Please note that once an annotation type was used, and assigned to tests, you can no longer change its name, so it is important to pick a good name right from the get-go.
Besides the name you also need to define an icon. You can pick any ordinary character or a Unicode icon. Icons help to visually differentiate annotations, so we recommend picking an icon that describes the type of an annotation well.
Furthermore, there is the Override Result property. You can set it to define whether an annotation should influence the result of an annotated test result, or not. If you set it to Override Result As Passed, then all failures that occur either within the annotated test itself or within any of its children will be changed to a passing result. When you set it to Override Result As Failed, then the test will be rendered as failed, regardless of whether it failed or not (this can be useful for tests that fail to catch known issues).
Lastly, there is the Matching Rule setting, which can automatically annotate results during result import. This setting can be set to a regular expression. All imported events, whose message texts match the regular expression, will be annotated with the corresponding annotation. As an example, using ^.*\(Screenshot in ".*\.png"\).*$ as a matching rule would annotate all squish result events that contain a screenshot taken on encountered failures. Please note that this setting does not apply to any previously imported results.
Finals Words
These should be all information you need to start using annotations, but for more detailed information you can also check out our documentation.


