Sep 24, 2020
Cross-compilation of Qt projects is now supported in the Qt Visual Studio Tools. This is possible due to the integration of Qt/MSBuild and the Linux development VS workload. In this post we will show how to use this feature to create an embedded application with Qt Quick in Visual Studio.
We will be developing an application for public information display on mirrored screens. These are part of installations in lounge areas, restrooms, etc. The application will target devices running Embedded Linux. For this post we will be using a Raspberry Pi 3 Model B running Raspbian (Buster).
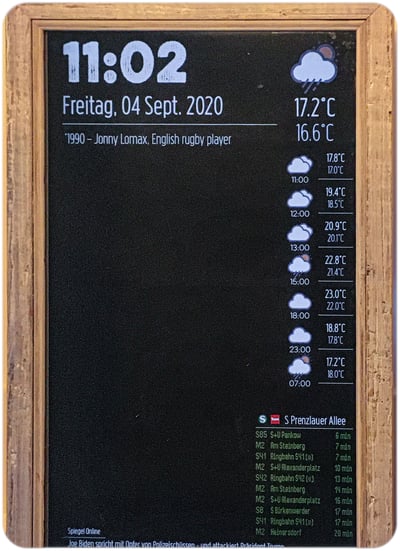
Our Qt Quick embedded application running on the target device
Preparing the development environment
The development host will be a Windows 10 machine. Visual Studio 2019 must be installed, including the Desktop development and Linux development workloads.

Required Visual Studio workloads
We will run the cross-compiler in an instance of the Windows Subsystem for Linux (WSL). The next step in setting up the development environment is to enable WSL and install a Linux distribution. It should then be possible to open a terminal window and run Linux commands.
WSL Command Shell
user@buildhost:~$ uname -srvo
Linux 4.4.0-18362-Microsoft #836-Microsoft Mon May 05 16:04:00 PST 2020 GNU/Linux
user@buildhost:~$
Command-line shell in WSL
To use the Qt Visual Studio Tools, at least one installation of Qt for Windows must be available. This will also allow running the application on the development machine, for testing purposes.
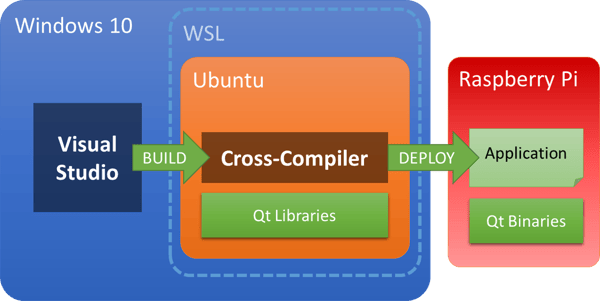
Overview of the development environment
Cross-compiling Qt
We can now proceed to setup the cross-compiler. We can either install a pre-built toolchain or compile our own. If all goes well, we should then be able to run a simple program on the device.
WSL Command Shell
user@buildhost:~$ echo "#include <iostream>" > main.cpp
user@buildhost:~$ echo "int main() {" >> main.cpp
user@buildhost:~$ echo "std::cout << \"Hello World from Raspberry Pi\\n\";" >> main.cpp
user@buildhost:~$ echo "return 0;" >> main.cpp
user@buildhost:~$ echo "}" >> main.cpp
user@buildhost:~$ /opt/cross-pi-gcc-8.3.0/bin/arm-linux-gnueabihf-g++ main.cpp
user@buildhost:~$ scp a.out pi@192.168.1.99:/home/pi
pi@192.168.1.99's password:
a.out    100% 12KB 218.1KB/s 00:00
user@buildhost:~$ ssh pi@192.168.1.99 ./a.out
pi@192.168.1.99's password:
Hello World from Raspberry Pi
user@buildhost:~$
Running "Hello World" on the Raspberry Pi
We are ready to build Qt for the Raspberry Pi. For that, we will follow the tutorial "RaspberryPi2EGLFS — A modern guide for cross-compiling Qt for HW accelerated OpenGL with eglfs on Raspbian and setting up Qt Creator". Once the build is complete, we should be able to run a sample Qt application on the Raspberry Pi.
WSL Command Shell
user@buildhost:~$ echo "#include <QDebug>" > main.cpp
user@buildhost:~$ echo "int main() {" >> main.cpp
user@buildhost:~$ echo "qInfo() << \"Hello World with Qt version\" << qVersion();" >> main.cpp
user@buildhost:~$ echo "return 0;" >> main.cpp
user@buildhost:~$ echo "}" >> main.cpp
user@buildhost:~$ echo "SOURCES += main.cpp" > hello.pro
user@buildhost:~$ raspi/qt5/bin/qmake
user@buildhost:~$ make -s
user@buildhost:~$ scp hello pi@192.168.1.99:/home/pi
pi@192.168.1.99's password:
hello    100%  12KB 359.6KB/s  00:00
user@buildhost:~$ ssh pi@192.168.1.99 ./hello
pi@192.168.1.99's password:
Hello World with Qt version 5.12.9
user@buildhost:~$
Running a Qt sample application on the Raspberry Pi
Setting up the Qt Visual Studio Tools
To install the Qt Visual Studio Tools from the IDE, open Extensions > Manage Extensions. Search for "qt": the results should show the "Qt Visual Studio Tools" extension; select it and press "Download". Close VS and follow the installation instructions. After re-opening VS, the Qt Visual Studio Tools should be available.
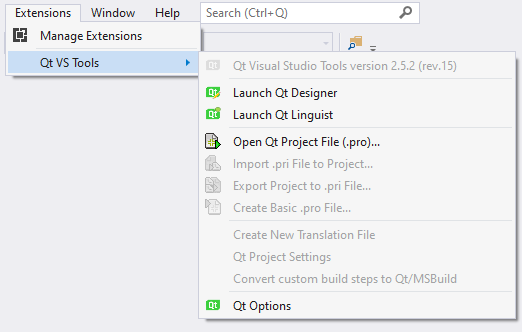
Qt Visual Studio Tools menu
To use the Qt Visual Studio Tools we must first register the versions of Qt that we will be using. We will start by registering Qt for Windows.
- Open "Qt VS Tools > Qt Options" and press "Add" on the "Qt Versions" tab.
- Provide a name and the path to the Qt installation.
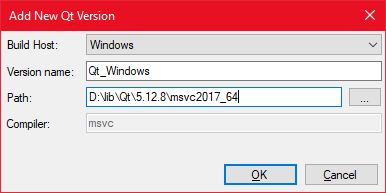
Registering Qt for Windows in the Qt VS Tools
We will now register the cross-compiled build of Qt residing in the WSL instance.
- Press "Add" again on the "Qt Versions" tab to open the "Add New Qt Version" dialog.
- Set the "Build Host" to "Linux WSL". (If we were using a physical build host instead of a virtual one through WSL, then we could instead select "Linux SSH".)
- Provide a name and path to the Qt installation, and also what compiler to use (defaults to g++). Here we will provide the path to the cross-compiler.
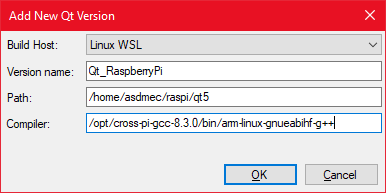
Registering Qt build for the Raspberry Pi
Creating a multi-platform Qt Quick project
After having registered the Qt versions that we will be using, we can now create a Qt project.
- Select File > New > Project to open the Visual Studio dialog for creating a new project
- Type "qt" in the project template search and choose "Qt Quick Application"
- Press "Next"; provide a name and location for the project, and then press "Create".
- The Qt Quick Application Wizard dialog will open; press "Next >" for configurations setup.
- Add project configurations for both the Windows and the Raspberry Pi versions of Qt.
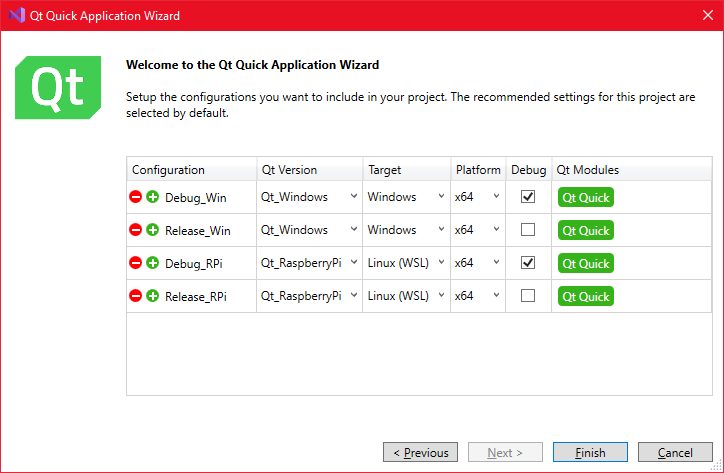
New project configurations
Press "Finish" to complete the project creation wizard. Visual Studio should now be showing the new multi-platform Qt Quick project. Select a Windows configuration and press F5 to build and run the application. An empty window with "Hello World" caption should then open.
Cross-compiling in Visual Studio with WSL
Using an instance of the WSL to run the cross-compiler is faster than using an SSH connection to a build host. When using SSH, MSBuild must first upload the source files to the remote host. On the other hand, WSL will mount local drives in /mnt, making file access instantaneous. In this case, MSBuild will map Windows paths into corresponding Linux paths rooted on /mnt, e.g.:
C:\include\foolibmaps to/mnt/c/include/foolib ✔️
MSBuild will assume that paths provided in property pages are local paths and will map them to /mnt. When using absolute Linux paths in property pages, this can lead to incorrect mappings, e.g.:
/home/user/raspimaps to/mnt/home/user/raspi❌
To avoid this issue, we will create symbolic links in /mnt to other top-level directories in the WSL instance file system.
WSL Command Shell
user@buildhost:/mnt$ sudo ln -s /home home
user@buildhost:/mnt$ ls -go
total 0
drwxrwxrwx 1 4096 Sep  1 15:29 c
drwxrwxrwx 1 4096 Sep  1 15:29 d
drwxrwxrwx 1 4096 Sep  1 15:29 e
lrwxrwxrwx 1    5 Sep  1 17:10 home -> /home
user@buildhost:/mnt$
Creating a symbolic link in /mnt
We are now ready to cross-compile the project. Select a Linux configuration and press F7 to start building.
Visual Studio Build Output
1>------ Rebuild All started: Project: QuickMirror, Configuration: Release_RPi x64 ------
1>Invoking 'mkdir -p $(dirname /mnt/c/Users/user/Source/Repos/QuickMirror/obj/x64/Release_RPi/qmake/temp/props.txt); mkdir -p /mnt/c/Users/user/Source/Repos/QuickMirror/obj/x64/Release_RPi/qmake/temp; cd /mnt/c/Users/user/Source/Repos/QuickMirror/obj/x64/Release_RPi/qmake/temp; ("/home/user/raspi/qt5/bin/qmake" -query) 1> props.txt', working directory: '/mnt/c/Users/user/Source/Repos/QuickMirror'
1>Reading Qt configuration (/home/user/raspi/qt5/bin/qmake)
1>Invoking 'mkdir -p $(dirname /mnt/c/Users/user/Source/Repos/QuickMirror/obj/x64/Release_RPi/qmake/temp/qtvars.pro); mkdir -p $(dirname /mnt/c/Users/user/Source/Repos/QuickMirror/obj/x64/Release_RPi/qmake/temp/Makefile); mkdir -p $(dirname /mnt/c/Users/user/Source/Repos/QuickMirror/obj/x64/Release_RPi/qmake/temp/qtvars.log); mkdir -p /mnt/c/Users/user/Source/Repos/QuickMirror/obj/x64/Release_RPi/qmake/temp; cd /mnt/c/Users/user/Source/Repos/QuickMirror/obj/x64/Release_RPi/qmake/temp; ("/home/user/raspi/qt5/bin/qmake" "CONFIG -= debug release debug_and_release" "CONFIG += release" qtvars.pro) 1> qtvars.log 2>&1', working directory: '/mnt/c/Users/user/Source/Repos/QuickMirror'
1>rcc qml.qrc
1>Invoking 'mkdir -p $(dirname qml.qrc); mkdir -p $(dirname /mnt/c/Users/user/Source/Repos/QuickMirror/main.qml); mkdir -p $(dirname /mnt/c/Users/user/Source/Repos/QuickMirror/obj/x64/Release_RPi/rcc/qrc_qml.cpp); (/home/user/raspi/qt5/bin/rcc /mnt/c/Users/user/Source/Repos/QuickMirror/qml.qrc --name qml -o /mnt/c/Users/user/Source/Repos/QuickMirror/obj/x64/Release_RPi/rcc/qrc_qml.cpp)', working directory: '/mnt/c/Users/user/Source/Repos/QuickMirror'
1>Starting remote build
1>Compiling sources:
1>main.cpp
1>qrc_qml.cpp
1>Linking objects
1>QuickMirror.vcxproj -> C:\Users\user\Source\Repos\QuickMirror\bin\x64\Release_RPi\QuickMirror.out
1>Done building project "QuickMirror.vcxproj".
========== Rebuild All: 1 succeeded, 0 failed, 0 skipped ==========
Cross-compiling Qt project in VS
Coming up
To summarize, we have created a multi-platform Qt Quick project in Visual Studio and used a cross-compiler to build it for the Raspberry Pi. In part 2 of this post we will look at:
- Deploying and running the application
- Application code in QML
- Debugging in the target device


