Oct 7, 2022
The Qt Safe Renderer (QSR) is our solution for creating user interfaces (UI) for safety-critical systems. Since 2017 the Qt Safe Renderer has been used by multiple customers and certified for different functional safety standards. With the upcoming version 2.0, we are introducing a new approach for validating the correct rendering of safety-critical information – the Monitor.
Functional safety applies to many industries, such as automation, medical, railway, and automotive. Safety-critical information in the digital displays must be correct, even if some malfunction prevents rendering the other parts of the user interface. Qt Safe Renderer provides a solution for rendering the safety-critical information to achieve functional safety. It can be used with Qt or other user interface technologies – or even for creating the whole user interface in some cases.
The upcoming Qt Safe Renderer 2.0 release contains many new groundbreaking features. This blog post illustrates the debugging of the safety application with the monitoring feature.
Test environment implementation
The step by step guides in this blog post are valid for the Windows environment. If you want to do the same in Linux or macOS, please adapt the commands accordingly.
The monitor example is suitable for the Linux operating system as such. It provides a good base for adapting it to Windows operating system (OS) in the developer’s computer. The TCP/IP (Transmission Control Protocol/Internet Protocol) implementation uses the POSIX API (The Portable Operating System Interface, Application Programming Interface). Most of the operating system provides the POSIX but in Windows, you must use for example Cygwin or Windows Subsystem for Linux (WSL).
But there are few alternatives for running the Linux applications in the Windows without adapting the source code. “Windows Subsystem for Linux (WSL) lets developers run a GNU/Linux environment -- including most command-line tools, utilities, and applications -- directly on Windows, unmodified, without the overhead of a traditional virtual machine or dual-boot setup.”
After installing the WSL, you can install the needed tools for building the QSR monitor example.
Install the tools with the following commands in the WSL:
sudo apt update
// You may also consider: sudo apt upgrade
sudo apt install build-essential
Then build the monitor example with following command in the WSL:
make -f Makefile_gcc qsrMonitor-indicators
To create some unexpected error case, you can use the QSR Test Harness to send various events to the safety application, the QSR indicators example in this case. The QSR Test Harness is located in the following installation directory:
<QSR install dir>\Src\QtSafeRenderer-2.0.0\tests\manual\testharness
The QSR Test Harness needs Qt for Python and it can be easily installed after installing the Python first.
You need to install Qt for Python in normal command prompt with the following command (no need to use the WSL for this) :
pip install PySide6
Enabling monitoring and debugging for the indicators example
Before you can use Monitor, you need to enable the output verification functionality in the Indicators example. Add the following definition to the indicator example’s project file (Indicators.pro) file:
DEFINES += USE_OUTPUTVERIFIER
Then you need to enable the debugging by adding the following line the Indicators.pro file:
SAFE_LAYOUT_EXTRA_PARAMS = -d
Then build the indicators example in the Qt Creator and run it before starting the QSR monitor.
The indicators example contains a control UI for interacting with it. These are predefined state changes with animations. So the indicator example is reflecting the controls and the monitor is aware of the selected state for each safe QML object.
Tracking the safe QML object names and CRC codes from design to the actual executable
The following QML file contains safe QML objects we want to track in this blog post:
<QSR install dir>\Examples\QtSafeRenderer-2.0.0\saferenderer\indicators\LeftIndicators.qml
The file has following content. And for example, let's check the first SafePicture iconBattery :
   SafePicture {
       id: iconBattery
       objectName: "iconBattery"
       width: 30
       height: 30
       color: "#e41e25"
       fillColor: "black"
       source: "iso-icons/iso_grs_7000_4_0247.dat"
       states: [
           State {
               name: "ON"
               PropertyChanges {
                   target: iconBattery
                   visible: true
               }
           },
           State {
               name: "OFF"
               PropertyChanges {
                   target: iconBattery
                   visible: false
               }
           }
       ]
   }
When building the indicators example, please check the compile output from the Qt Creator. You can spot the iconBattery and related unique hash code for it:
warning: Debugging mode (-d) is now enabled.
debug: Item: "iconBattery" Value: 139780313
debug: Item: "iconFuel" Value: 174249564
debug: Item: "iconParkingBrake" Value: 41111189
debug: Item: "iconLowbeam" Value: 62048029
debug: Item: "iconTyre" Value: 174312805
debug: Item: "iconLamp" Value: 174271904
debug: Item: "iconSeatbelt" Value: 108941076
debug: Item: "safeText" Value: 130720724
debug: Item: "park" Value: 485515
debug: Item: "neutral" Value: 80525468
debug: Item: "reverse" Value: 147638645
debug: Item: "drive" Value: 7049413
You can find those hash values from the automatically generated monitor configuration data XML (Extensible Markup Language) file. It is located in the following folder:
<QSR install dir>\Examples\QtSafeRenderer-2.0.0\saferenderer\monitor\data\monitorconfigdata.xml
For example, the iconBattery with the hash value 139780313 is described in the file.
The information elements contain the hash values for the id, states (note the implicit default state 0). You can find the CRC (Cyclic Redundancy Check) value for the given safe QML object in the given state:
<item>
   <id>139780313</id>
   <state>
   <id>0</id>
   <variant>MainForm</variant>
   <assetid>238523426</assetid>
   <visible>true</visible>
   </state>
   <state>
   <id>1342</id>
   <variant>MainForm</variant>
   <assetid>238523426</assetid>
   <visible>true</visible>
   </state>
   <state>
   <id>21414</id>
   <variant>MainForm</variant>
   <assetid>238523426</assetid>
   <visible>false</visible>
   </state>
</item>
So now we know how to check what are the CRC values associated to each safe QML object in each state. And the QSR monitor is using those CRC values.
Running the QSR monitor
The QSR monitor can be started in the WSL with the following command:
cd <QSR install dir>/Examples/QtSafeRenderer-2.0.0/saferenderer/monitor
./qsrMonitor-indicators -i 127.0.0.1 -p 32112
And the QSR test harness can be started in a normal command prompt with the following command:
cd <QSR install dir>\Src\QtSafeRenderer-2.0.0\tests\manual\testharness>
python testharness.py
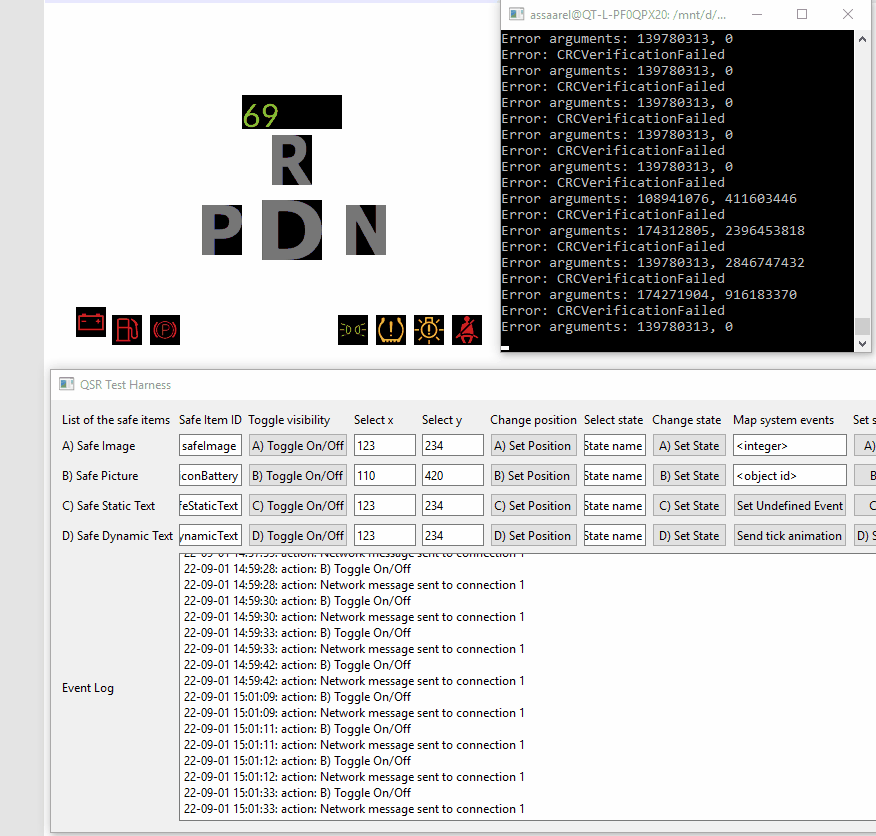
The screen should have now the QSR indicators example running (top left view), the QSR monitor running (top right view) and the QSR Test harness running (bottom view). The states in the the indicators example are changed automatically by the control UI (not visible in the screencapture for the sake of the simplicity).
The QSR Test Harness is used to toggle on/off the SafePicture iconBattery and its position is set to overlap with another SafePicture. The QSR monitor is showing the CRC verification values for the safe QML items. The iconBattery has hash value 139780313. And when the CRC for it does not match, the error is shown with the actual CRC values. In case of error the actual CRC value for the toggled off iconBattery is 0 due to black fill color. And in case of overlapping items the actual CRC for the iconBattery is shown. Also the the iconFuel's hash code is listed in the errors during the overlapping.
With the steps described above, it is easy to interpret possible faults in the system that are detected with the QSR monitor. The described approach can be used in both host system testing and with the actual target device. The QSR monitor can be run in the host computer or in the target device.
QSR 2.0 is expected to be available soon. The pre-release version is already available via the Qt installer. The QSR is part of the Qt for Device Creation Enterprise version. So, you get it as part of the bundle without needing a dedicated QSR license. Shall you have any questions, please don't hesitate to contact us.