We invoke the squishrunner command to execute tests and generate JUnit and web reports.
Additionally, squishrunner is called with a --exitCodeOnFail switch so it returns a custom exit
code (nonzero) if any of the test cases have failed, and zero otherwise. Therefore, CircleCI can
set the job status accordingly.
What is CircleCI?
CircleCI is a platform that offers CI/CD services on the cloud or on private infrastructure. Inthis example, we will use an agent that is running on the local machine
Local agent configuration
To set up our configuration we should have a repository with our sources in GitHub or BitBucket. Next, we need to add this repository to CircleCI as a source for our project.
After that, we need to have a local agent set up. To do this we go to “Self-Hoster Runners” and select “Create Resource Class”. Following the instructions on that page will get us to have the following folder with our local agent:
- Workdir/
- circleci-launch-agent.exe
- circleci-runner.log
- launch-agent-config.yaml
The next step is setting up the local agent configuration file “launch-agent-config.yaml”. Here we
need to change:
- “auth-token” to the token we obtained while setting up a self-hosted runner.
- “name”: name of our runner.
- “working-directory”: path to the folder with the runner
- “mode”: we might want to change this property from “single-task” to “continuous”, so runner process will not end after the execution of 1 build.
At the end configuration file should look like this:
api:
  auth_token: "02ff98778548cd252o1ythfpsl570we153d776599d0d0510c1596b346e34c761e9f3d135669839" # FIXME: Specify your runner token
  # On server, set url to the hostname of your server installation. For example,
  # url: https://circleci.example.com
runner:
  name: "WindowsLaptop" # FIXME: Specify the name of this runner instance
  mode: continuous
  working_directory: D:\CircleCI\Workdir
  cleanup_working_directory: false
logging:
  file: D:\CircleCI\circleci-runner.log
The last step of configuring a self-hosted runner is creating a global environment variable, that
will define the location of our squishrunner. One way of doing this is by creating a simple batch
script with the following content:
set SQUISHRUNNER_PATH=D:\Squish/7.1/Squish_for_Qt_7.1.0/bin/squishrunner.execall circleci-launch-agent.exe
Executing this script will start our self-hosted agent.
Project configuration
In order to setup or workflow on CircleCi, we should edit the project configuration file
version: 2.1jobs:run-tests:machine: trueresource_class: eduardkaverinskyi/localsteps:- checkout- run:name: "Run Squish tests"command: ${SQUISHRUNNER_PATH} --testsuite ${TESTSUITE_PATH} --local --exitCodeOnFail 13 --reportgen junit,C:/CircleCI/Workdir/reports/xml/junit_report.xml --reportgen html,reports/web_reportenvironment:TESTSUITE_PATH: ./repository_testsuite_js- run:name: "Run FAILING Squish tests (expected failure)"command: ${SQUISHRUNNER_PATH} --testsuite ${TESTSUITE_PATH} --local --exitCodeOnFail 13 --reportgen junit,C:/CircleCI/Workdir/reports/xml/junit_report_failing.xml --reportgen html,reports/web_reportenvironment:TESTSUITE_PATH: repository_testsuite_failing_rb- store_artifacts:path: reports- store_test_results:path: C:/CircleCI/Workdir/reports/xmlworkflows:run-tests-workflow:jobs:- run-tests
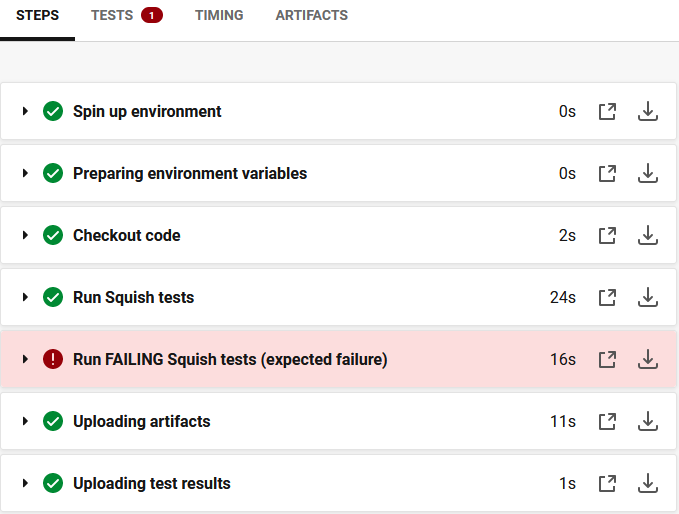
This job performs the following actions:
- Sets execution of this job to our self-hosted runner.
- Performs checkout of source code.
- Runs Squish tests (both failing and successful) and generates a JUnit report and HTML report and sets --exitCodeOnFail 13 setting.
- Stores artifacts (files produced by report generation).
- Stores test results (JUnit reports)
Job Execution
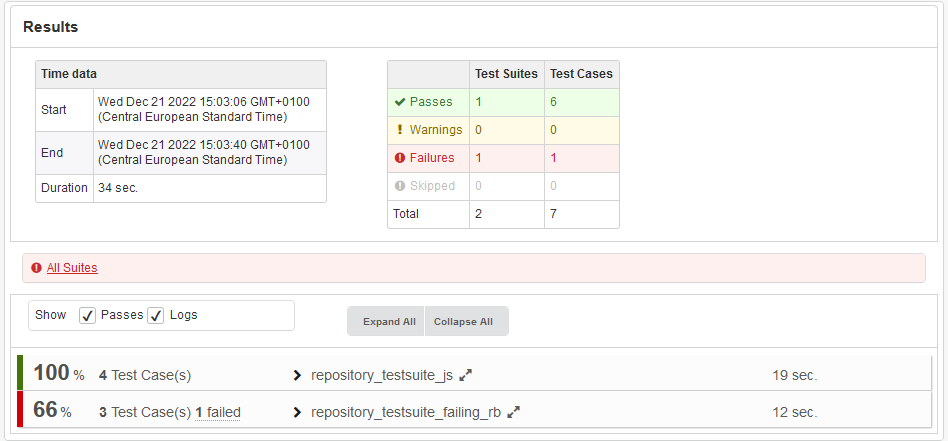
Executing job with Squish tests looks like this:
JUnit report for failed test:
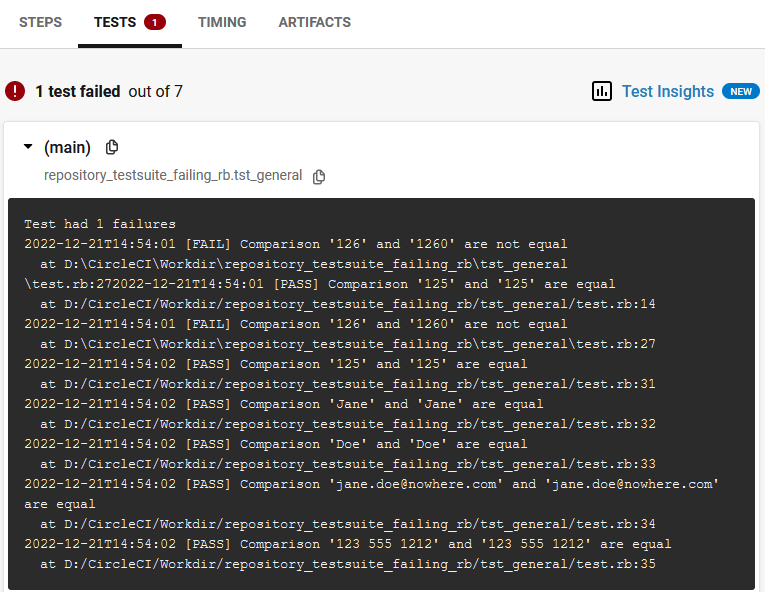
After test execution, artifacts, including the HTML report, are uploaded. To analyze detailed
results in the HTML report, you need to select Artifacts view and open web_report/index.html
in a web browser.