Software testing projects benefit greatly from well-defined test environments which yield reproducible results. Automated GUI testing using Squish is no exception to this. Docker containers are a great way to define such environments, but there's more: by implementing a GUI test automation setup on top of Docker, it also becomes easy to parallelize test execution and to distribute test execution over multiple computers using Docker Swarm or Kubernetes. There are so many articles on using Docker for this and Docker for that, it might make you wonder: is it all just hype or are there real tangible benefits?
What's In It For Me?
There's a lot of talk about how Docker has influenced the way we think about distributing and running software, but it's not just hot air. In particular, Docker containers feature two properties which are highly relevant to GUI test automation:
- Docker containers are isolated from the rest of the system. Unlike traditional virtual machines though, they can be started and stopped in the blink of an eye. This makes it viable to start every test in a clean, well-defined environment.
- Docker containers can be completely self-contained. Docker images (the templates from which containers are launched) can be transported easily to different computers. This makes it very straightforward to shorten test cycle times by distributing the test execution over multiple hosts.
Let's walk through a basic example of how to get up and running with Squish GUI tests in Docker containers. To get the most of this, a basic (but by no means extensive) understanding of Docker is highly beneficial. If in doubt, head over to the official Docker web page and have a look at the Docker overview.
What Goes Into a Testing Container?
Docker containers are instances of Docker images. Thus, to get a container which can execute tests, the first step is to devise a suitable Docker image.
For the sake of demonstration, we will assume that
- You want to test an application which runs on Linux.
- You already have a Linux-based Docker image containing your application (and all its dependencies).
In many cases, complex applications can be built by combining multiple Docker containers, each running a single application. For example, you might have one container for a web server and a separate container for the database. Communication between the containers then happens via network connections.
However, Squish integrates very tightly with the application under test (AUT); instead of operating on pixel coordinates, Squish has a deep understanding of the object hierarchy in an application as well as the available properties to use for verifications and object identification. It's this tight system integration which requires that Squish is running in the same container as the AUT.
Thus, instead of running your AUT in one container and Squish in another, we have to produce a single Docker image containing your application as well as all components required for executing GUI tests. This image will be based on your existing Docker image containing your AUT and extend it.
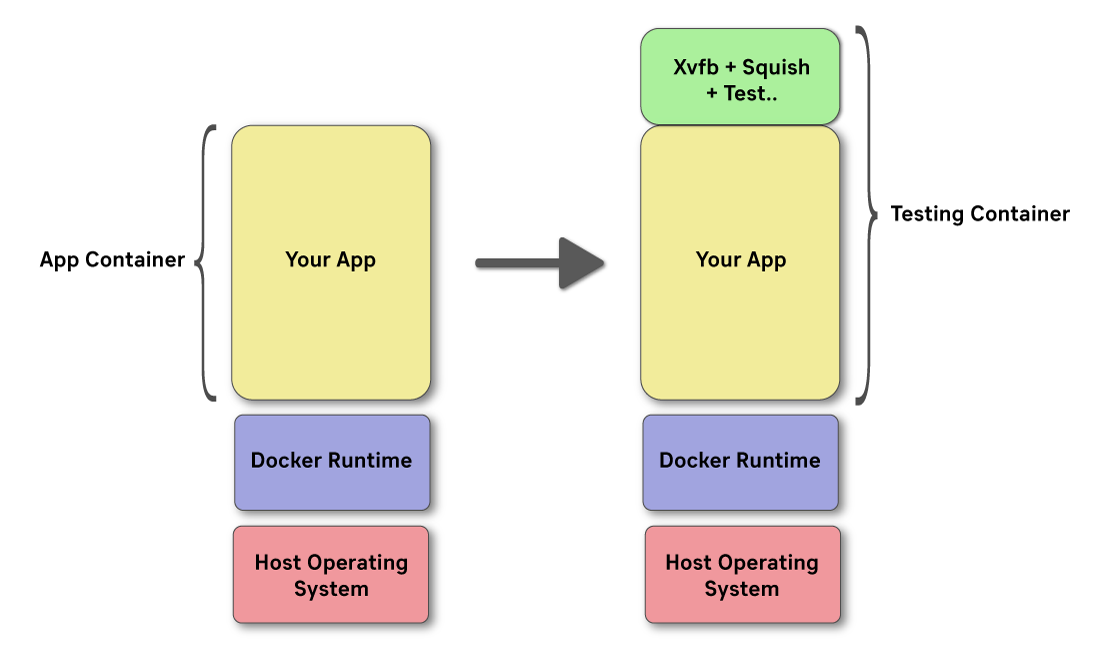
In particular, the testing image needs to contain:
- A program to emulate a graphical display for the application to show a user interface: Xvfb
- A Squish installation (including a license key).
- The test scripts to execute for exercising the AUT build.
Technically, the test scripts don't need to be part of the Docker image. It would also be possible to load them into the container at runtime by mapping a file system path into the container. Indeed, this might be a viable approach in case the test script corpus is rather large (e.g. due to many screenshots). However, packaging the test scripts into the Docker image has two important benefits:
- The image becomes self-contained: any computer which runs the Docker runtime can be used to execute the Squish tests.
- The test scripts matching the application builds are always available: different AUT builds (e.g. different versions of the application) may expose different functionality and thus may require different, potentially more extensive, test suites.
Of course, since we are about automation, all this should happen without any human intervention! The entire process should happen automatically - typically as part of your Continuous Integration pipeline.
Building The Docker Image
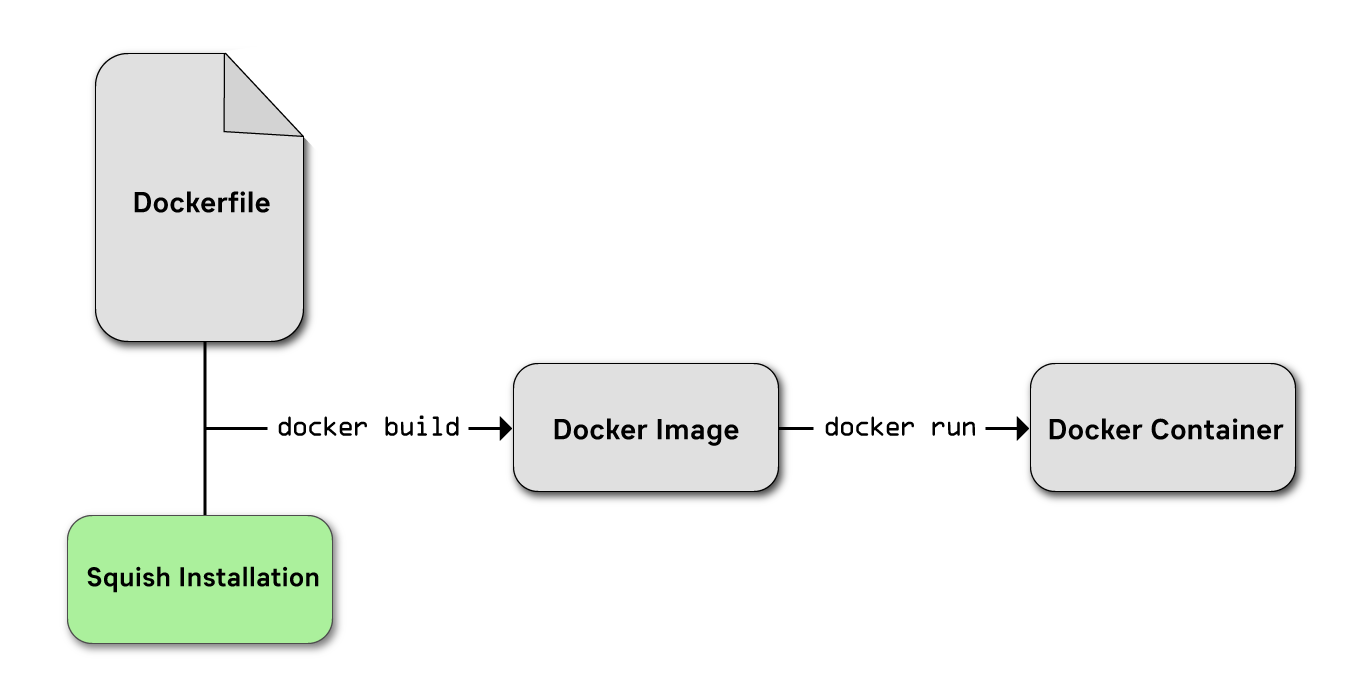
Building a Docker image means taking three steps:
- Collecting all files which should go into the image into a single working directory, the contents of which forming what's called the 'Docker context'.
- Creating a file called Dockerfile which defines where to put those files and how to configure the image (e.g. what additional software packages to install, what environment variables to set etc.).
- Running the docker build command.
Collecting Required Files
We will need at least a Squish installation to use for running the tests as well as the test suite(s) to execute. Thus, let's start out by creating a working directory to hold the context:
$ mkdir /tmp/workdir
Next, we will install Squish into that working directory -- since we want to test a Qt 5.15 package, the squish-6.6.2-qt515x-linux64.run package is installed. To ensure that this happens without us having to click through the installation program, we will perform an unattended installation. Also, the SQUISH_LICENSEKEY_DIR environment variable is overwritten such that the installation program stores the license key in our work directory:
$ export SQUISH_LICENSEKEY_DIR=/tmp/workdir

$ ~/Downloads/squish-6.6.2-qt515x-linux64.run unattended=1 targetdir=/tmp/workdir/squish licensekey=111-22222-33333-444 ide=0 testcenter=0 menushortcut=0 desktopshortcut=0
Of course, instead of 111-22222-33333-444 you should specify your real license key.
Last, but not least, we would like to include a single test suite in our testing image. So we copy that into our work directory:
$ cp -r ~/suite_sample /tmp/workdir
So far, so good! Next, we need to define a Dockerfile which expresses that our testing image is based on the existing Docker image containing the AUT as well as how to configure the testing image.
Writing A Dockerfile
With our working directory populated, we need to define where those files should go as well as what extra configuration to apply to the Docker image.
Assuming that the Docker image containing our application is called addressbook:1.0.1 and the application to test is at /home/addressbook/addressbook . There are a lot of useful things which can be done when creating a Dockerfile , but we'll leave explaining those to official Dockerfile docs and go straight ahead to creating a file called /tmp/workdir/Dockerfile with this content:
dockerfile

# Base our testing image on the standard application image (here: addressbook:1.0.1)

FROM addressbook:1.0.1
# Install some extra dependencies required for Xvfb and Squish
RUN apt-get update && apt-get install -y --no-install-recommends \\
libxtst6 \\
libgssapi-krb5-2 \\
xvfb \\
&& rm -rf /var/lib/apt/lists/*

# Configure important environment variables required for the application under test
# to access the virtual display created by Xvfb.
ENV DISPLAY=:0
ENV LD_LIBRARY_PATH=/home/addressbook

# Copy a Squish installation, a license file and a sample test suite into the image.
COPY squish /root/squish
COPY .squish-3-license /root/.squish-3-license
COPY suite_sample /tmp/suite_sample

# Register the application under test with squishserver
RUN /root/squish/bin/squishserver --config addAUT addressbook /home/addressbook

# Launch the virtual display server Xvfb when starting the container.
CMD ["Xvfb", ":0", "-screen", "0", "1920x1080x24+32"]
What this does is tell Docker that our image should be derived from addressbook:1.0.1 (i.e. the existing image which contains the AUT build), a couple of additional Linux packages should be installed (in particular: Xvfb) and which environment variables should be active. Finally, the file defines that the Squish installation goes into /root/squish and squishserver is configured such that it knows where the executable of our applicaiton under test is: in /home/addressbook/addressbook .
Finally, the last line configures the image such that when a container is started, it automatically launches Xvfb, i.e. a virtual display, with an HD resolution.
Energize!
At this point, all that's left to do is to trigger the image build. Simply change into the working directory and then execute docker build :
$ cd /tmp/workdir

$ docker build -t addressbook-with-squish:1.0.1 .
The -t argument is used to define the name of the resulting Docker image. It's a good idea to use a variation of the name of the AUT image. Since our AUT image is called addressbook:1.0.1, we went for addressbook-with-squish:1.0.1 but your mileage may vary.
Running A Containerized Test
To see that everything works all right, let's create a container based on our image and launch it:
$ docker run -d addressbook-with-squish:1.0.1

71f150d5c9ccb7e4219ce0f412400839a925f1cf7ea0d15d66ffacd1ab80ca4e
This will launch a container in detached mode; the command should return straight away, printing an ID string which uniquely identifies our newly started container. We will make use of that in subsequent commands.
What has happened is that a new isolated environment started running on your machine. In this environment, a virtual display is running -- but other than that, it's idle. So let's try running a test!
$ docker exec 71f /root/squish/bin/squishrunner --testsuite /tmp/suite_sample --local --reportgen testcenter,http://testcenter/project/addressbook?token=ABCDEF --reportgen junit,/tmp/report.xml
The command is split over multiple lines for readability. What this does is to run the squishrunner command inside the running container which has an ID starting with 71f . Note how we didn't have to specify the entire ID -- just the first couple of characters are sufficient. Four arguments are passed to squishrunner :
- --local to start a squishserver instance
- --testsuite to execute the test suite /tmp/suite_sample stored inside the container
- --reportgen testcenter,... to send all test reports directly to a Test Center instance.
- --reportgen junit,... to also store any test reports in JUnit format (for processing by a continuous integration system, for instance)
You won't actually see much happening though. In particular, you cannot see the application doing its thing. This is because of our virtual display -- all graphical interactions are happening in a headless mode. The most visible indication of progress is the output generated by the squishrunner command.
Getting The Test Report
When using Test Center, nothing needs to be done: all test results are immediately uploaded to the Test Center instance, so you can use the convenient web interface to analyze the reports. However, we also instructed squishrunner to store an additional copy of the test results in JUnit format in the file /tmp/report.xml . This file exists only within the container. In order to process it, e.g. by feeding it to our continuous integration system, we need to get it out of the container.
There are multiple approaches to this, each with their own advantages and disadvantages. In our case, a simple docker cp command is the easiest:
$ docker cp 71f:/tmp/report.xml /home/frerich/report.xml
This will copy the file /tmp/report.xml out of the container with the ID starting like 71f onto the host system, storing the file in /home/frerich/report.xml . This file can now be fed to your continuous integration system (e.g. Jenkins) for further processing.
Where To Go From Here
We just executed our first GUI test using Squish in a fully isolated, self-contained environment! However, we just barely touched the surface. There is so much more to consider and do. Here are some topics to consider when thinking about where to go with this:
- The testing image maybe should be made available to other computers! An easy approach consists of calling docker save and docker import but a more manageable solution would be to host your own private Docker registry which acts as a repository for Docker images to share among multiple computers.
- Copying test reports out of the container via docker cp works for small examples. However, for larger test reports which also include screenshots and other artifacts, it can be rather slow. A better approach might be to use Docker volumes which allow mapping a host directory into the container. That way, writing to a specific location inside the container will make the files automatically show up on the host - all data is shared, no copying needed.
- The testing image is larger than it needs to be. This is because we made no effort to trim the Squish installation. Things like the examples, the documentation or most of the provided script interpreters are not needed for just executing test suites. Thus, it might be useful to introduce an additional 'pruning' step when building the test image which removes unneeded files from a Squish installation.
- It would be useful to spread the testing over multiple nodes and use load balancing to make sure that the load is balanced evenly. Docker swarm is a great way to have multiple computers act as a cluster. A central manager node will make sure that containers for test runs are always dispatched to the computer which is free to do work!
Do you have favorite tricks with Docker or are there things you'd like to learn about in particular? Let us know in the comments!