.webp)
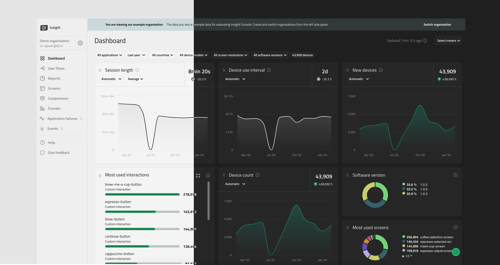
So far, we have explained how to check data with Qt Insight and how to use it for practical user behavior analysis. Finally, this article will show you how to add the Qt Insight Tracker API to your Qt application, send data to the cloud, and view the data sent through the Qt Insight Web Console.
Contents
- Installing Qt
- Opening a Project in Qt Creator
- Qt Insight Sample Project
- CMakeLists.txt
- qtinsight.conf
- Using the Tracker API in a QML file
- Sending User Operation Events
- Using the Application
- Using Qt Insight with Offline Devices
- Automotive HVAC Demo with Qt Insight
- Summary
Installing Qt
The Qt Insight Tracker assumes that your application is implemented in the Qt framework. Therefore, you must first install Qt.
Search for "Qt installation" in a search engine and go to the Qt download page.
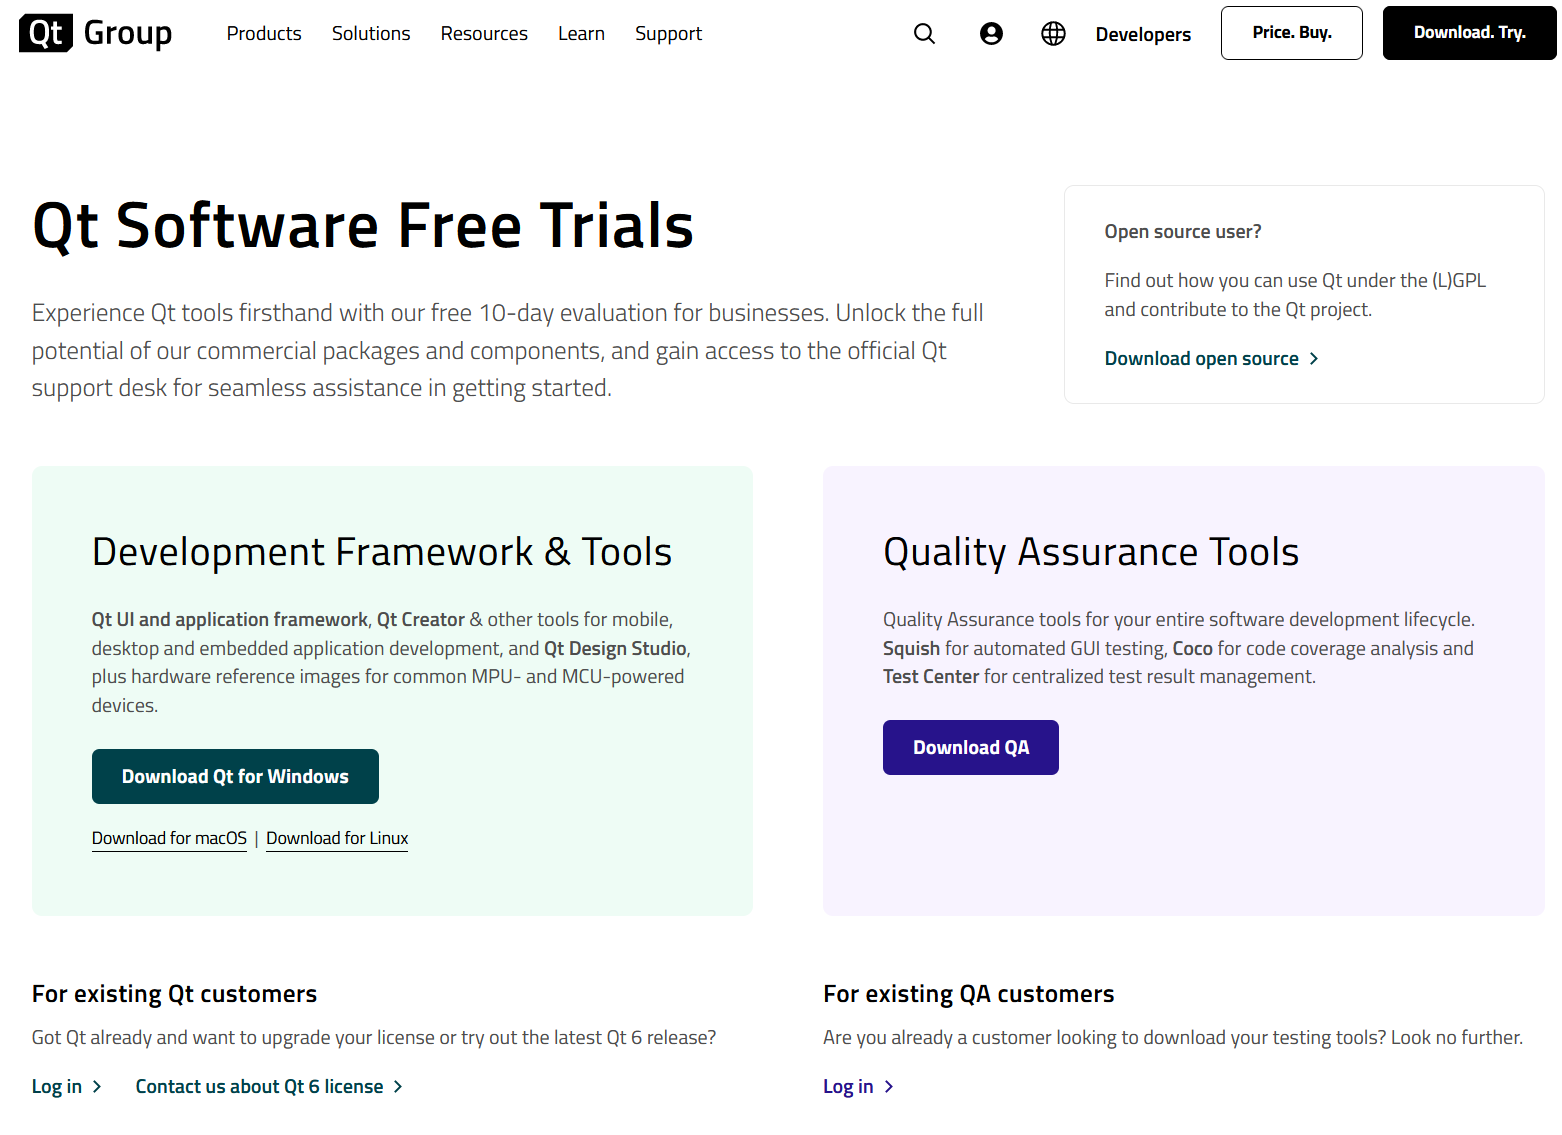
You will see that this page has two options - a free evaluation version of commercial Qt and the open source download. Qt Insight is available for both commercial licenses and open-source versions, so please read the descriptions of each before selecting the one that best fits your needs and proceed accordingly.
If you choose to request a free evaluation license
If you choose "Request a Free Evaluation License," the following screen will be displayed.
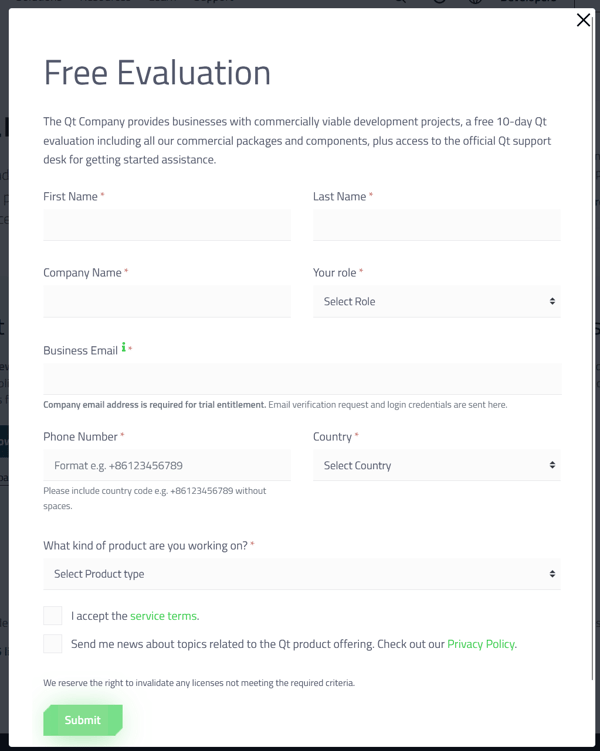
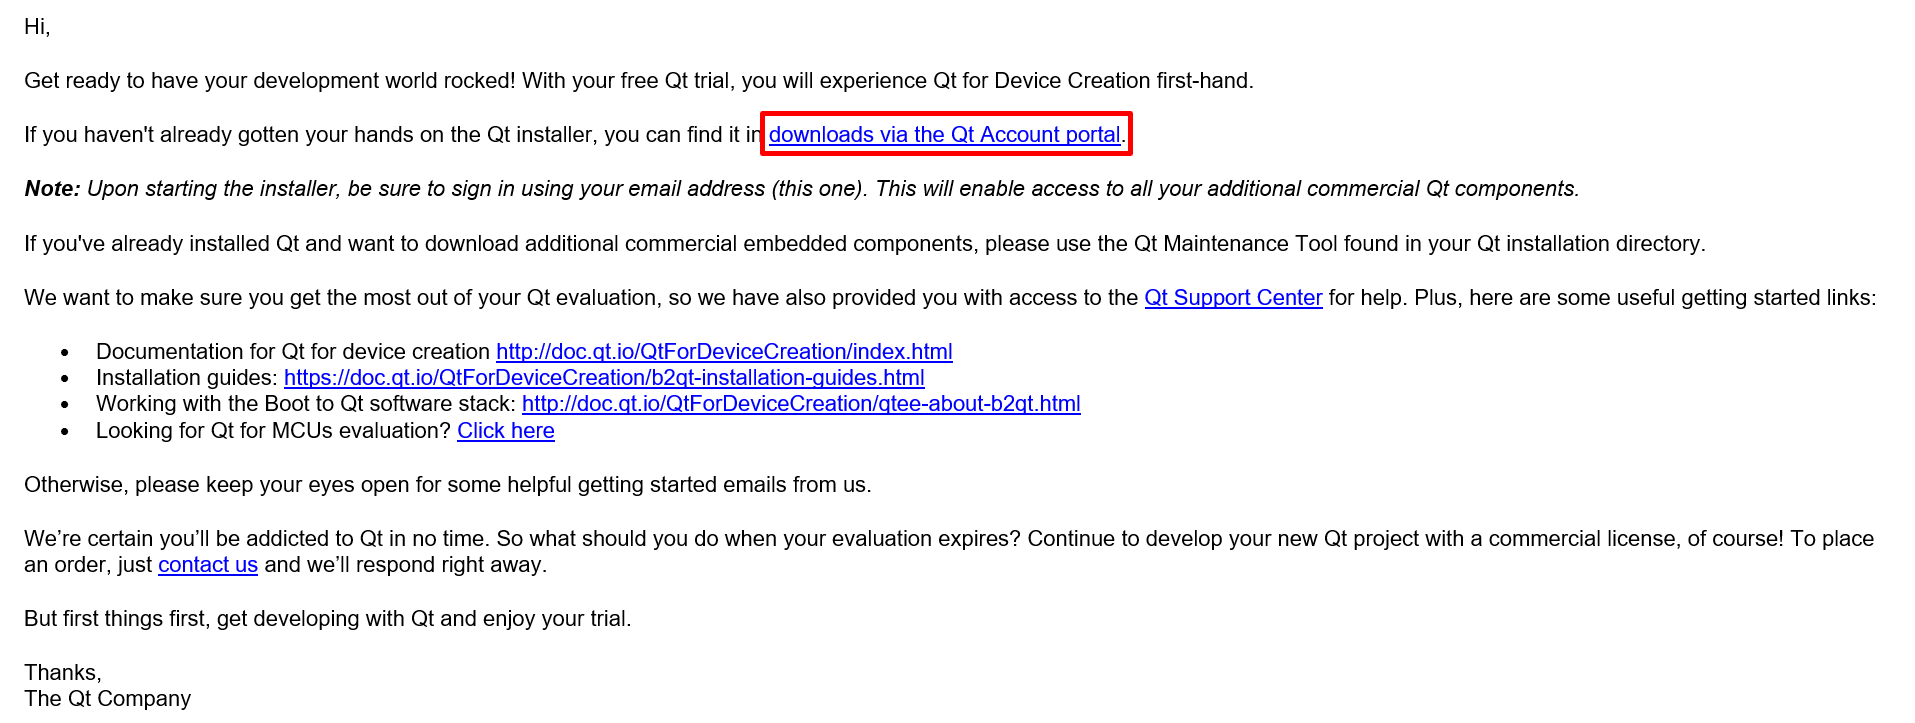
Input your information here and you will receive an email from qtaccount@qt.io like the one below. Click on "downloads via the Qt Account portal" highlighted in red below.
Upon selecting "Downloads" from the left menu on the Qt Customer Portal, you will see the "Online Installer" screen in the center. From the three "Unified Qt Installer" options in the center, download the installer that corresponds to your PC's OS. As I am using Windows, I will download the "Unified Qt Installer 4.6.1. for Windows" located on the far right.

If you choose to download the open-source version
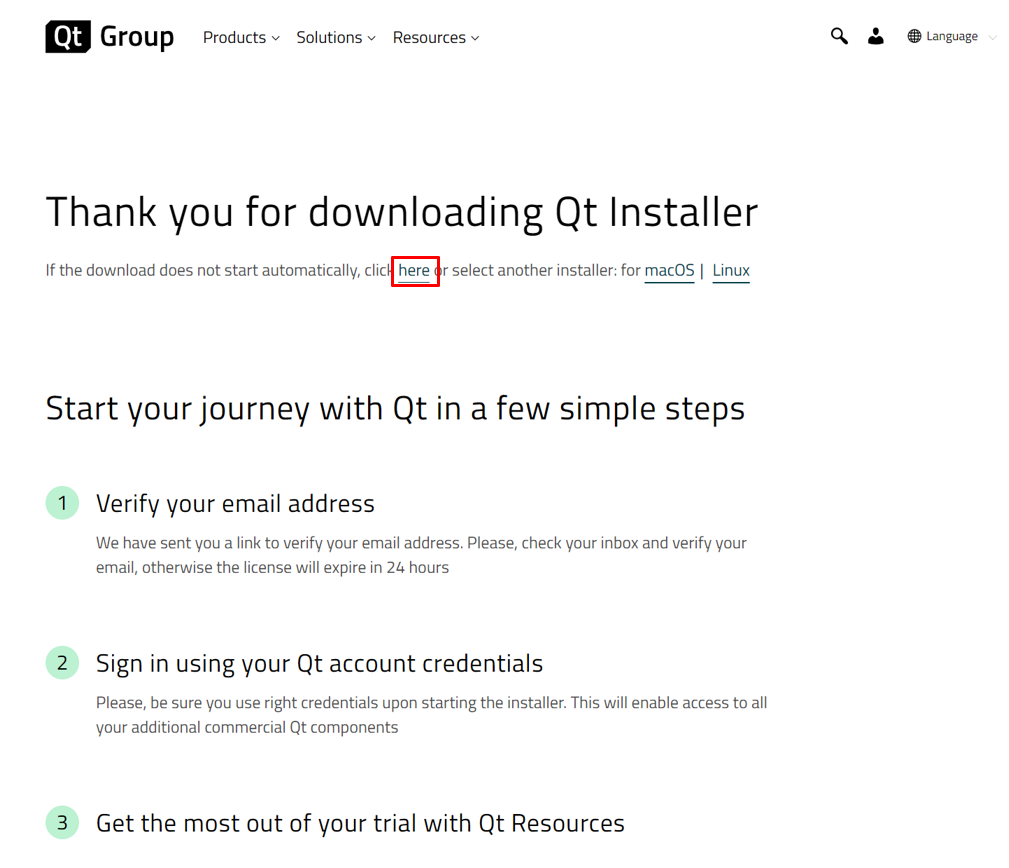
If you select to download the open-source version, the screen shown below will appear, and the Unified Installer tailored to your operating system will be automatically downloaded. If it doesn't happen, click on the "here" highlighted in red in the image below.
Installation of required modules
Once the Unified Installer has been downloaded, let's go ahead and run it.
When you launch the installer, you will see a screen like the following. For Qt installation, you will need to log in to your Qt account. If you already have an account, enter your email and password, then click "Next" at the bottom right to proceed.
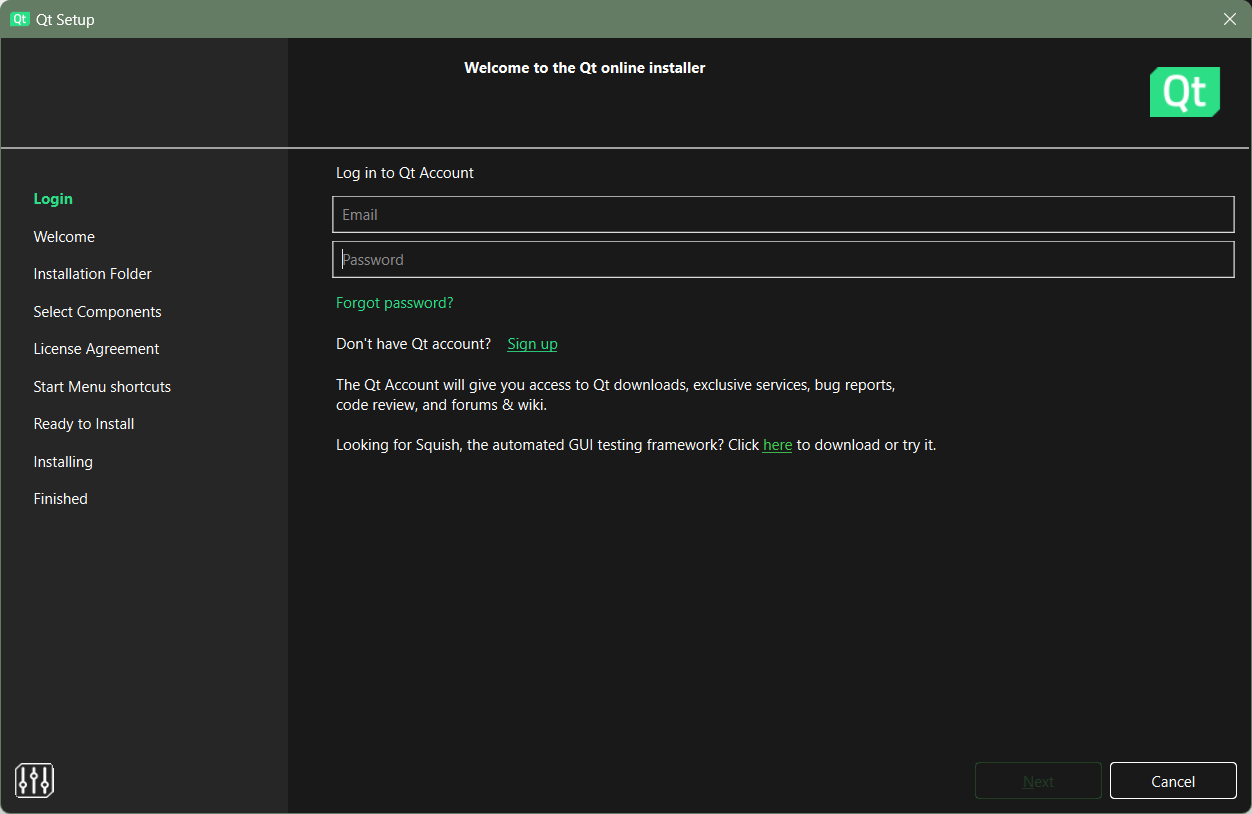
If you do not have a Qt account, register for one by clicking on "Don't have a Qt account? Sign up" and follow the registration process. After logging in, continue clicking "Next" until you reach the screen below.
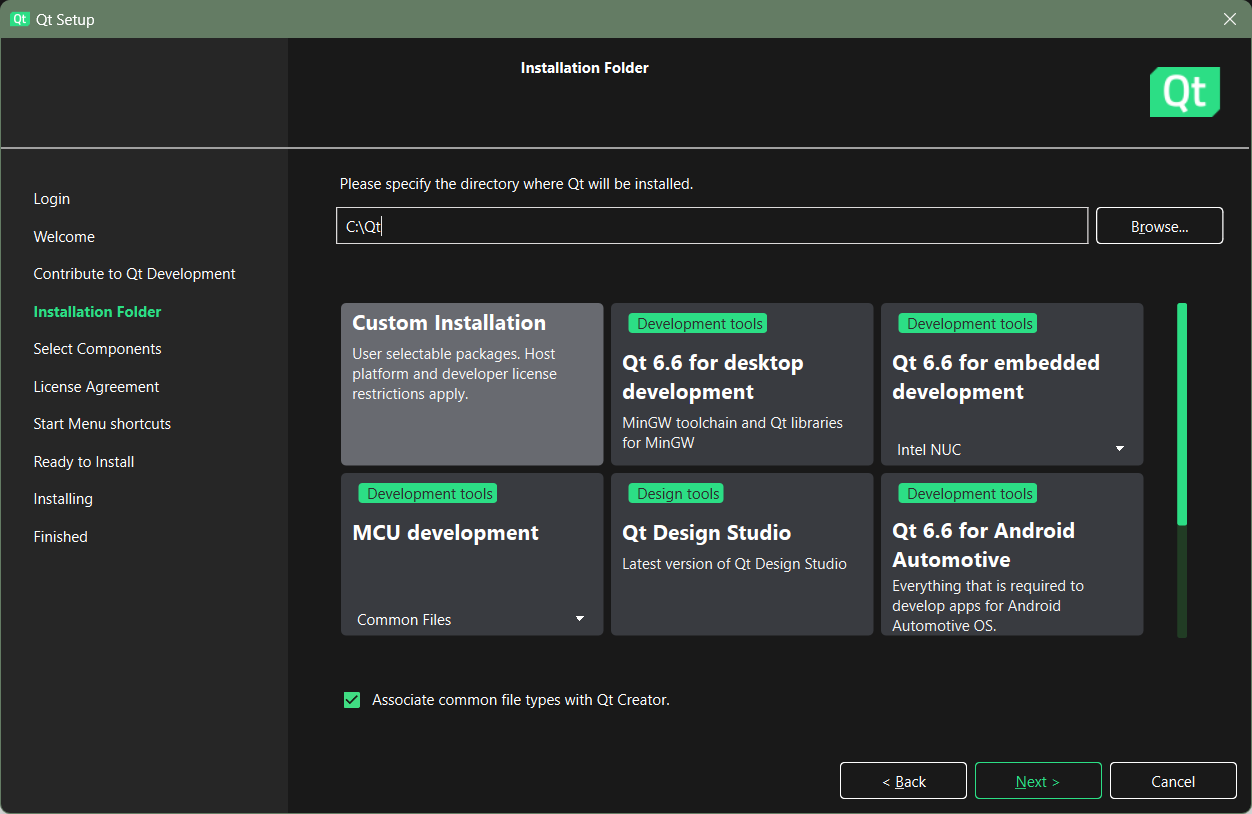
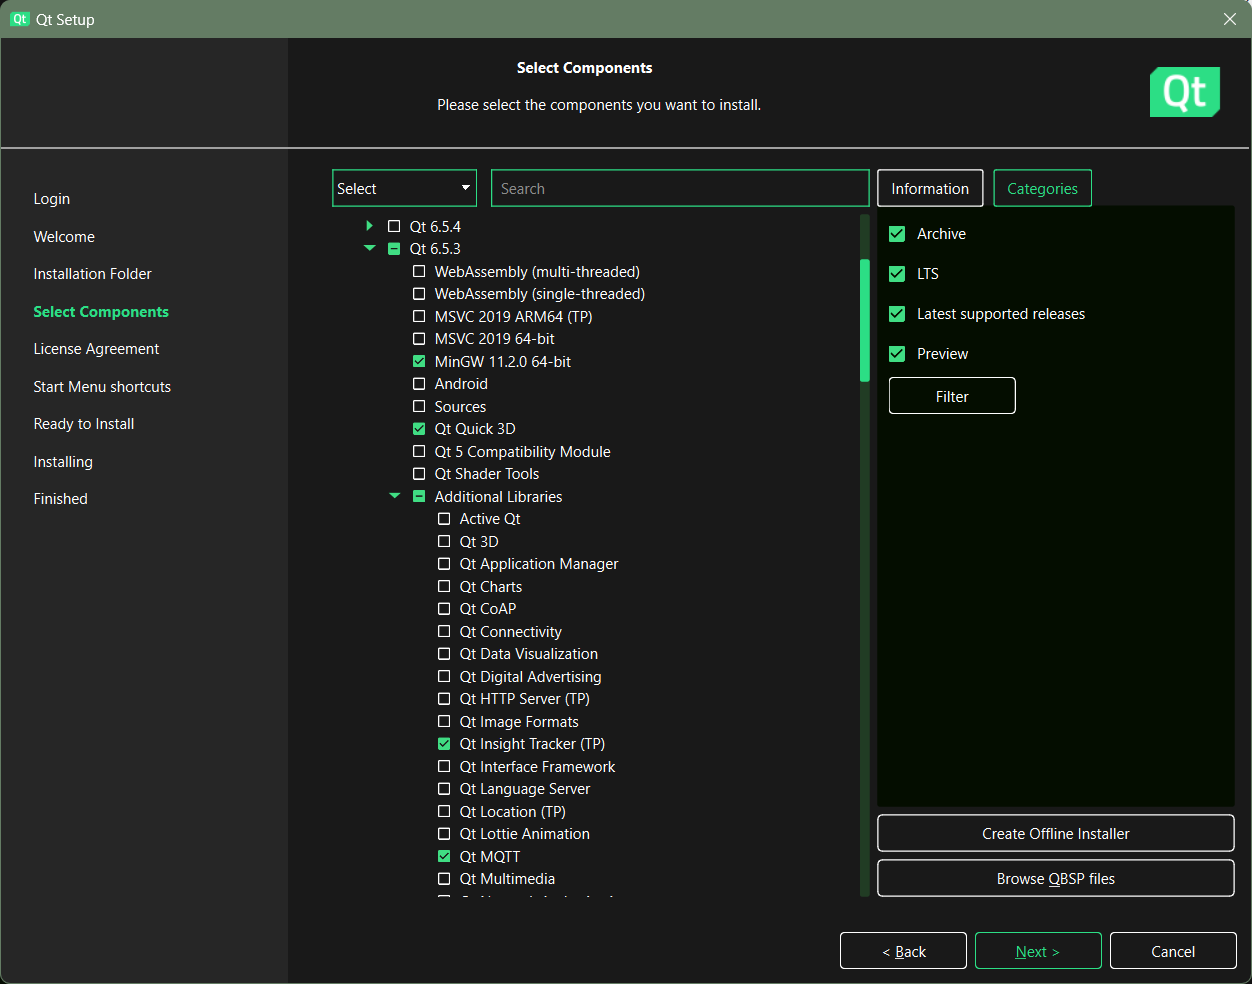
On this screen, select "Custom Install" and click "Next".
Choose Qt 6.5.3 for this installation. If Qt 6.5.3 is not listed, check the "Archive" box at the top right, then click on "Filter".
Check the boxes next to "MinGW 11.2.0 64-bit", "Qt Quick 3D", "Qt Insight Tracker(TP)", and "Qt MQTT" under Qt 6.5.3, then click "Next". Note that "Qt Insight Tracker(TP)" is required for utilizing the Qt Insight Tracker API.
Review and accept the End User License Agreement, then click "Next" to proceed to the next screen. From here on, continue clicking "Next" until the installation is complete.
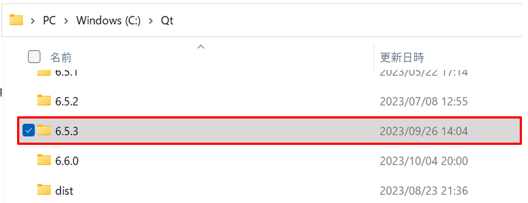
On Windows, Qt will be installed in the "Qt" folder directly under the C drive by default.
Opening a Project in Qt Creator
Qt comes with an integrated development environment called Qt Creator. Let's open it now.
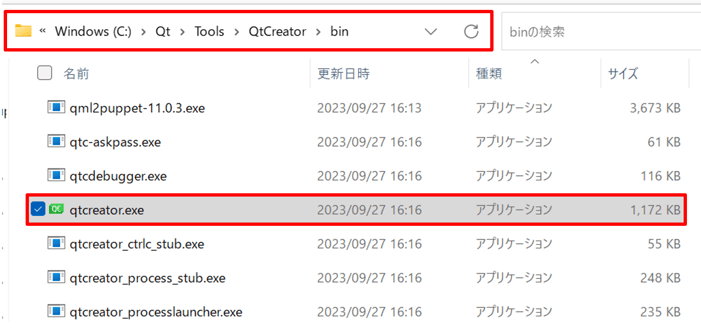
You can run Qt Creator from the start menu shortcut or by running C:\Qt\Tools\QtCreator\bin\qtcreator.exe.
Qt Creator provides a variety of sample applications along with their source code. To access them, simply select "Examples" from the menu on the left side of the Welcome screen. Then, choose the Qt version from the dropdown menu to view a list of sample Qt applications for that version.
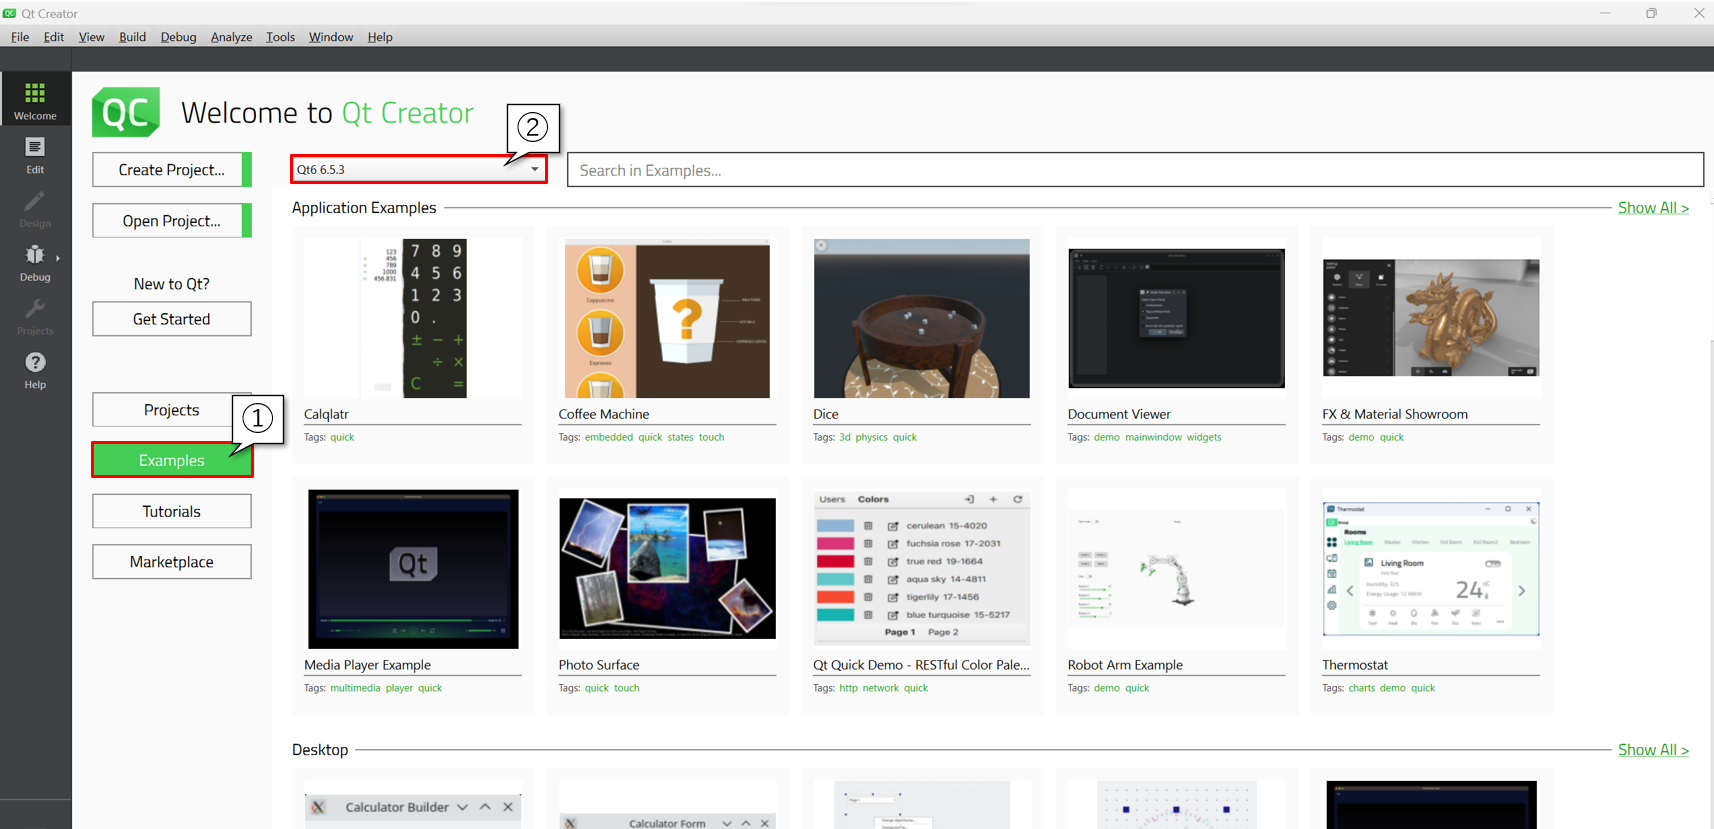
You'll also find a sample of Qt Insight available. Simply type "Insight" in the search box, and you'll see the "Qt Insight - Qt Quick Application" sample. Click it to open the project.
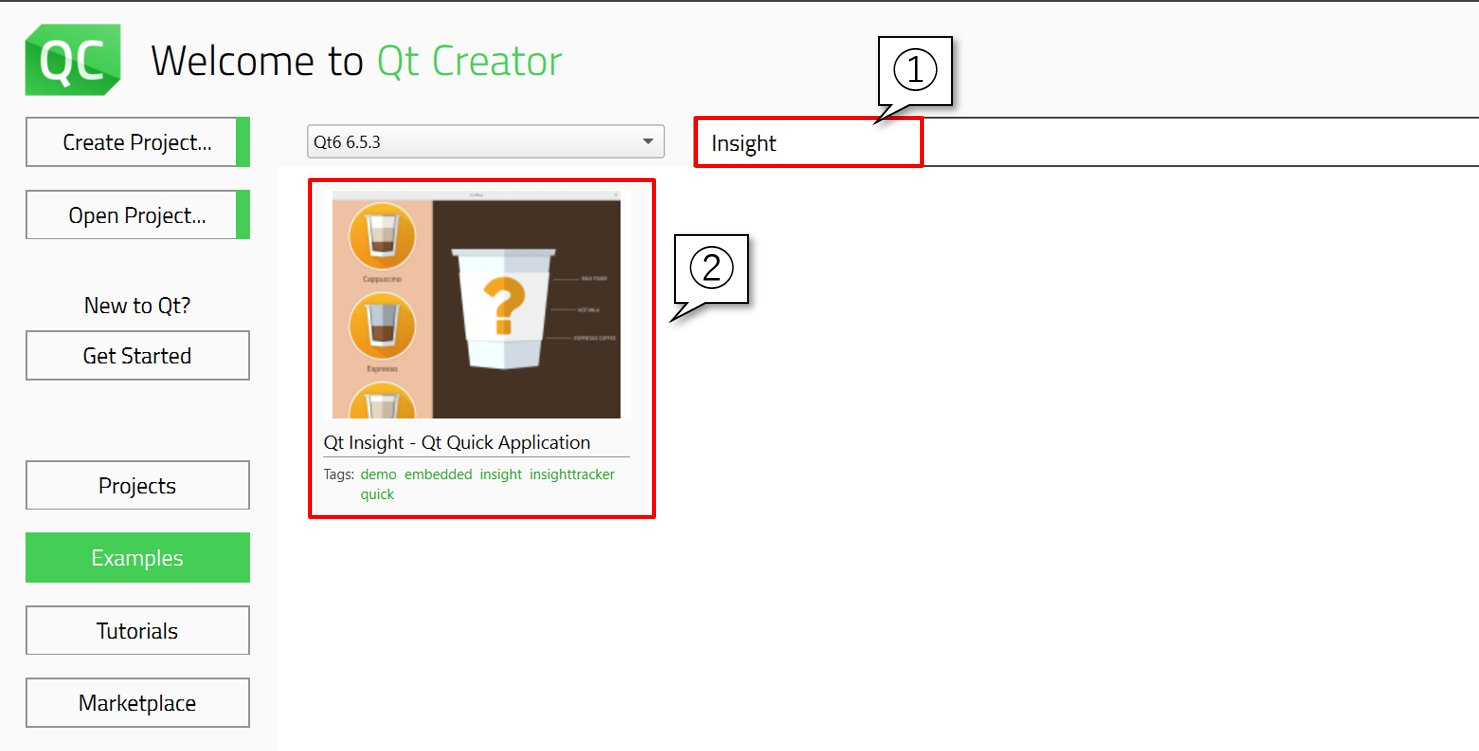
After opening the project, a window explaining the sample will open, but it's okay to close it for now.
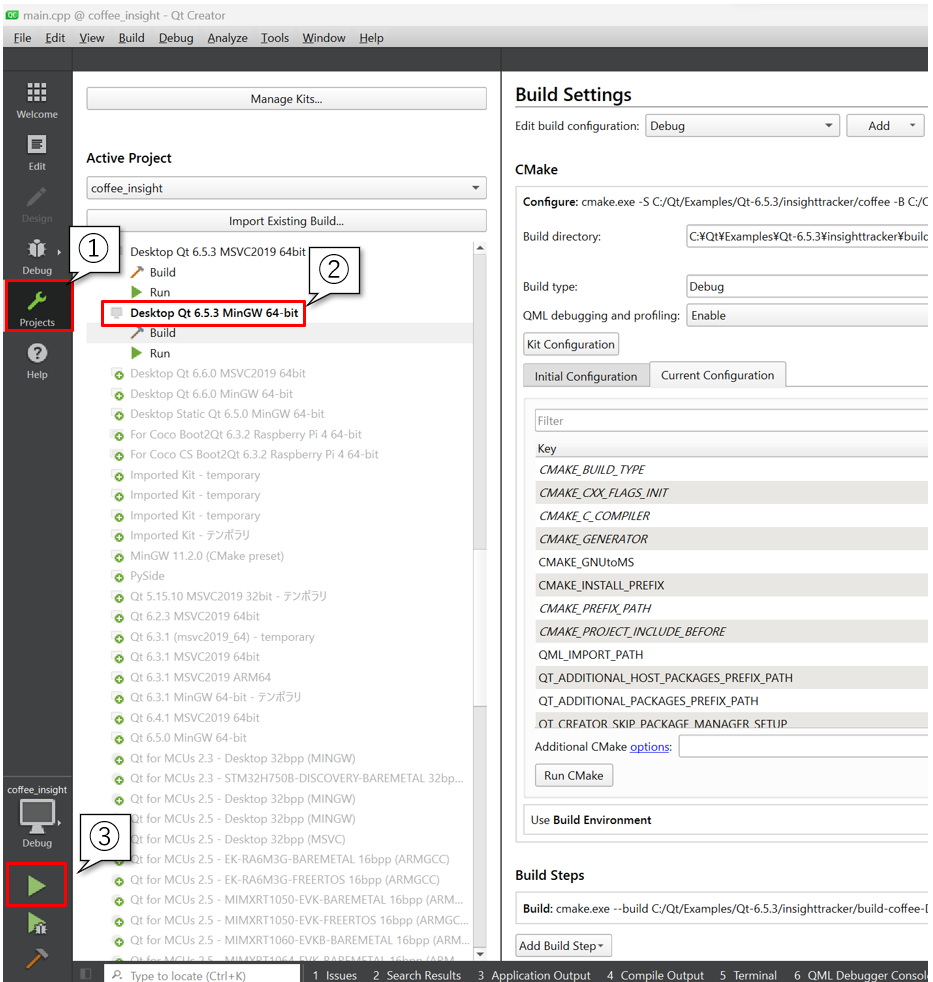
You can select the build settings from the list of Qt kits on the left side of Qt Creator. Clicking on "Desktop Qt 6.5.3 MinGW 64-bit" will activate the project build configuration. Upon successful completion, the play button at the bottom left will turn green.
Qt Insight Sample Project
Let's take a look at the contents of the project.
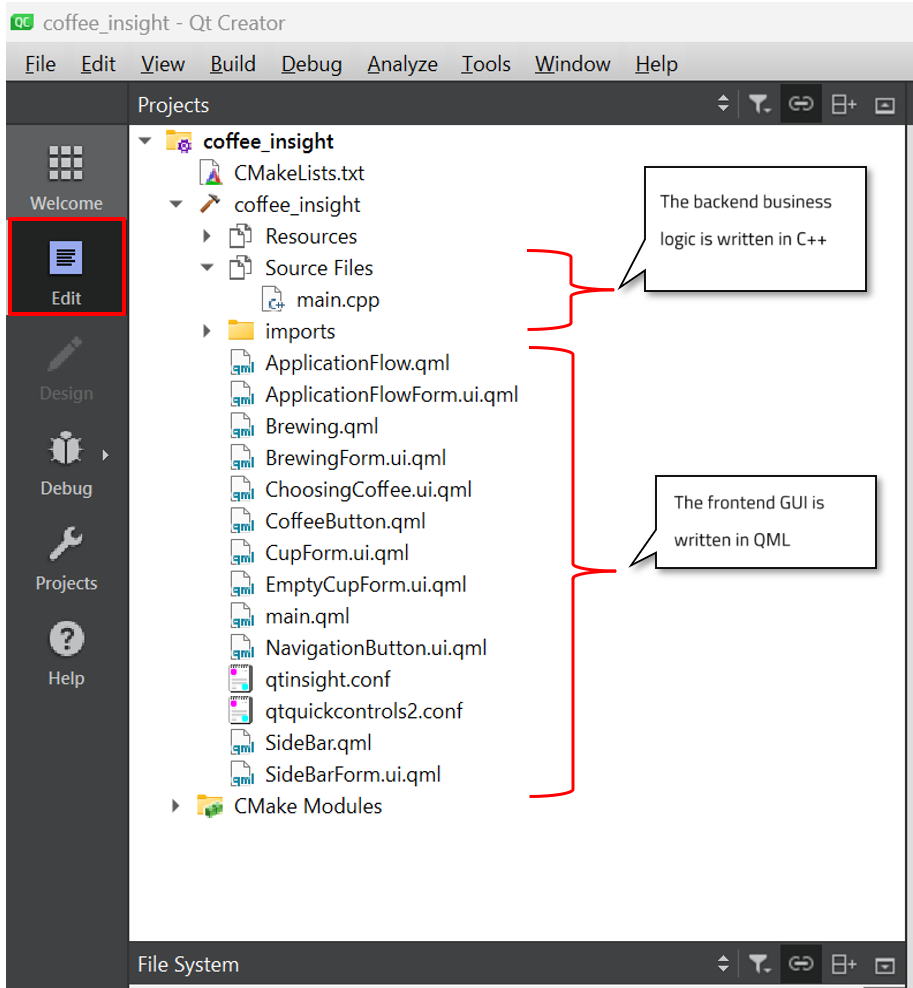
By selecting "Edit" from the menu on the left side, you can review the file structure of the project.

Qt projects typically consist of front-end GUI written in .qml files and back-end business logic written in C++ or Python. Additionally, project configuration is now done using CMake in the latest versions.
Qt Insightは、C++とQMLのAPIを用意しています。それらを活用することで、データをクラウドに送信することができます。
Qt Insight provides C++ and QML APIs that enable you to send data to the cloud.
CMakeLists.txt
To utilize those APIs, you will need to add the necessary configurations to the CMakeLists.txt file. Double-click on CMakeLists.txt to open it in the editor and make the required entries.
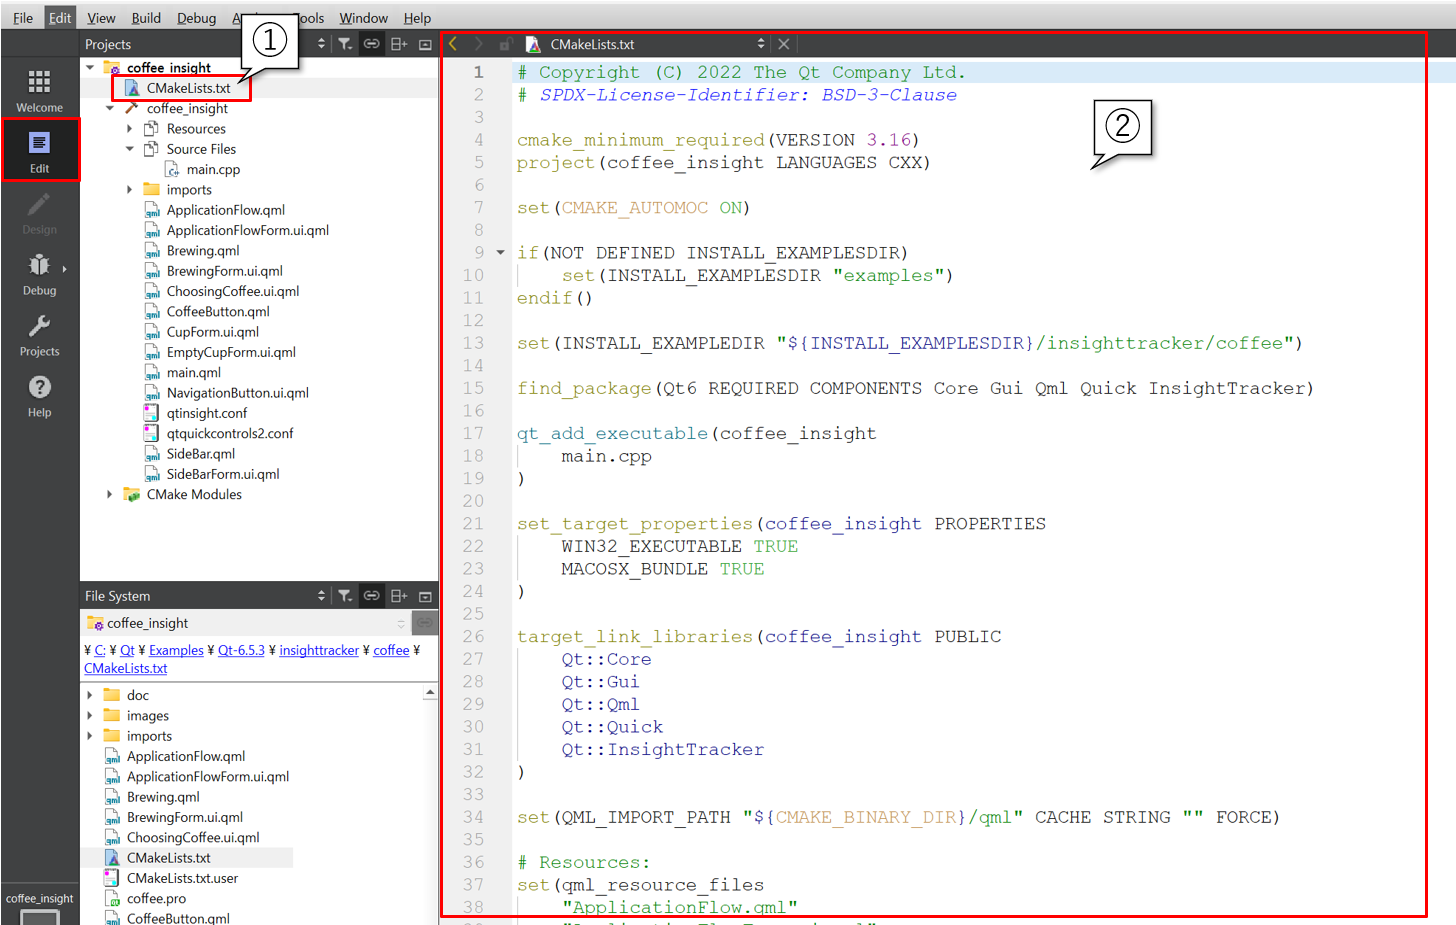
To utilize the Qt Insight Tracker API, you need to link the InsightTracker library to your application. This involves adding InsightTracker to the find_package() on line 15 and target_link_libraries() on line 26 as shown below.
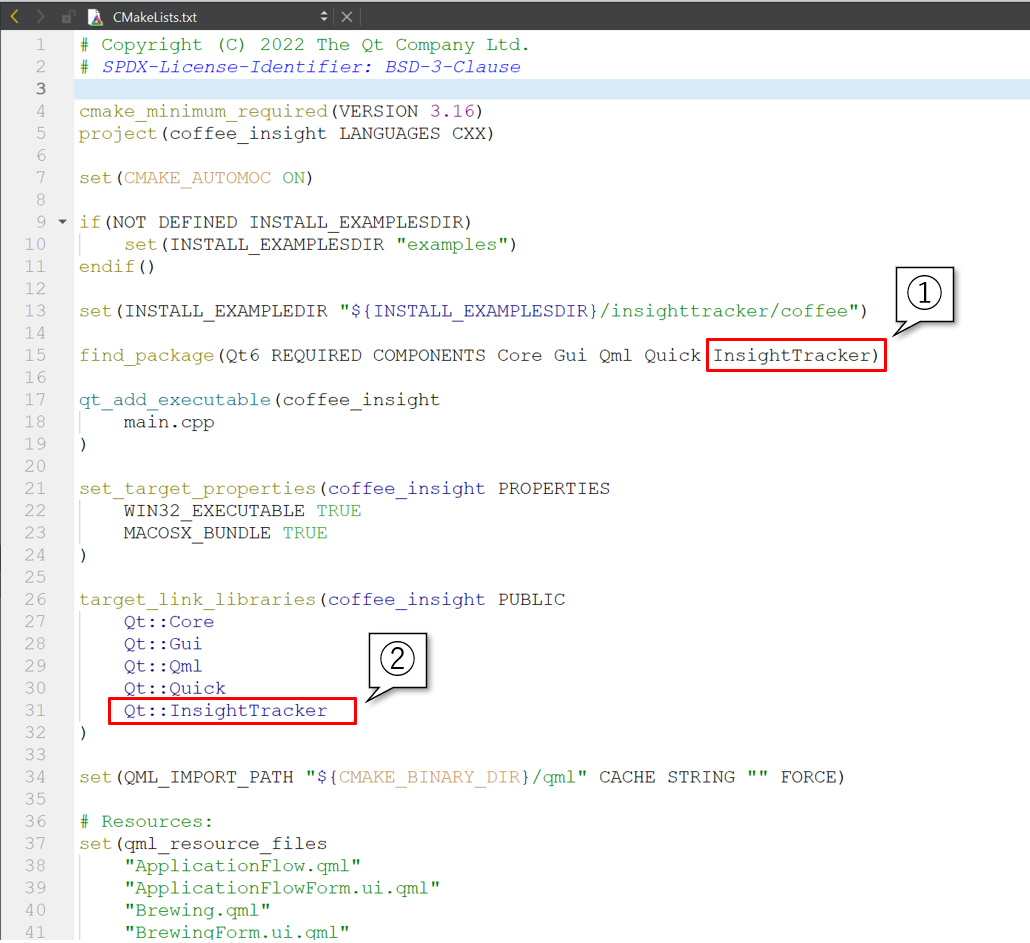
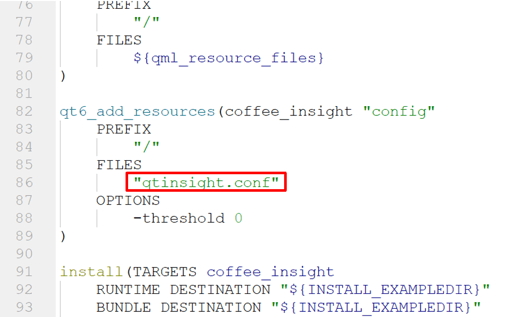
Another essential element in Qt Insight is the qtinsight.conf file. In CMakeLists.txt, on line 86, it is provided as an argument to the qt6_add_resources() function as shown below.
qtinsight.conf
The qtinsight.conf file is where you configure Qt Insight settings. It can be found in the project structure on the left side, so double-click to open it.
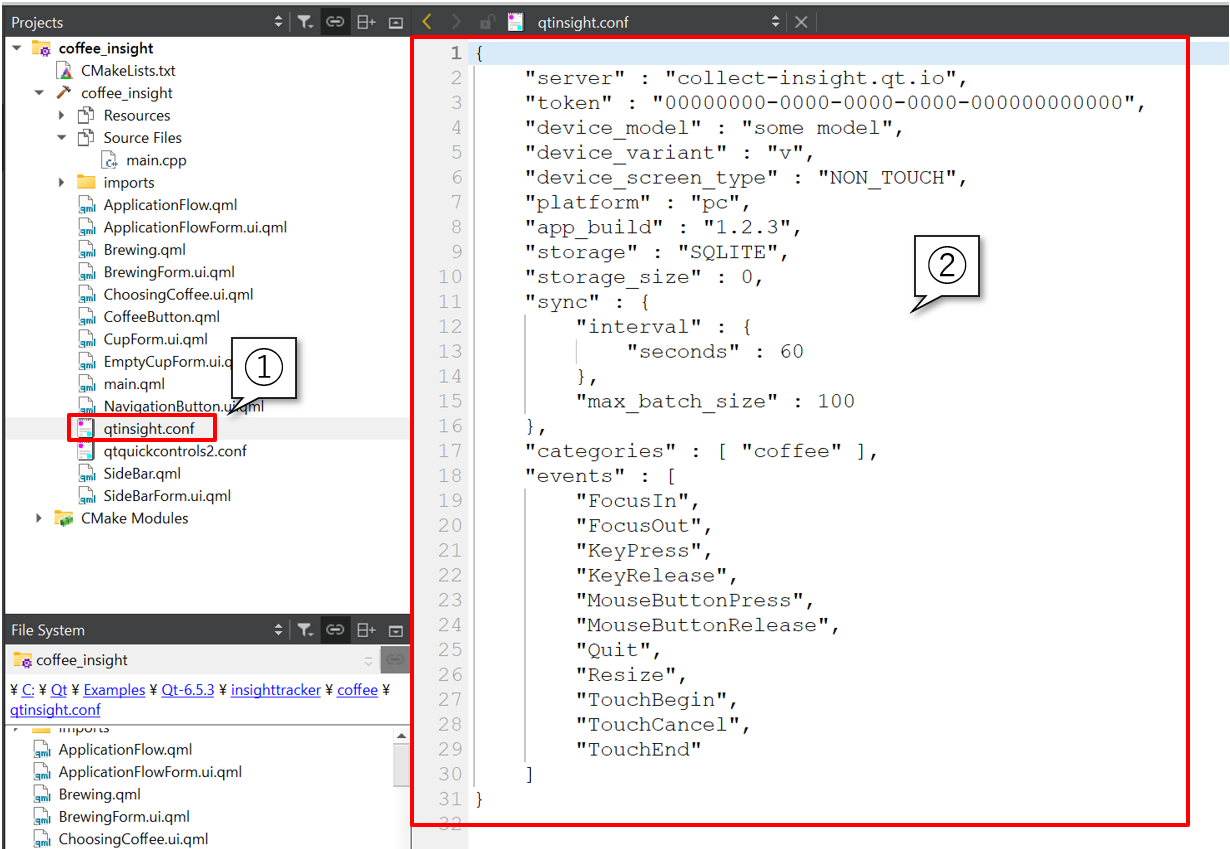
Here are some configuration items for qtinsight.conf.
- server
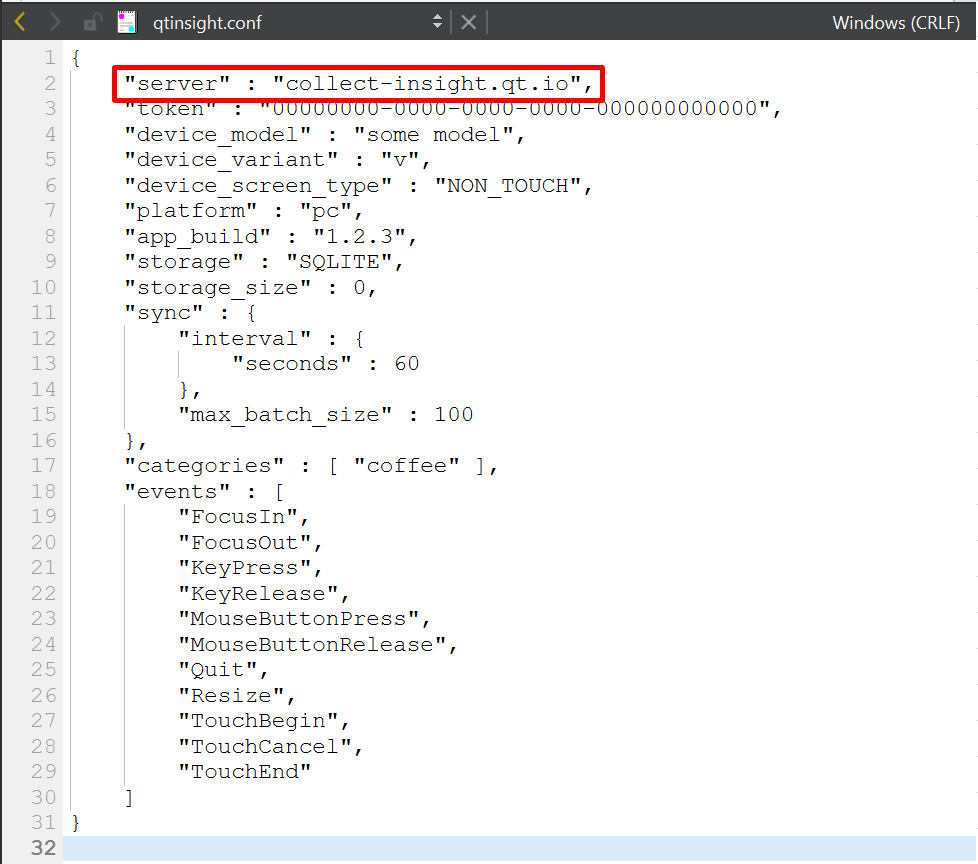
Specifies the URL of the cloud server. If you choose the option to send data to the cloud managed by Qt or during the trial period, the default URL collect-insight.qt.io is sufficient. However, if you opt for the private cloud option by installing Qt Insight's backend in your own cloud environment, you will need to modify this URL accordingly. - token
Set the token in the qtinsight.conf file to the one generated in the Qt Insight Web Console. Let's create and configure the token in the console by selecting the organization created previously.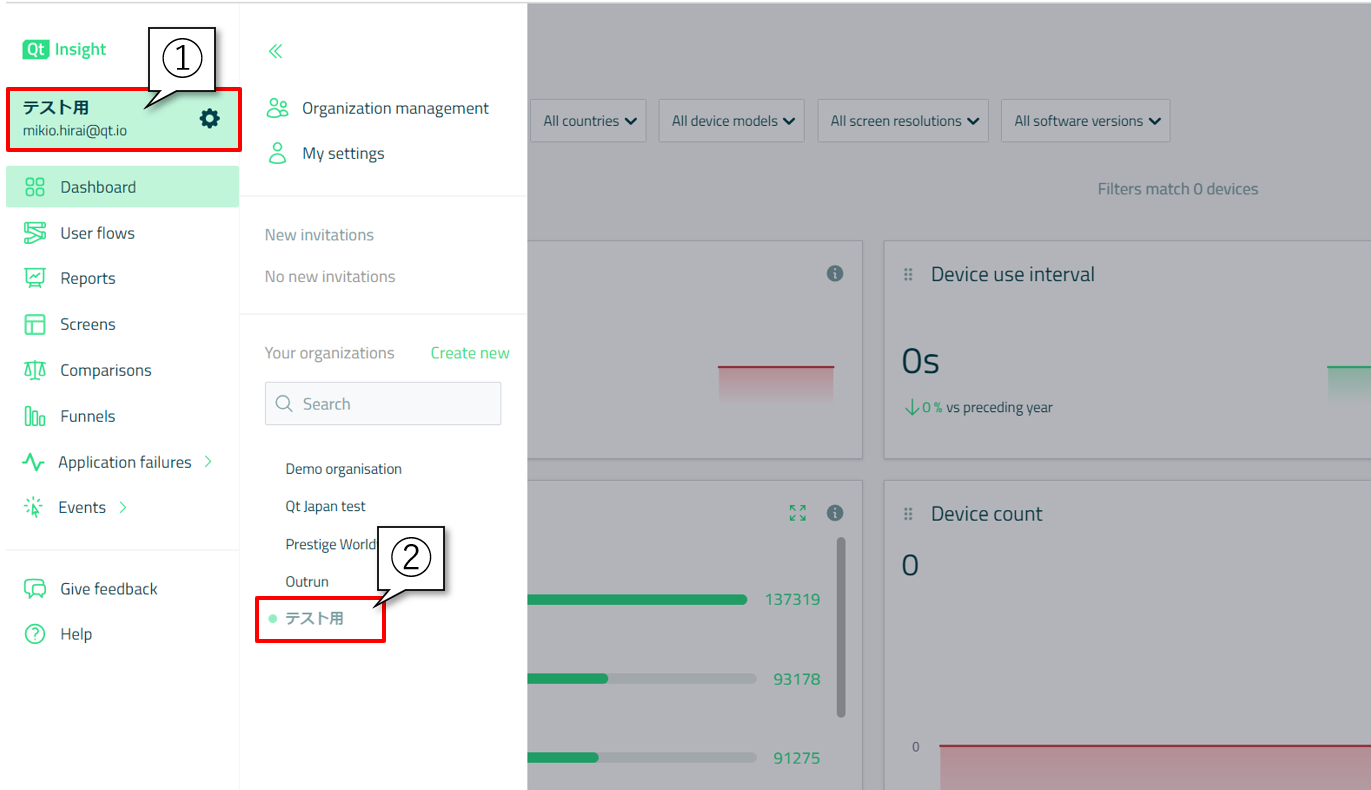
Next, select "Organization management".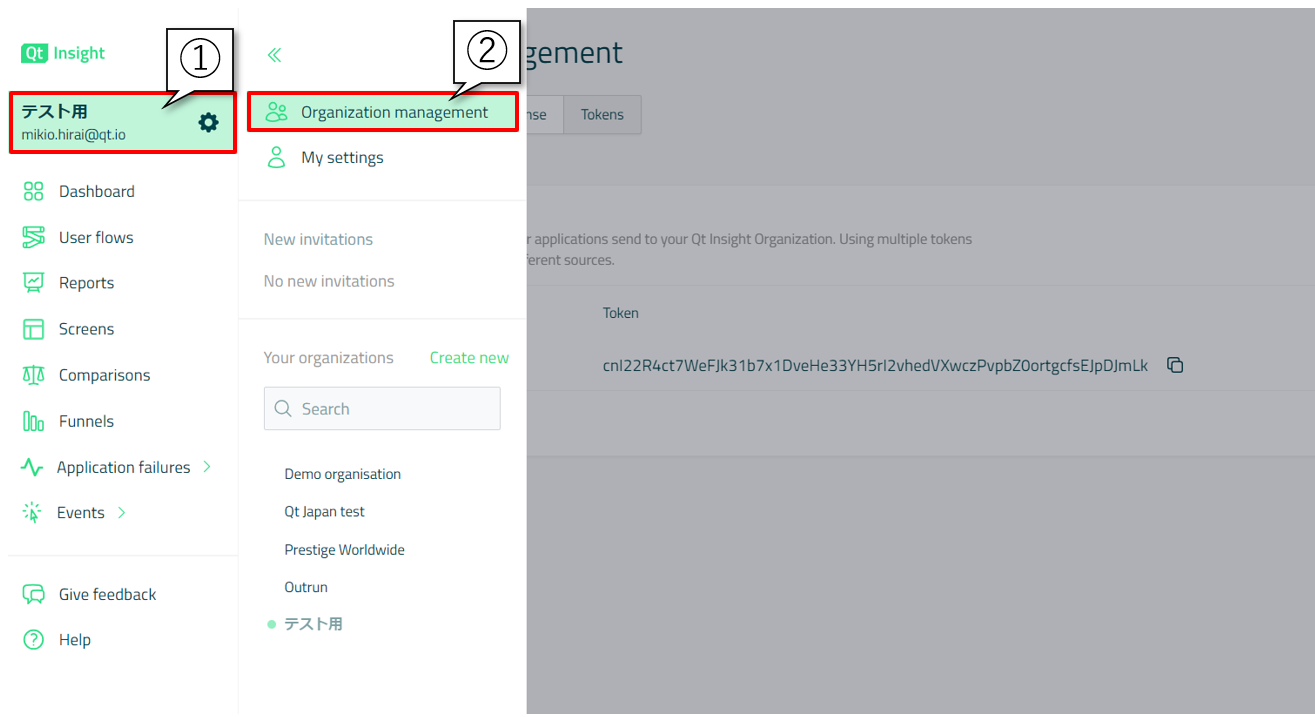
When you open the "Tokens" tab under "Organization management", you will see the Default tokens.
If you do not see it, or if you want to create a new token, you can add it by clicking the "Add new" button in the upper right corner.
Copy the values of the tokens shown here.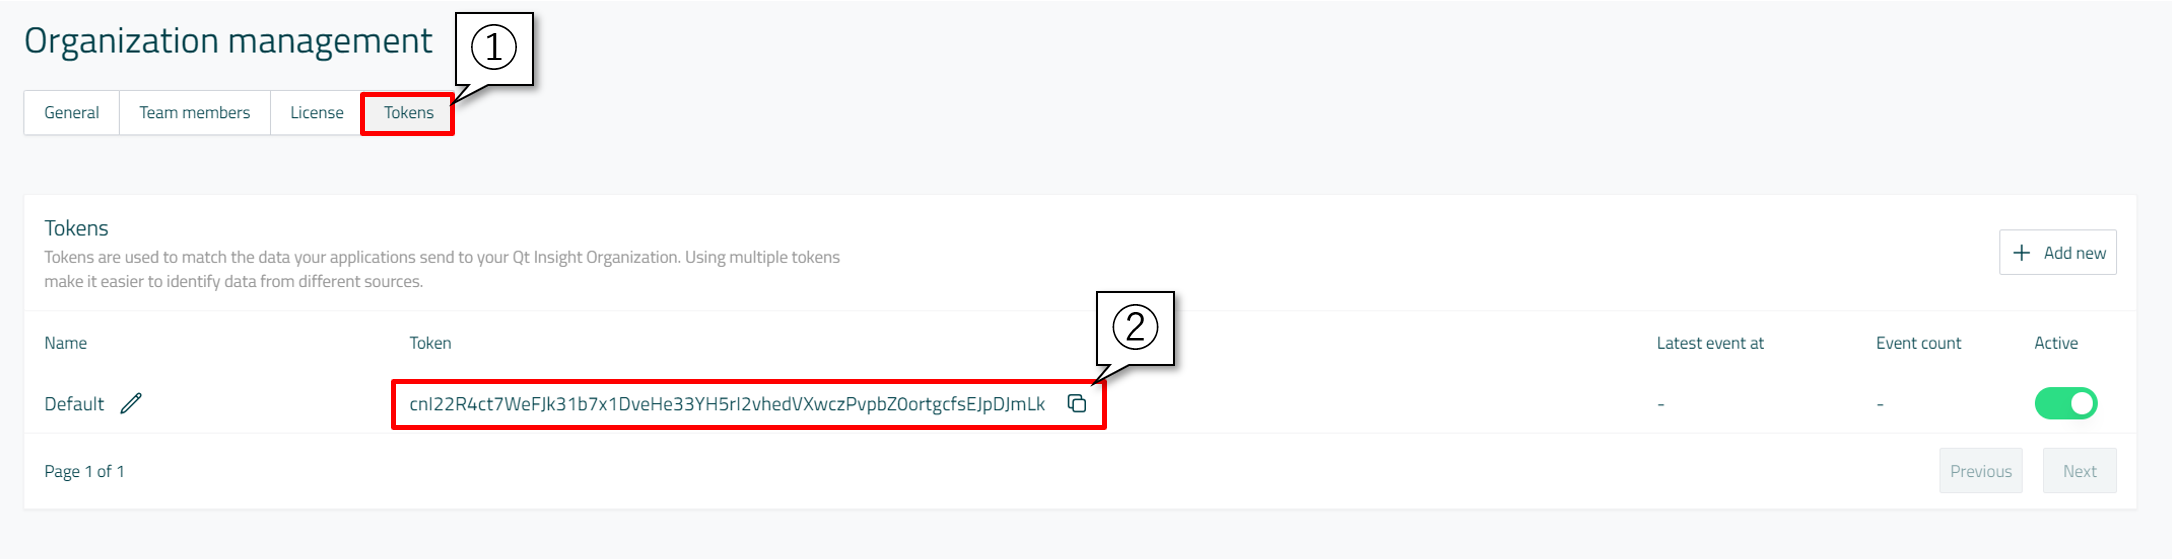
Paste the copied value into the token field in qtinsight.conf. Now the data you sent to the cloud will appear in your Qt Insight Web Console organization.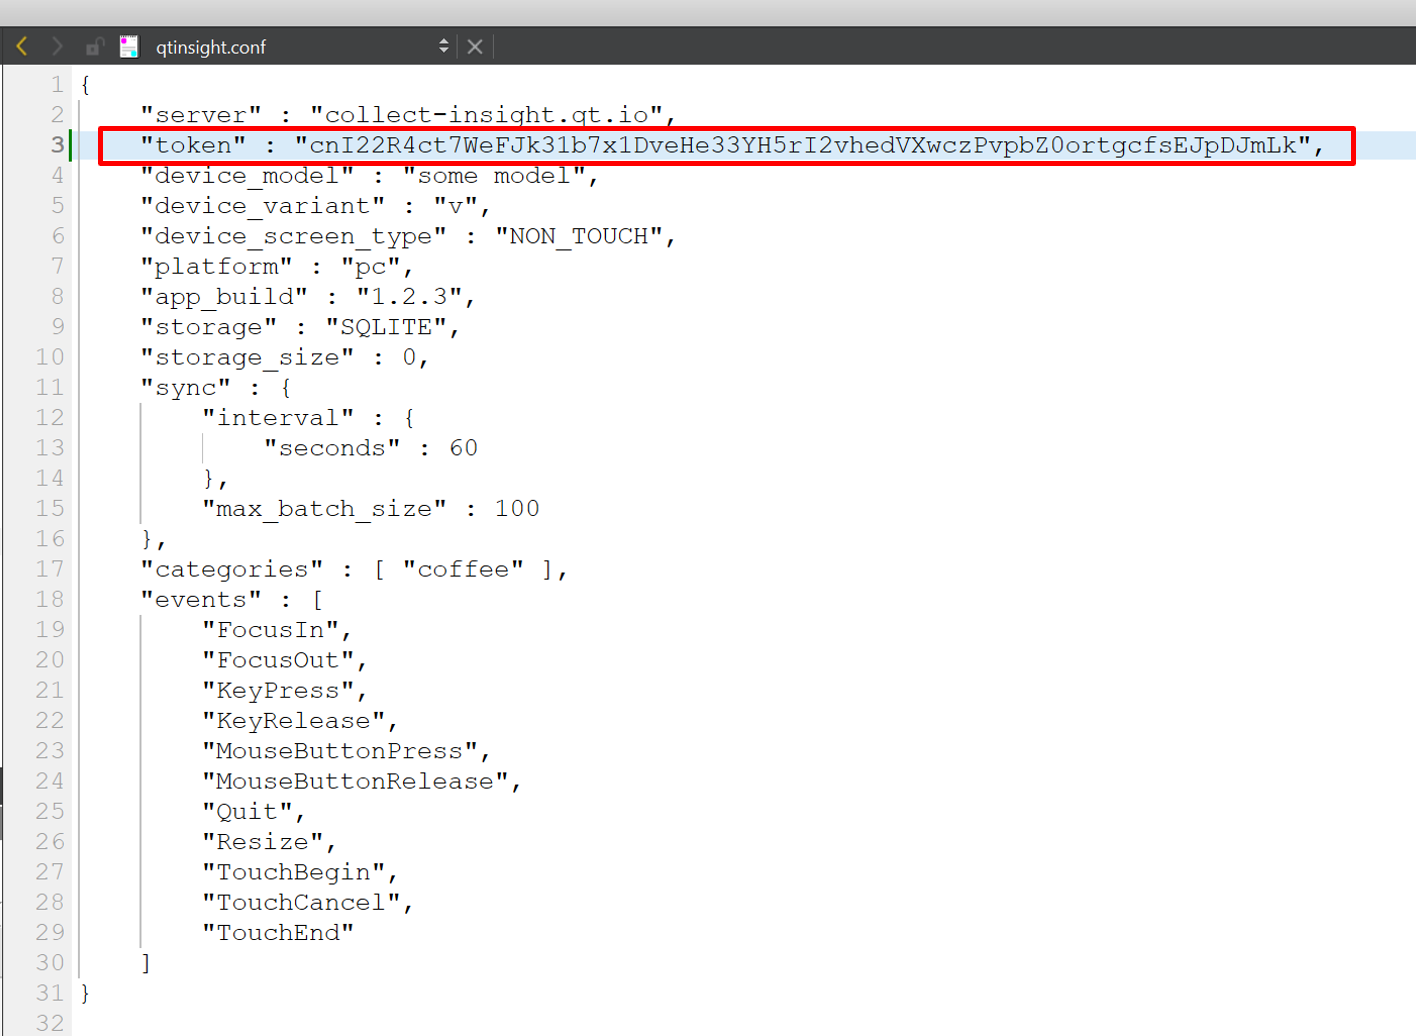
- device_model
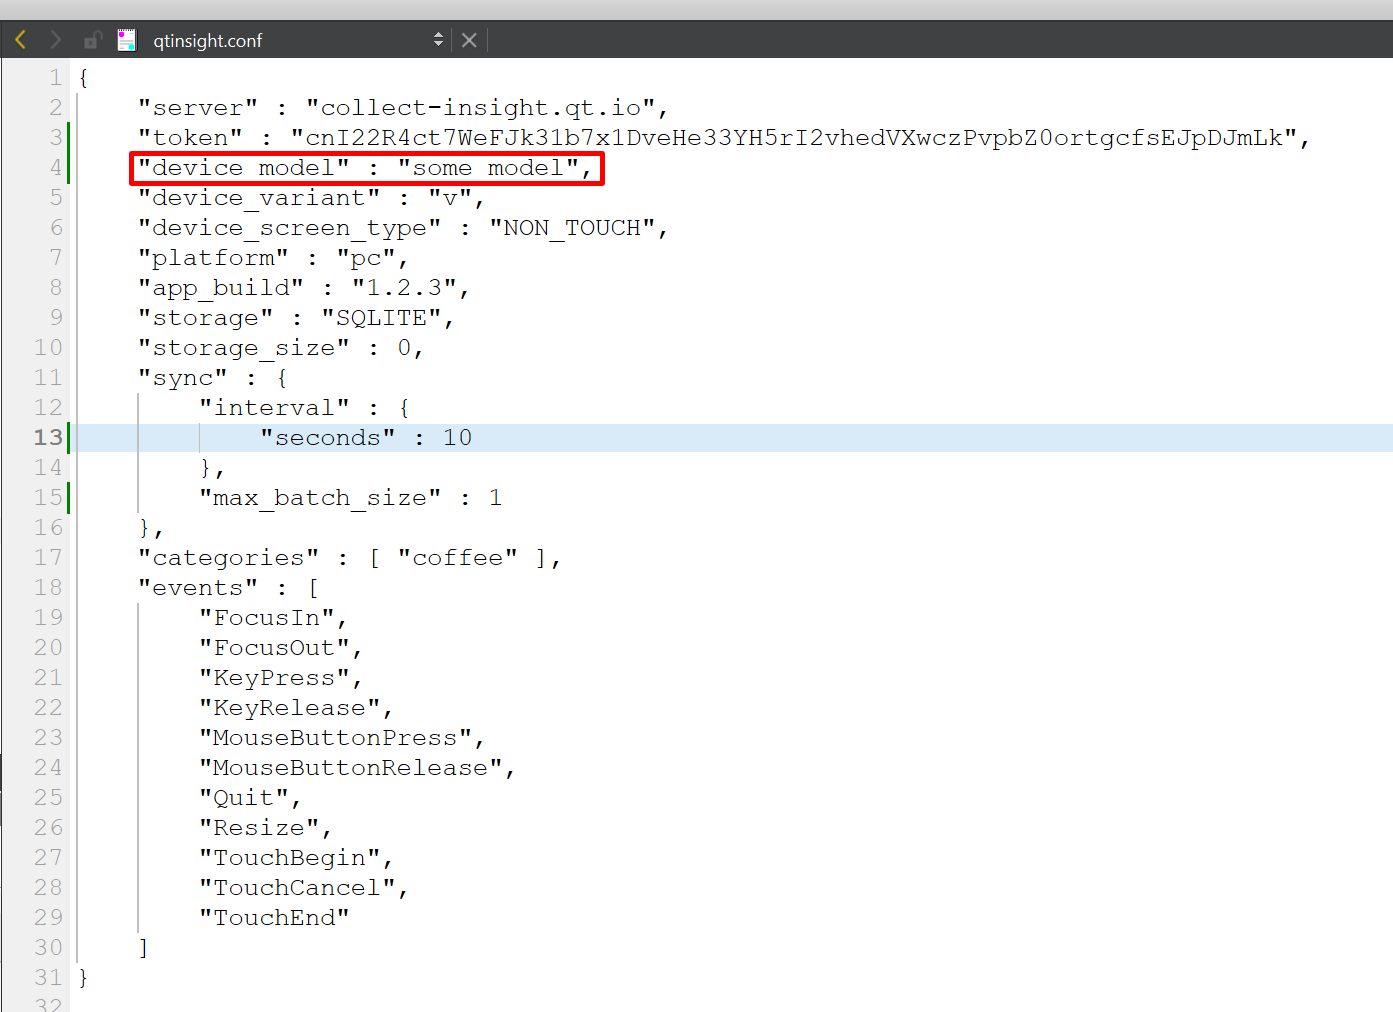
device_model can be set to an arbitrary string. This string can be used for filtering in the Qt Insight Web Console.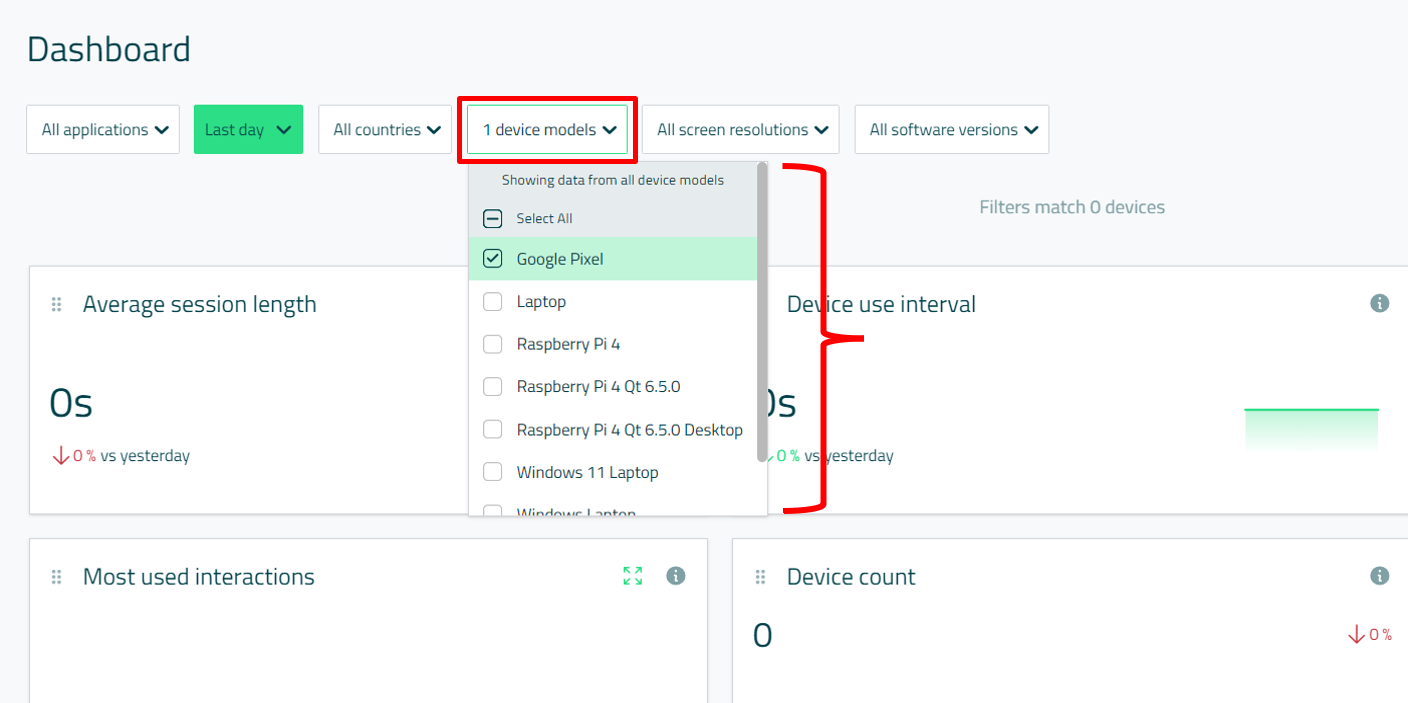
- device_variant
device_variant can be set to a string, although it is currently not utilized in the Qt Insight Web Console as of Qt Insight 1.5. - device_screen_type
device_screen_type can be set to either "TOUCH" or "NON_TOUCH" in Qt Insight 1.5, although it is not displayed in the Qt Insight Web Console. - platform
platform can be set to any of the following strings, although as of Qt Insight 1.5, it is not displayed in the Qt Insight Web Console.- "web"
- "mob"
- "pc"
- "srv"
- "app"
- "tv"
- "cnsl"
- "iot"
- storage
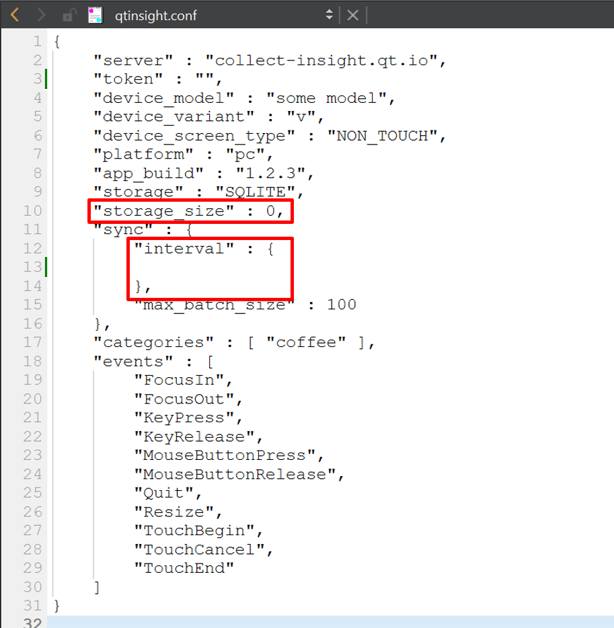
storage in Qt Insight 1.5 allows for configuration of "SQLITE," enabling event data to be saved in a SQLite database. If a different string or an empty value is set for storage, data saving to the database will be disabled, and data will be sent to the cloud immediately upon event occurrence. - storage_size
In Qt Insight, instead of immediately sending data to the cloud when an event occurs, the event data is first saved in a SQLite database. Subsequently, the data is periodically sent from the database to the cloud. The sent events are then removed from the database. The "storage_size" parameter represents the maximum size of this database, allowing you to set a limit on the number of queries to be stored.
If, as in this case, you set it to 0, there will be no upper limit on the size.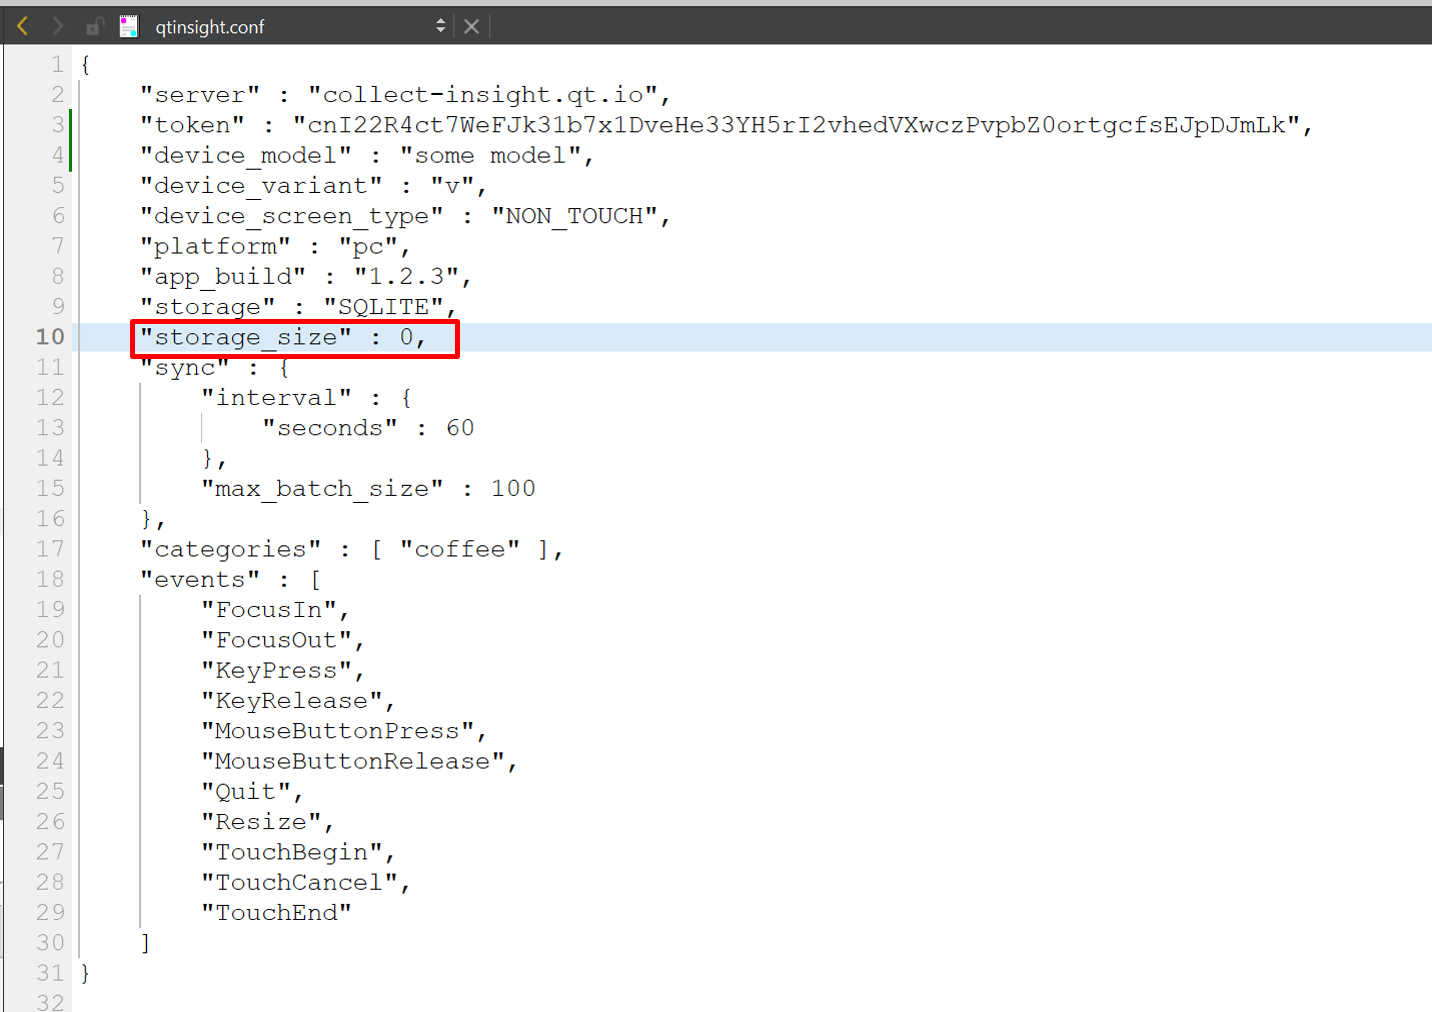
- sync
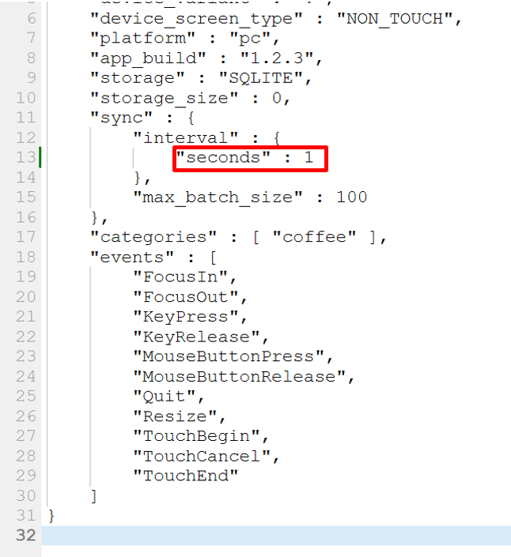
In the sync section, we define the interval and maximum event batch size for periodically sending data to the cloud. Currently, the interval is set to 60 seconds and the max batch size is 100, meaning that up to 100 events are sent to the cloud every 60 seconds. The interval can be specified not only in seconds but also in minutes, hours, days, and months.
To make the sending process more clear in this example, let's change the interval to 10 seconds and the max batch size to 1.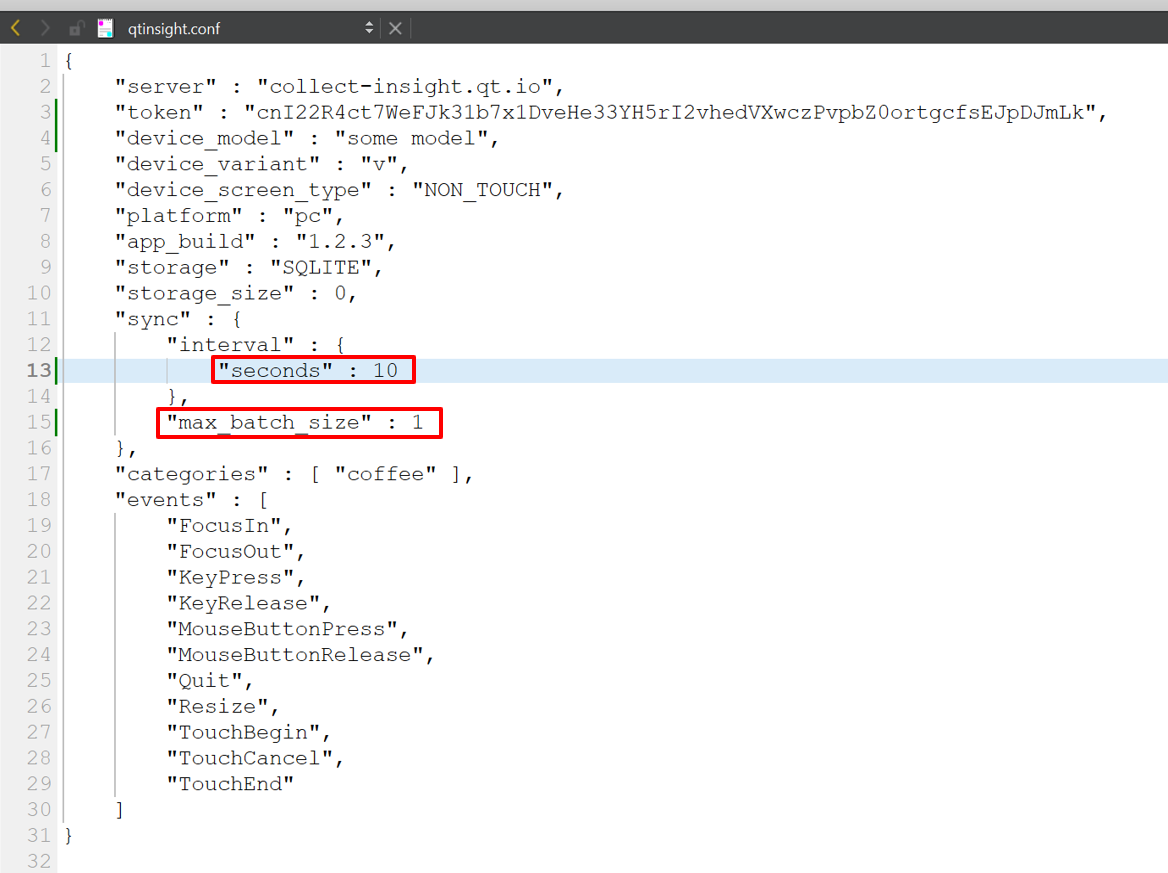
- categories
As of Qt Insight 1.5, sendClickEvent(), the API that sends data to the cloud, has a category as an argument. If you specify a category that is not in the list of categories in qtinsight.conf, the event will not be sent to the cloud (it will be filtered out). - events
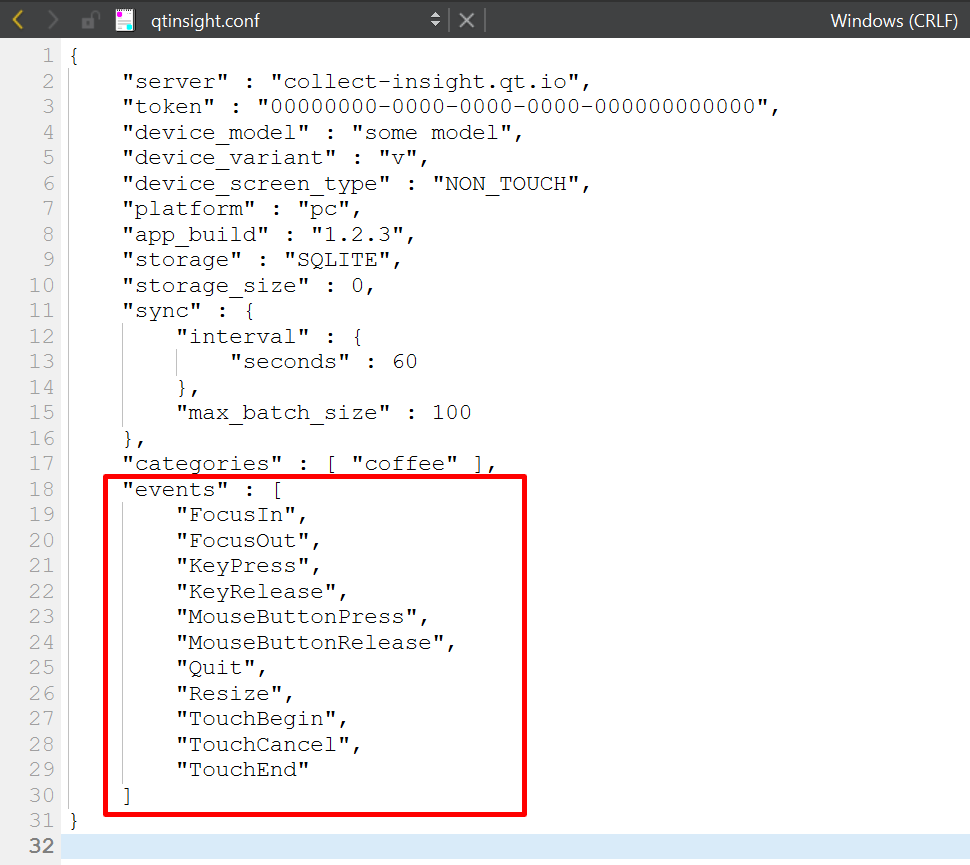
In the current Qt Insight 1.5 and Qt 6.6 versions, you can automatically send QEvents defined in the "events" section to the cloud without modifying the source code. This makes it easier to automatically track events in both Qt Widget and QML. It's advisable to remove any unnecessary events from the list to avoid consuming event quotas unnecessarily. Keep in mind that during the Qt Insight trial period, there is a limit on the number of events accepted by the cloud (up to 50,000 events per month). Therefore, if you have events that are not essential, consider clearing the events list.
You can view the sent events in the "Automatic interactions" section of the "Event log."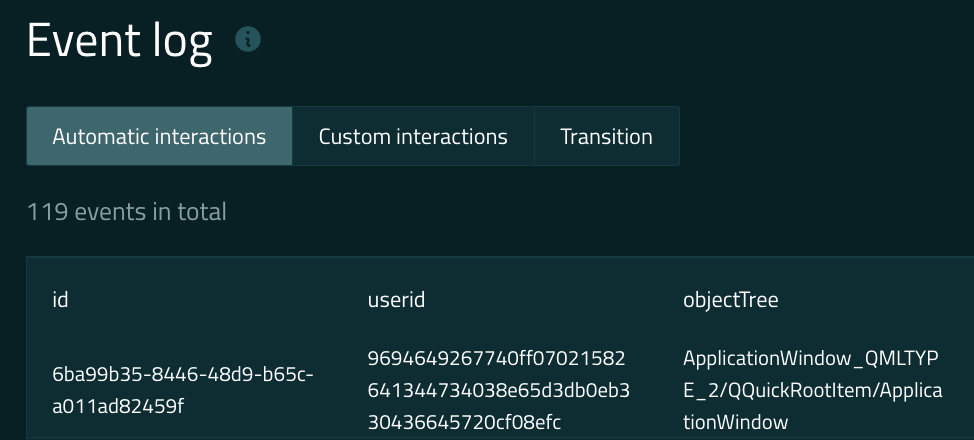
To understand how these configuration settings are handled, see the function QInsightConfiguration::load() in the Qt source code. This function is located in qinsightconfiguration.cpp. If you're curious, take a look.
Using the Tracker API in a QML File
Now, let's take a look at an example of using the Tracker API in a QML file.
Enabling Qt Insight
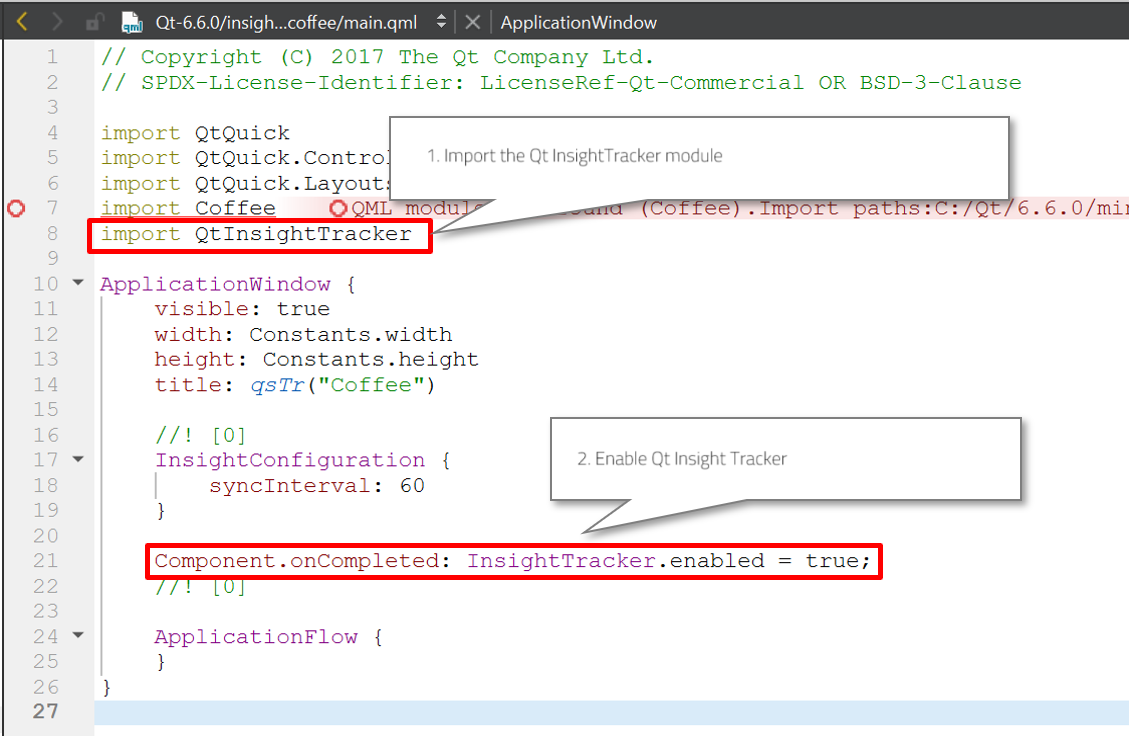
To enable the use of the Qt Insight Tracker API, you will need to import the QtInsightTracker module and activate the Qt Insight Tracker API. Let's open the main.qml file, which serves as the entry point QML file.
Upon examination, you'll notice that the QtInsightTracker module is imported at line 8, and by changing the InsightTracker.enabled property to true at line 21, the Qt Insight Tracker is activated.
In this application, the enabled status is set to true when the Component.onCompleted signal is triggered, ensuring that the Qt Insight Tracker is automatically enabled upon application startup.
While it's common practice to activate this feature after obtaining user consent through dialogs during app launch, it's crucial in actual product deployment to enable the application in a manner aligned with its purpose and legal requirements.
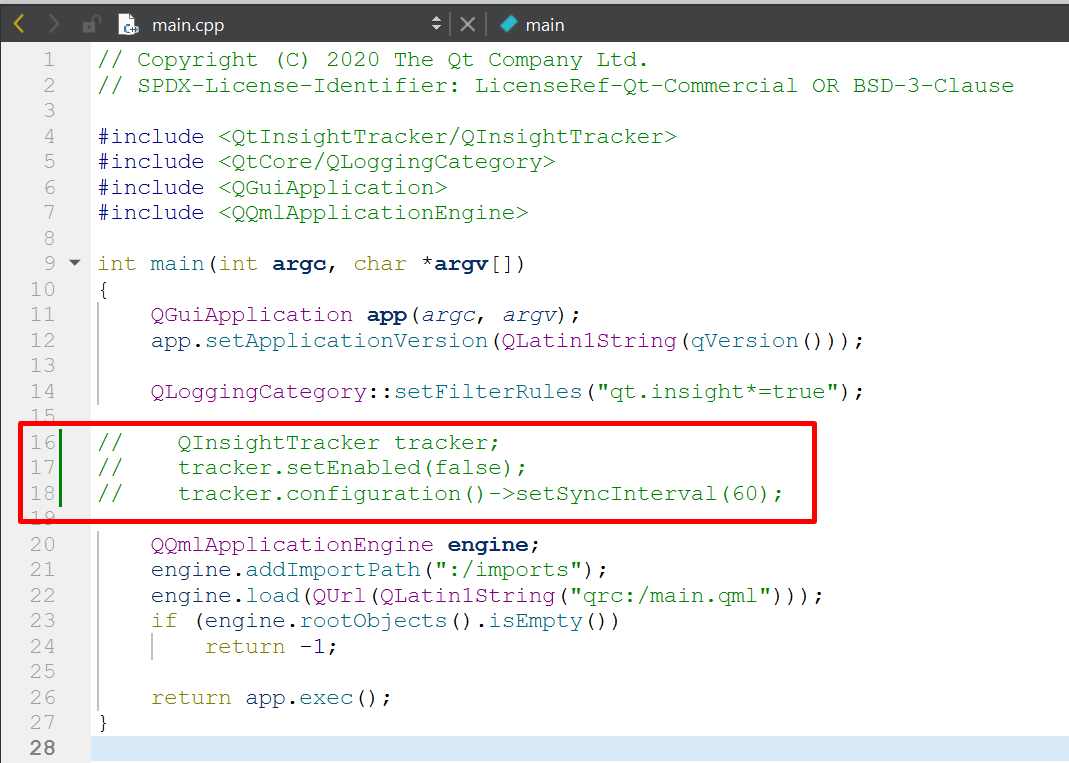
By the way, in this sample app, the Qt Insight API is also utilized on the C++ side.
When you open main.cpp, you'll see that from line 16 to line 18, an instance of the QtInsightTracker class is created. From there, the activation of Qt Insight Tracker (line 17) and the configuration of the event sending interval for Qt Insight Tracker (line 18) are set up.
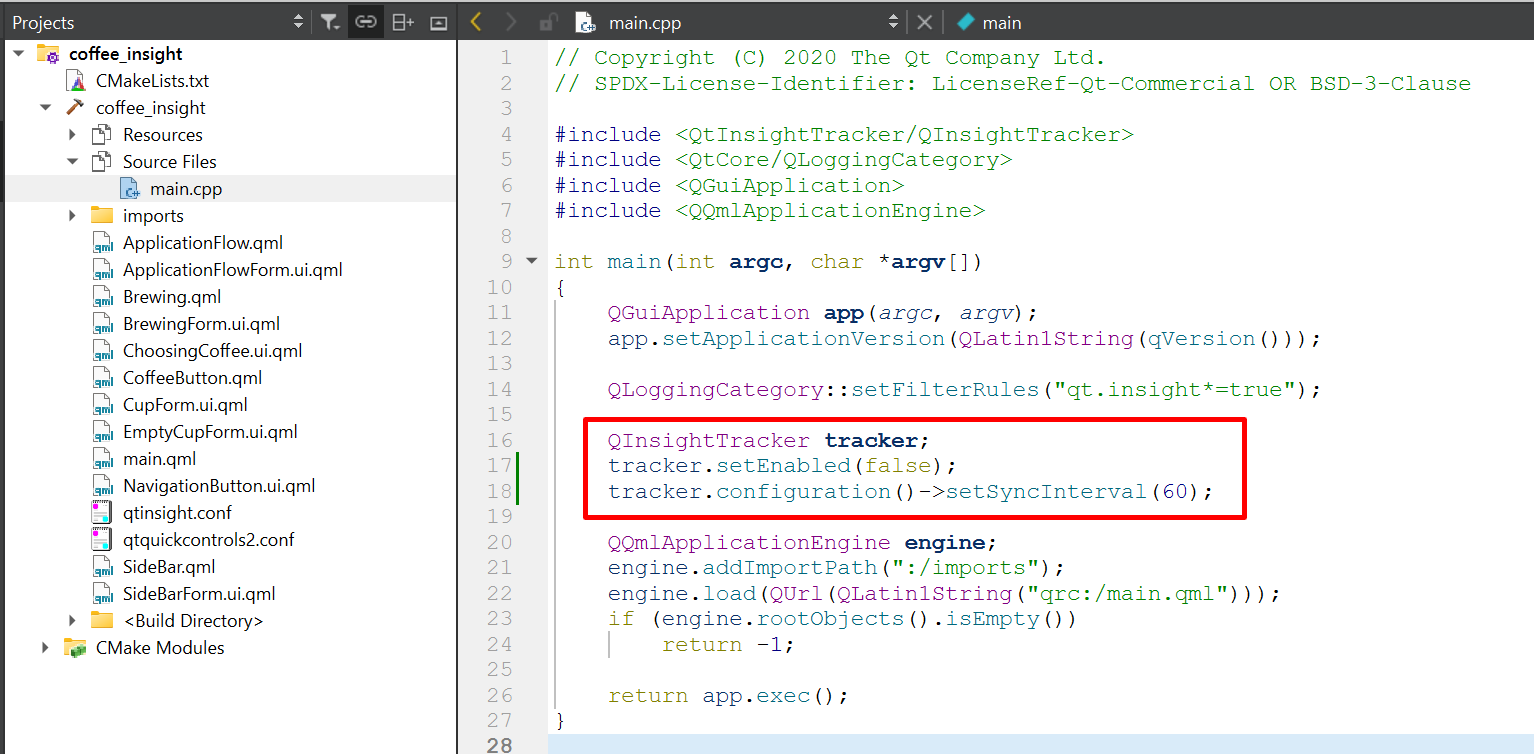
This part is unnecessary for now, so let's comment it out.
Learn more about Qt Insight Tracker's C++ API here.
Sending user interaction events (sendClickEvent)
First open the file CoffeeButton.qml.
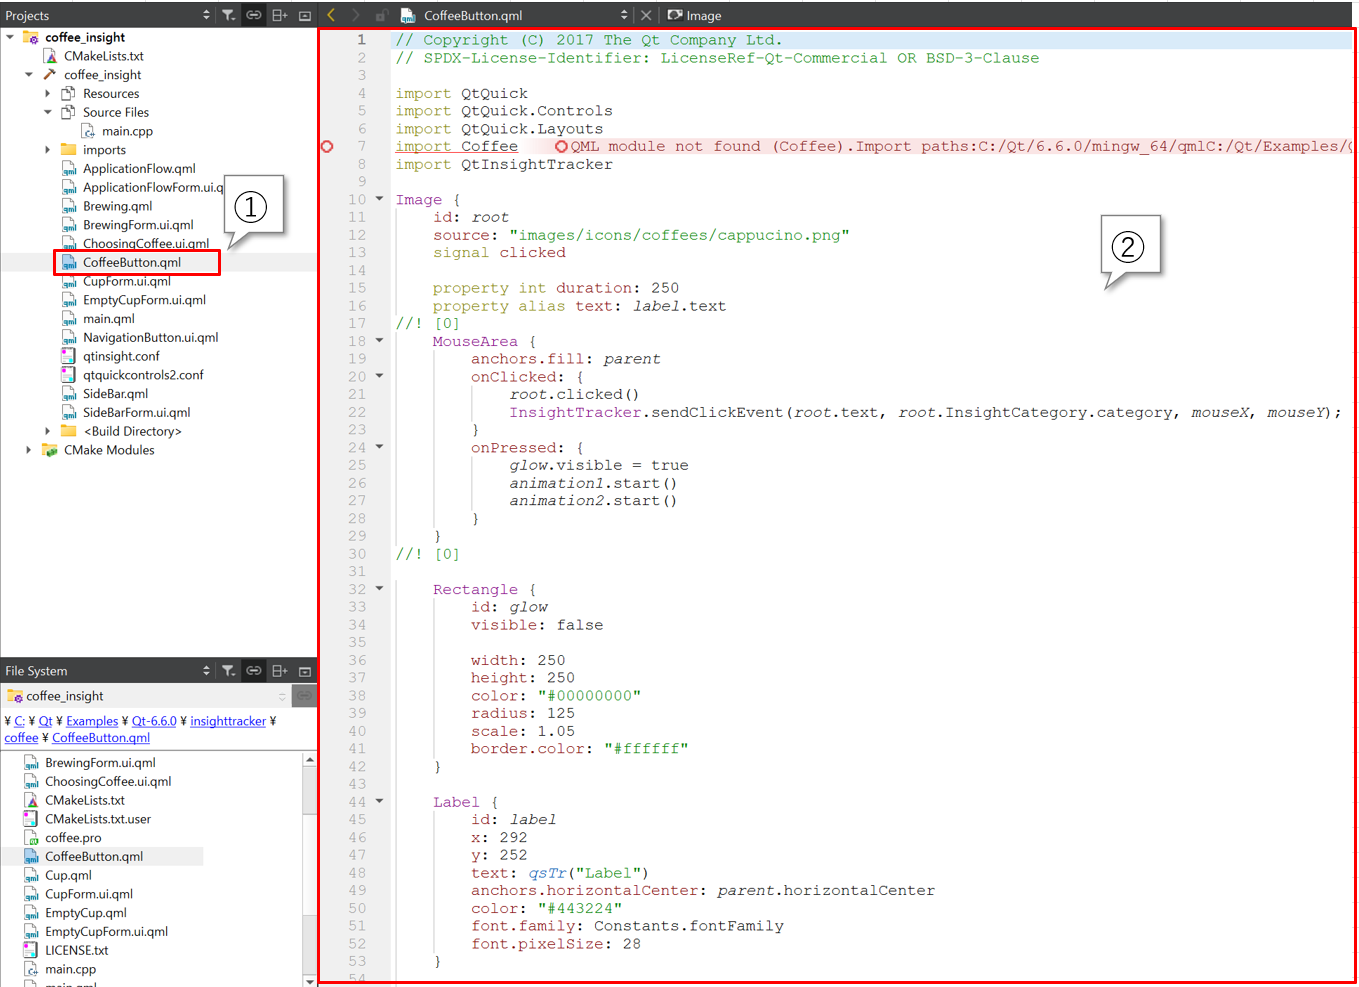
This file corresponds to the coffee selection button that appears on the left when the app is launched.
The area of interest this time is lines 18 through 29.
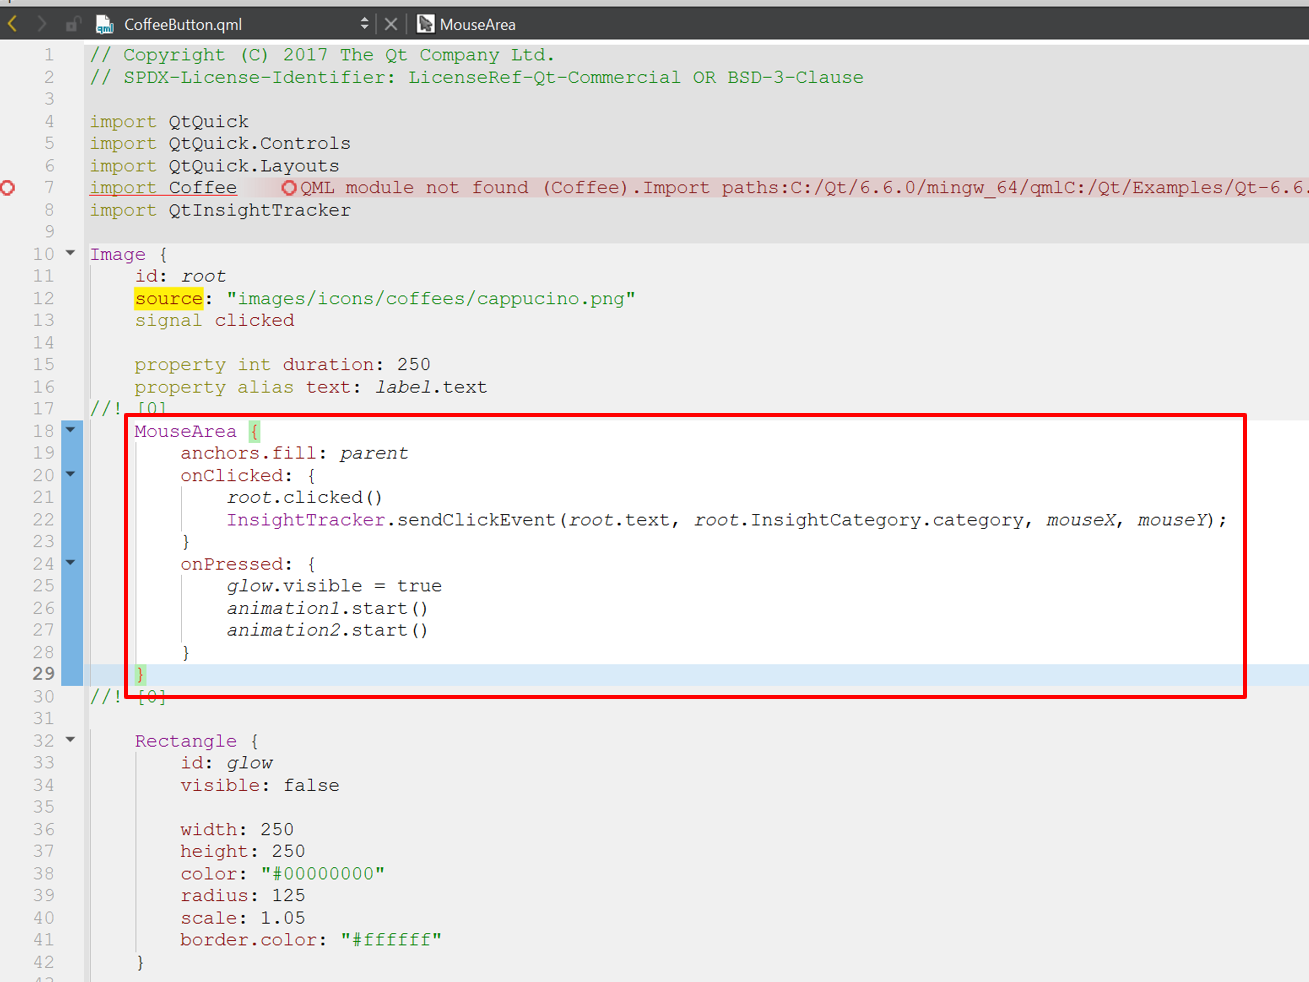
In QML, the language used to describe GUI in Qt, you can easily create dynamic interfaces by hierarchically defining "QML types" and setting their attribute values.
The MouseArea used on line 18 is a QML type designed to respond to mouse and touch events. By including handlers like onClicked and onPressed, the specified actions are executed when the MouseArea is clicked or pressed.
In this program, the onClicked handler on line 20 includes the usage of InsightTracker.sendClickEvent(), which sends click events to the cloud.
sendClickEvent(string name, string category, int x, int y, string contextKey, double contextValue)
Let's see how it is actually used. Here are the call locations

- root.text
The first argument of InsightTracker.sendClickEvent, name, is a string parameter. The name of the click event is specified here. In this case, we specify the variable root.text. This is passed as an argument by referencing the value of the text property of the QML element with the ID root in CoffeeButton.qml.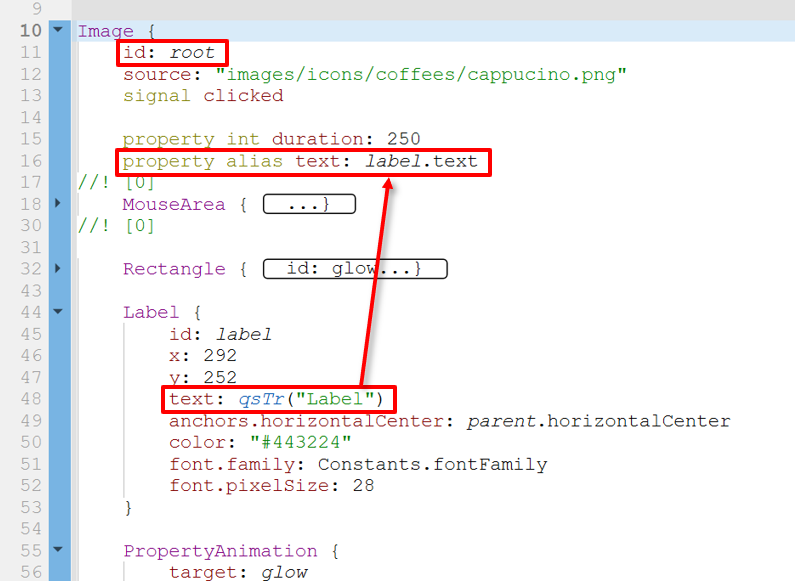
- root.InsightCategory.category
The second argument of InsightTracker.sendClickEvent, category, specifies the category of the event to be sent. Here, the value root.InsightCategory.category is specified. This value is specified where CoffeeButton.qml is instantiated.
Let's open SideBarForm.ui.qml. Here, four instances of CoffeeButton.qml have been created for each coffee type.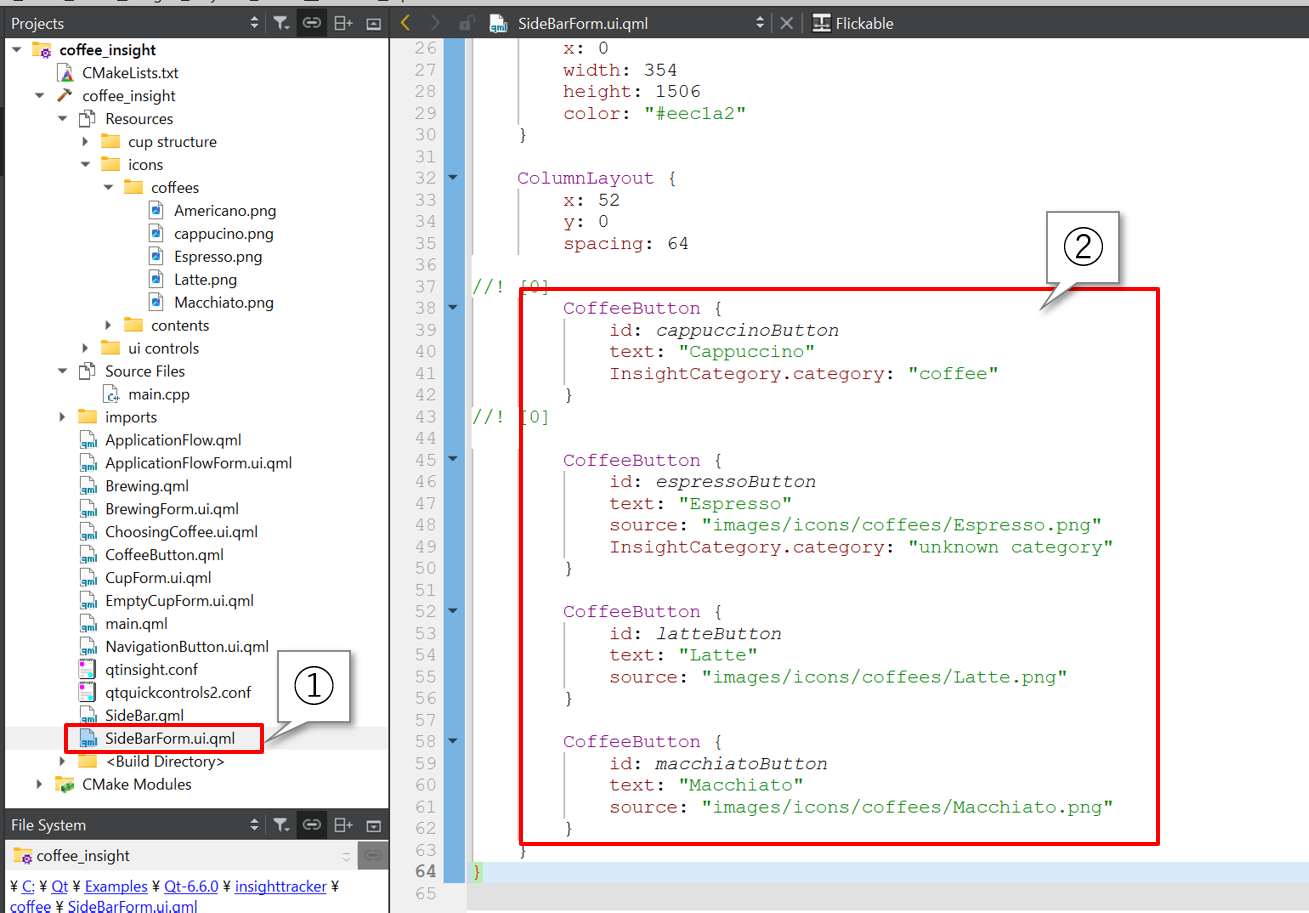
For example, looking at the first instance of CoffeeButton, InsightCagetory.category is set to "coffee" in line 41. This means that "coffee" will be sent as the second argument of InsightTracker.sendClickEvent() when the onClicked event of the MouseArea of this instance is called. Note that the category of this second argument can be a string, so it is not necessary to specify InsightCategory.category as in this case. - mouseX, mouseY
The fourth and fifth arguments send the coordinates of the clicked mouse. Here, the values of mouseX and mouseY, which are properties of MouseArea, are referenced and sent.
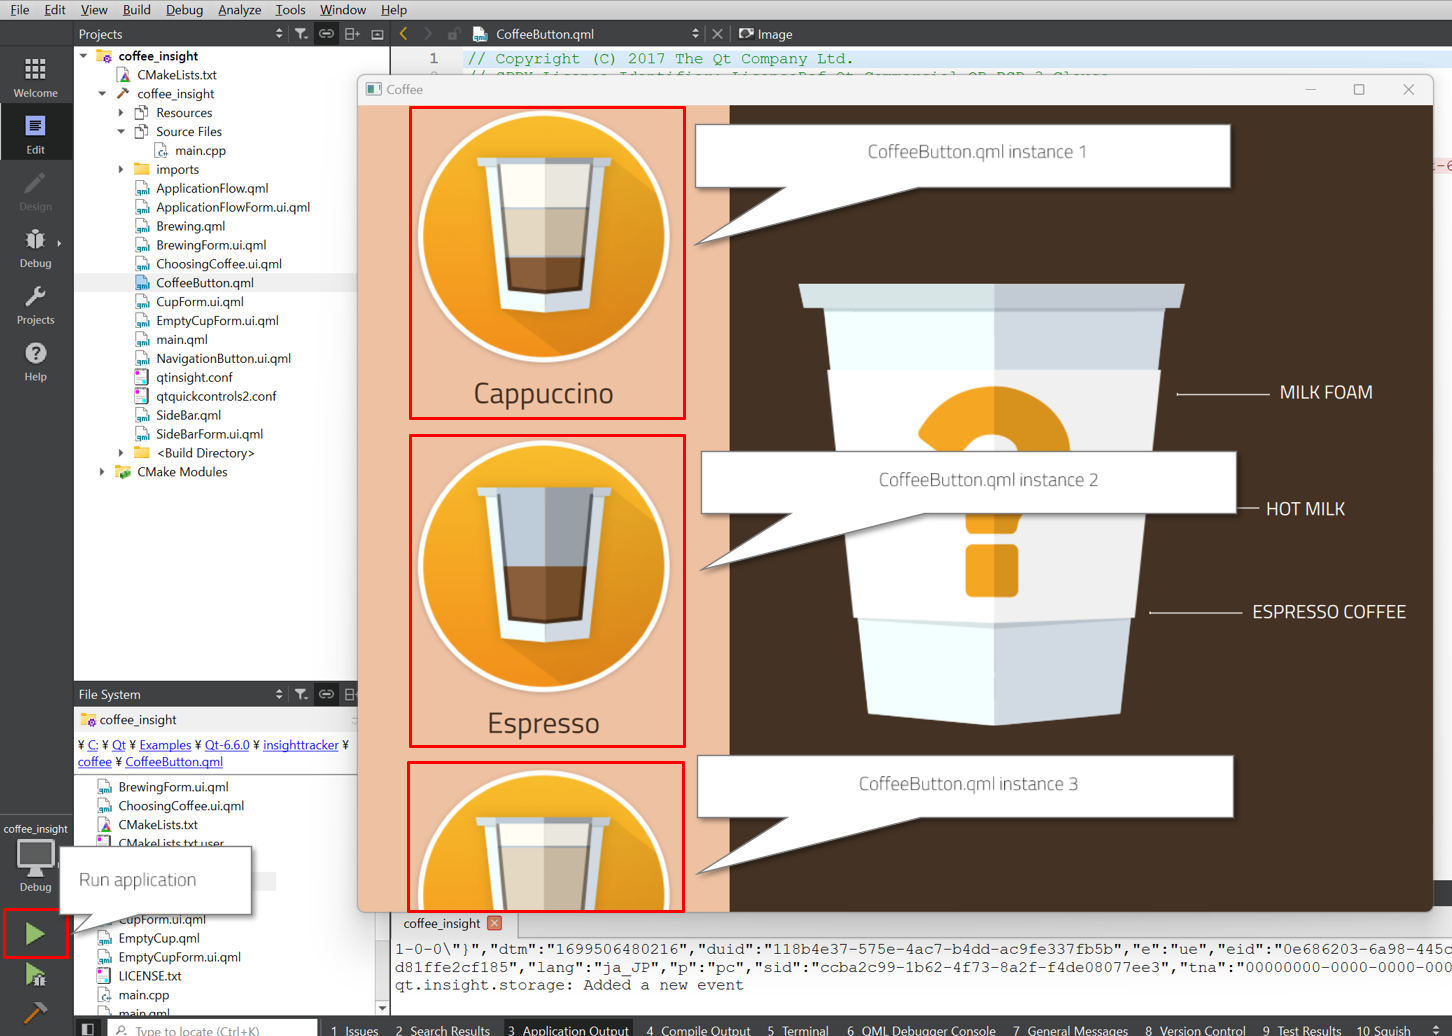
Let's check if the values are actually being sent to the cloud by launching the application. Once you set the token in the qtinsight.conf file to the one generated for your organization, you can view the sent data in the Qt Insight web console. To begin, click the green play button at the bottom left to build and run the application.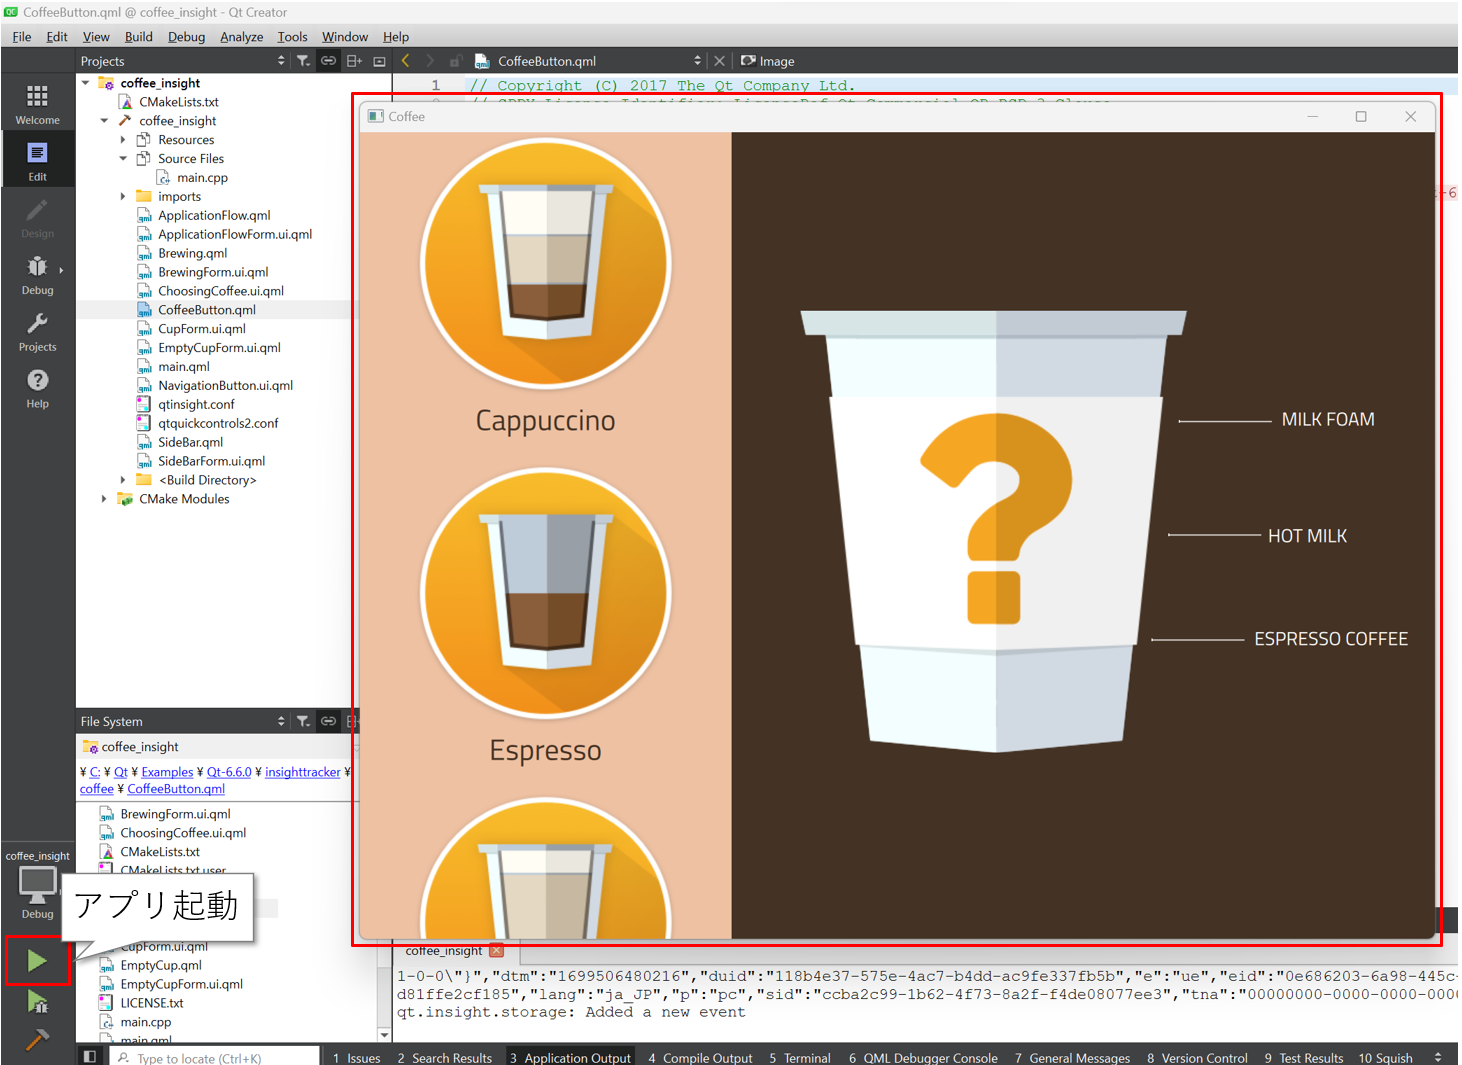
In this application, the Application Output pane displays debug outputs from the application, including logs from the Qt Insight Tracker API.
Try clicking on the coffee button on the left side of the coffee machine app. The event occurrence should be displayed in the Application Output.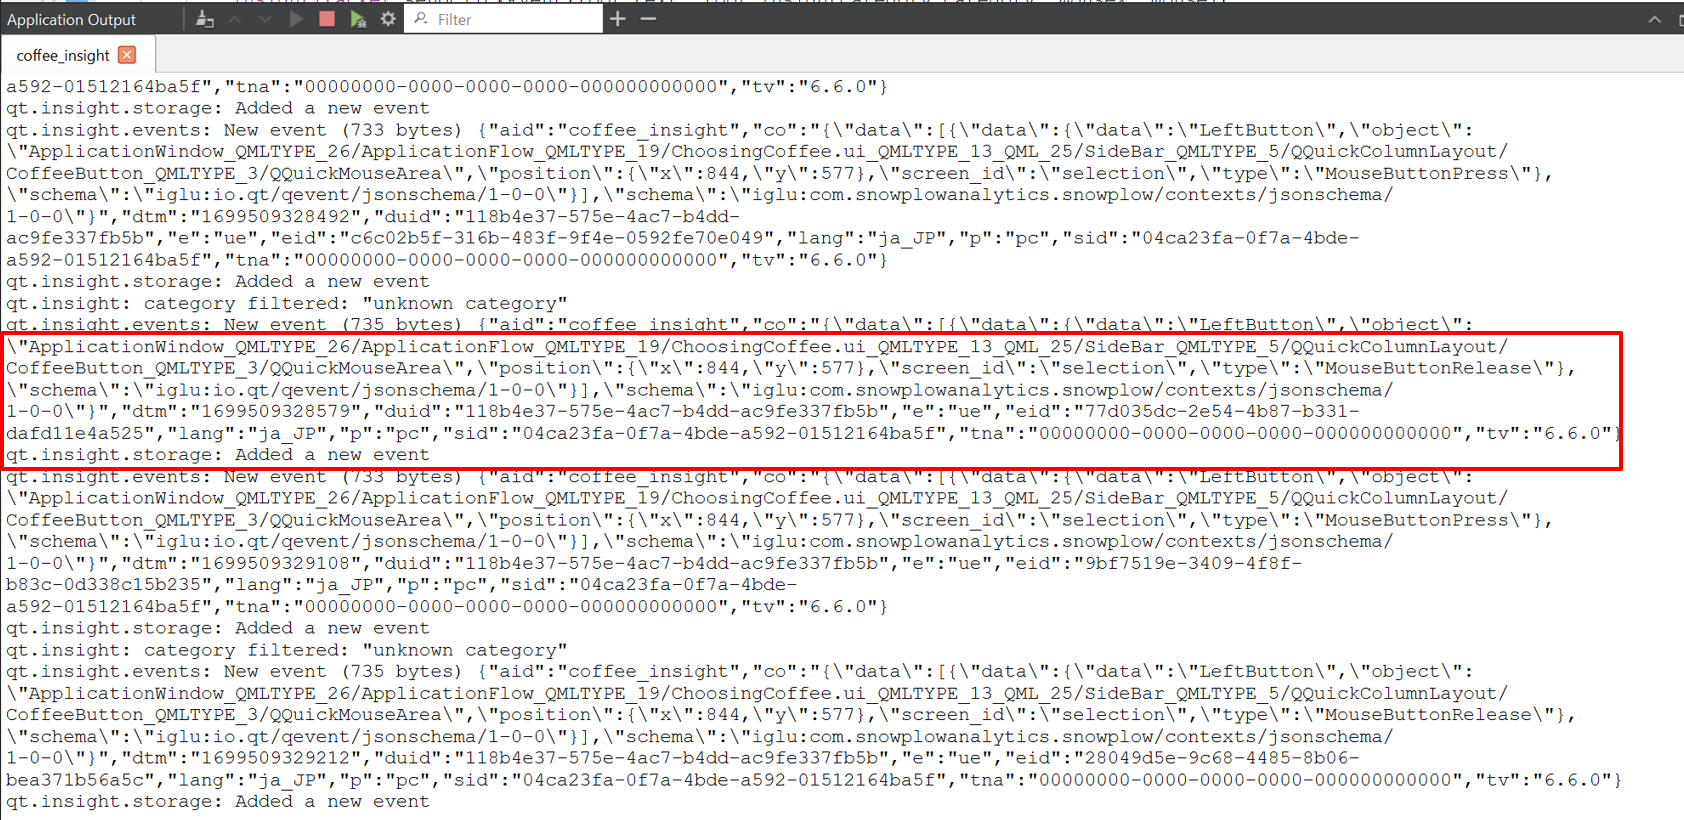
At this point, events are stored in the SQLite database and sent to the cloud at intervals specified in qtinsight.conf sync settings. During transmission, logs are also output to the Application Output for monitoring.
Sending screen transition events (InsightTracker.sendScreenView)
Next, let's explore the API for recording screen transition events.
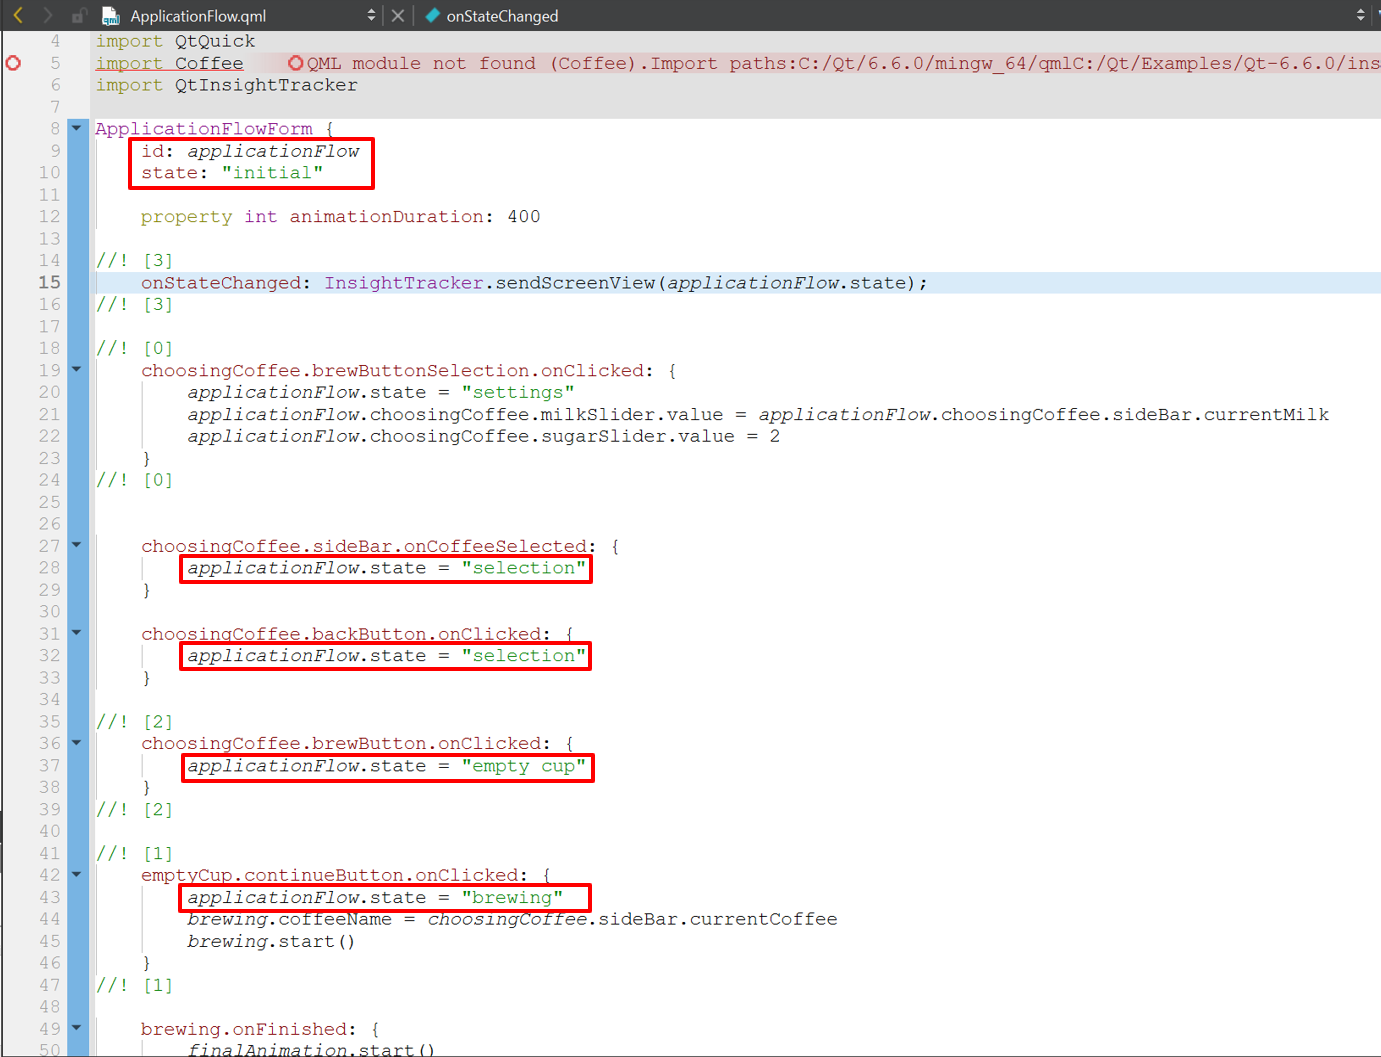
Open ApplicationFlow.qml. You will find a line calling InsightTracker.sendScreenView at line 15.
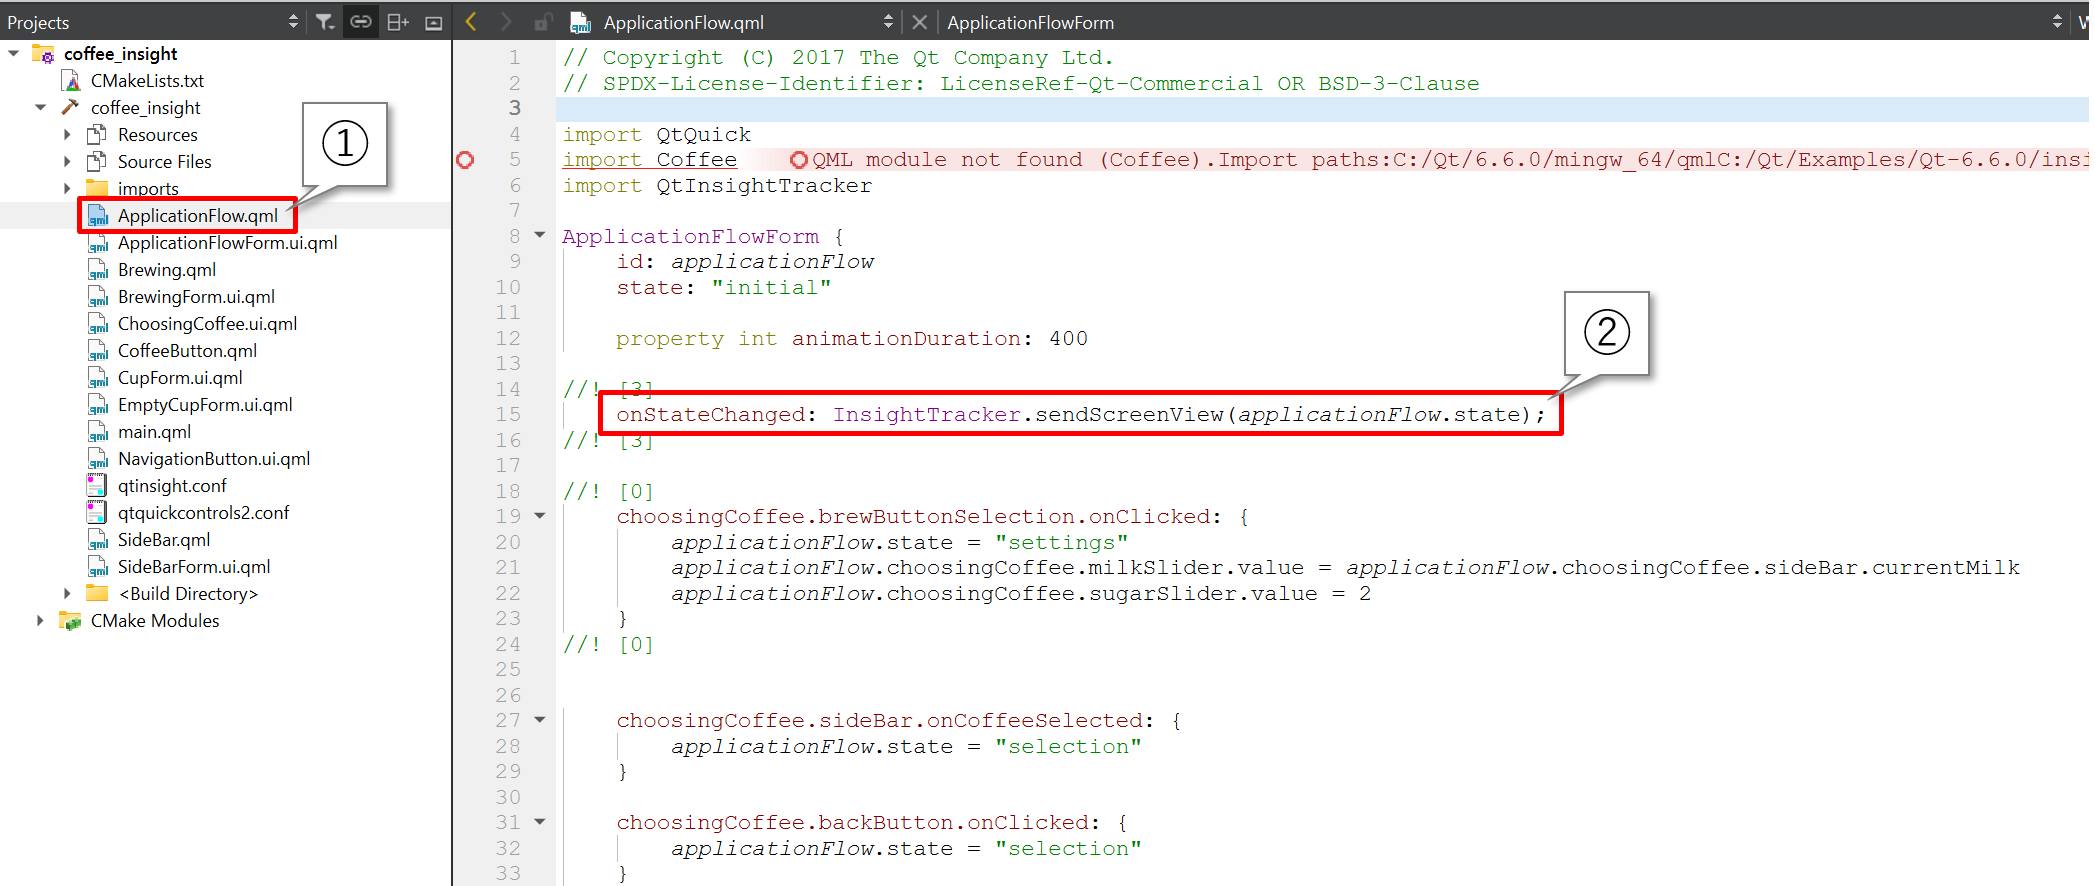
sendScreenView(string name)
The sendScreenView function is typically called when a screen transition occurs. The name parameter specifies the name of the screen. In this code, we specify applicationFlow.state.
applicationFlow refers to the ID value of the QML element ApplicationFlowForm on line 8, and state is one of the properties of ApplicationFlowForm. Each time the screen changes events at lines 28, 32, 37, and 43 set the name of the screen. Additionally, the onStateChanged signal handler at line 15 is executed every time the state property changes, triggering the call to InsightTracker.sendScreenView. As a result, events are sent to the cloud every time the screen transitions occur.
Session initialization (startNewSession)
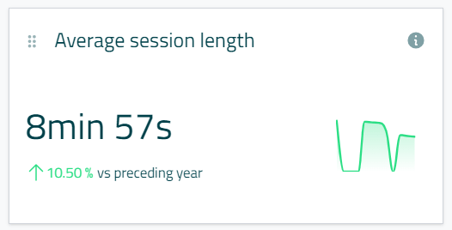
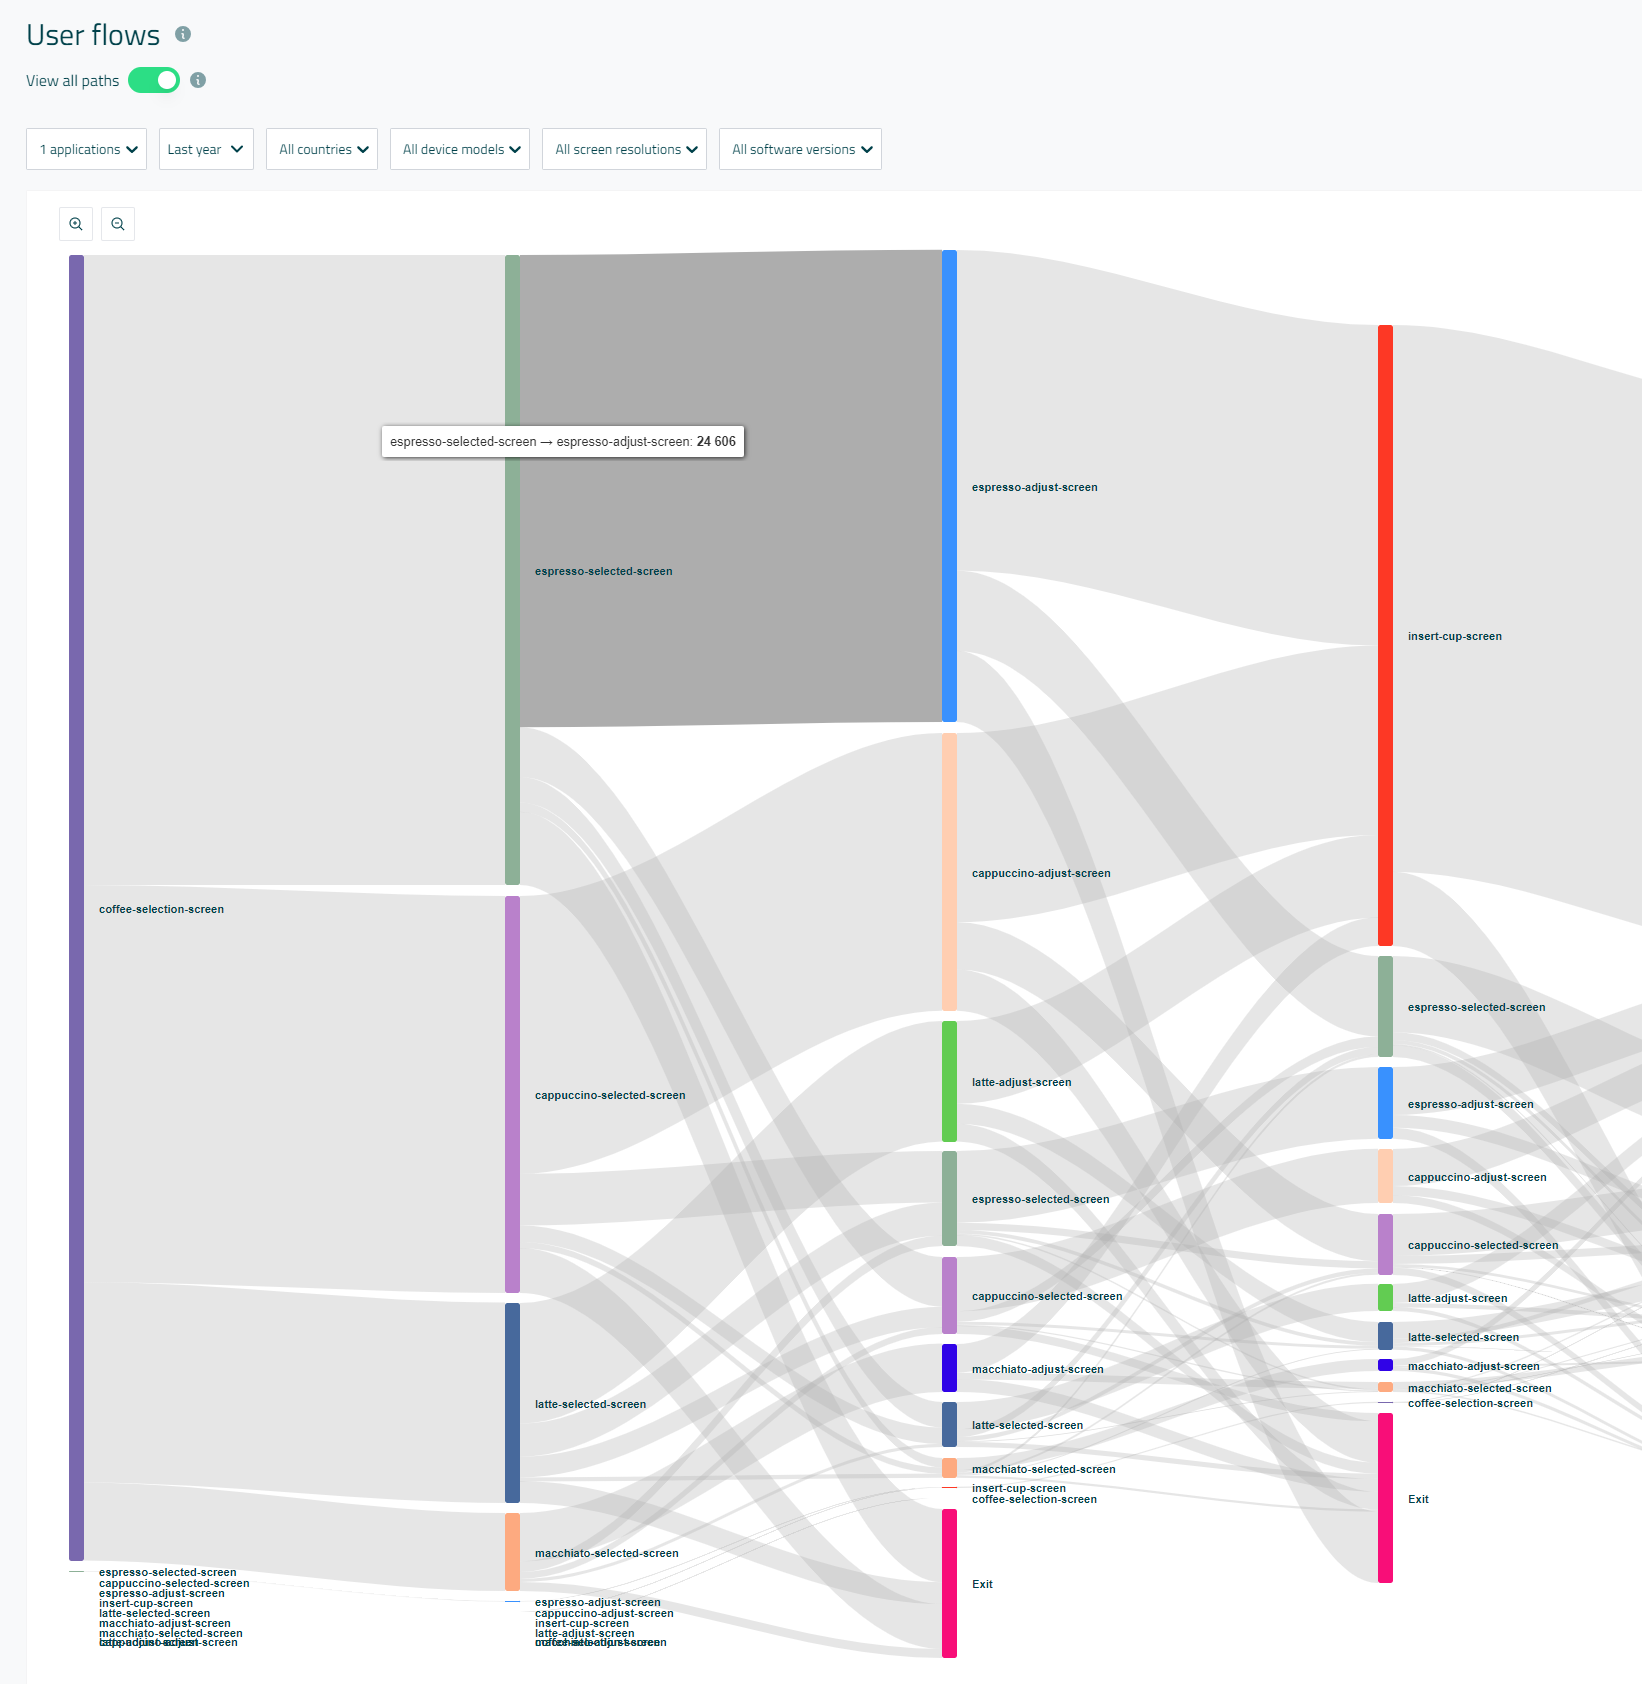
Qt Insight Tracker has an API called startNewSession(). This API can be used to reset a session. Sessions are used for metrics like average session length and to break up a series of navigation in user flows.
In the CoffeeMachine application, it is used in line 87 of ApplicationFlow.qml.
Here, InsightTracker.startNewSession() is executed as the last action of the SequentialAnimation on line 53.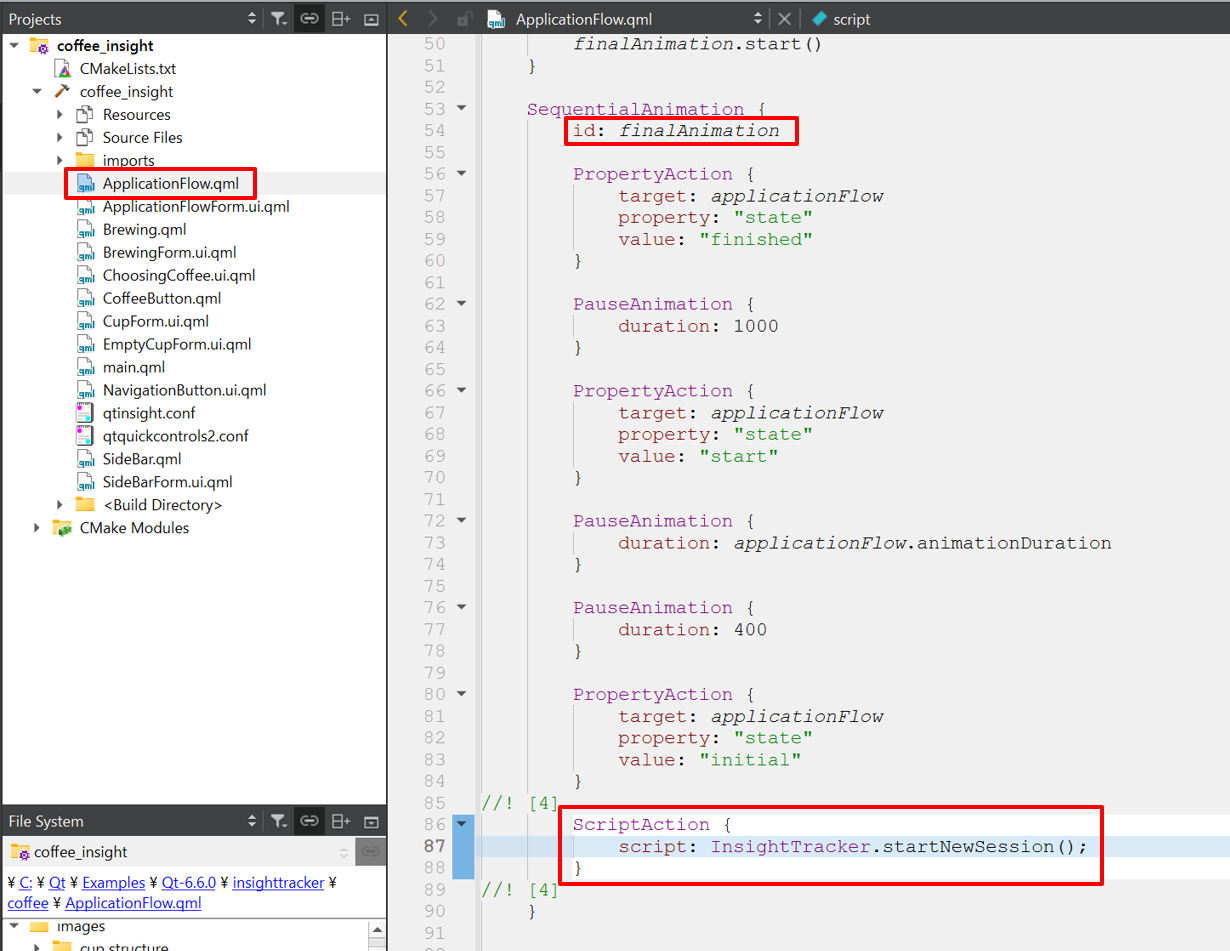
Since this finalAnimation is supposed to be executed after the user selects a coffee in the CoffeeMachine application and the coffee is brewed, the application separates "until the user selects a coffee" as a single session This means that the application contains only one single session.
Try using the application
Finally, let's actually use this application. If you have not yet changed the token in qtinsight.conf, follow the steps described previously in this article.
Furthermore, since we want to see the results immediately in the Qt Insight Web Console, let's set the sync interval to 1 this time so that events are sent to the cloud every second.
Now let's launch the application by clicking on the green play button in the lower left corner of Qt Creator. After a few moments of actual operation, the data should be visible in the Qt Insight Web Console!
Using Qt Insight on an offline device
There are some applications, especially embedded applications, that are not always connected to the Internet. When using Qt Insight on such devices, you can utilize the insightuploader.exe, which is installed in the <Qt installation folder>/<Qt version>/<platform>/bin directory after installing the Qt Insight Tracker module via the Maintenance Tool.
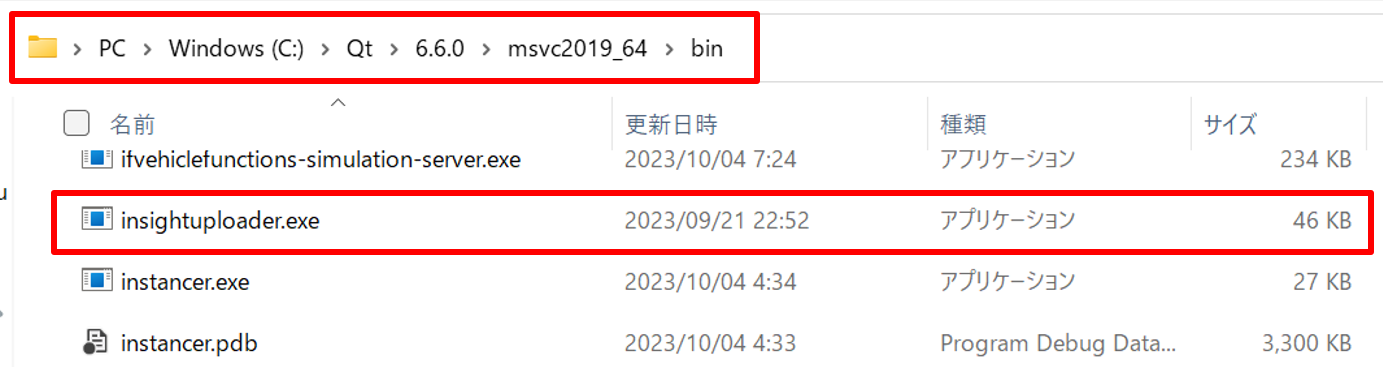
By passing the .db file containing event data saved by the application with Qt Insight Tracker to the insightuploader.exe command-line tool, data stored in this .db file on offline devices can also be sent to the cloud. Below, we will explain this process step by step.
Set the location of the .db file
The location of the .db file can be checked by following these steps.
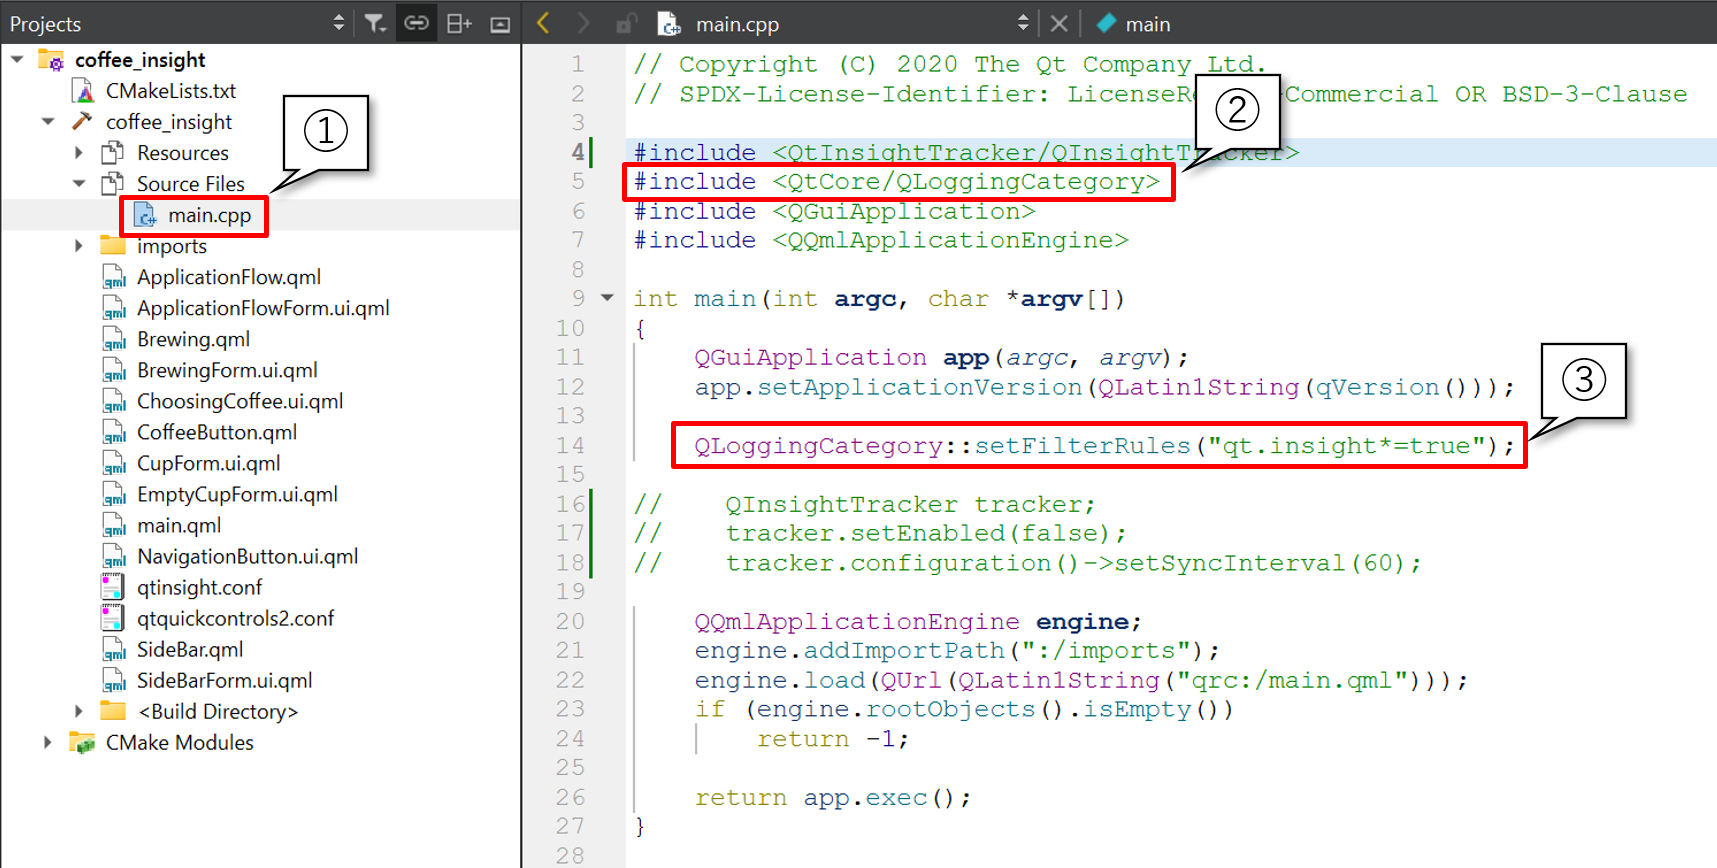
First, open the main.cpp file of the Coffee Machine sample app. You will find a command on line 14, QLoggingCategory::setFilterRules("qt.singht*=true");.
By adding the line #include <QtCore/QLoggingCategory>, you can use this function, which will output debug messages related to Qt Insight to the Application Output in Qt Creator.
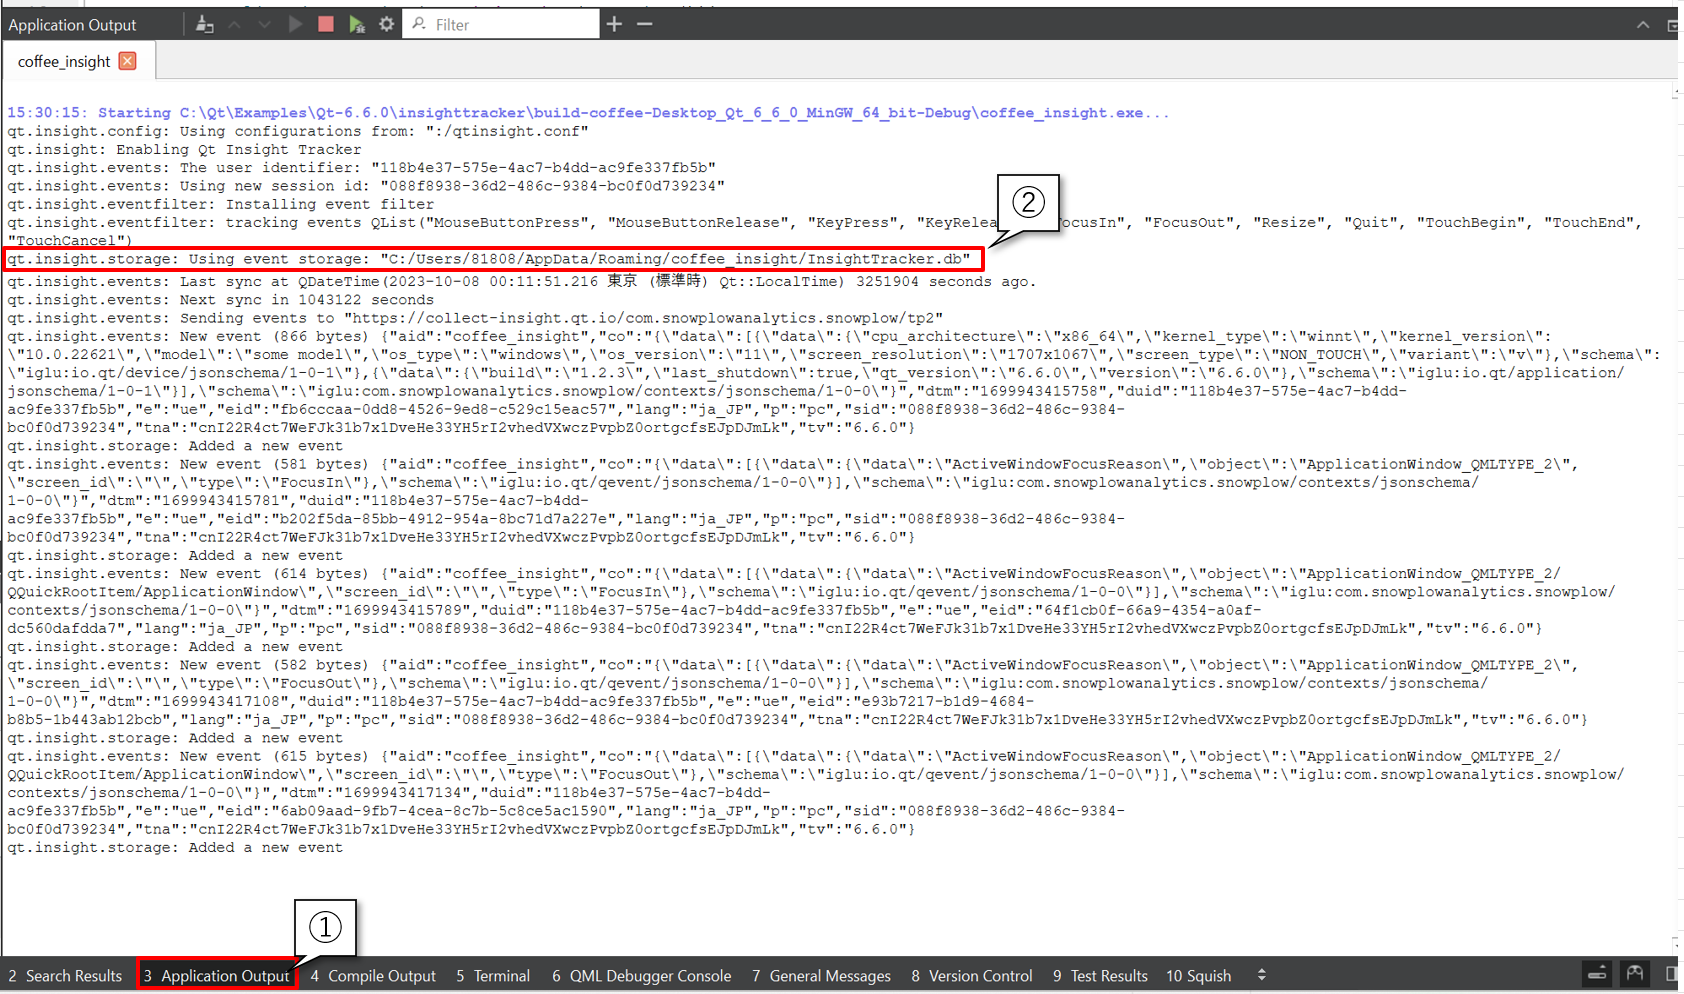
When you launch the CoffeeMachine app again in this state, the Application Output will display the following information. From this, it can be seen that the events of the CoffeeMachine app are saved in C:/Users/81808/AppData/Roaming/coffee_insight/InsightTracker.db. The same output is generated for embedded applications, so it is necessary to retrieve the InsightTracker.db file containing the events from the device and transfer it to the PC.
Now, let's proceed with uploading the event data from the InsightTracker.db file to the cloud using insightuploader.exe.
Simply provide the path to the InsightTracker.db file as an argument to the program, also specifying the value of server from qtinsight.conf in the --server parameter, to upload the data to the cloud.

Have the events been successfully uploaded? It may take some time, but the uploaded events can be checked in the event log.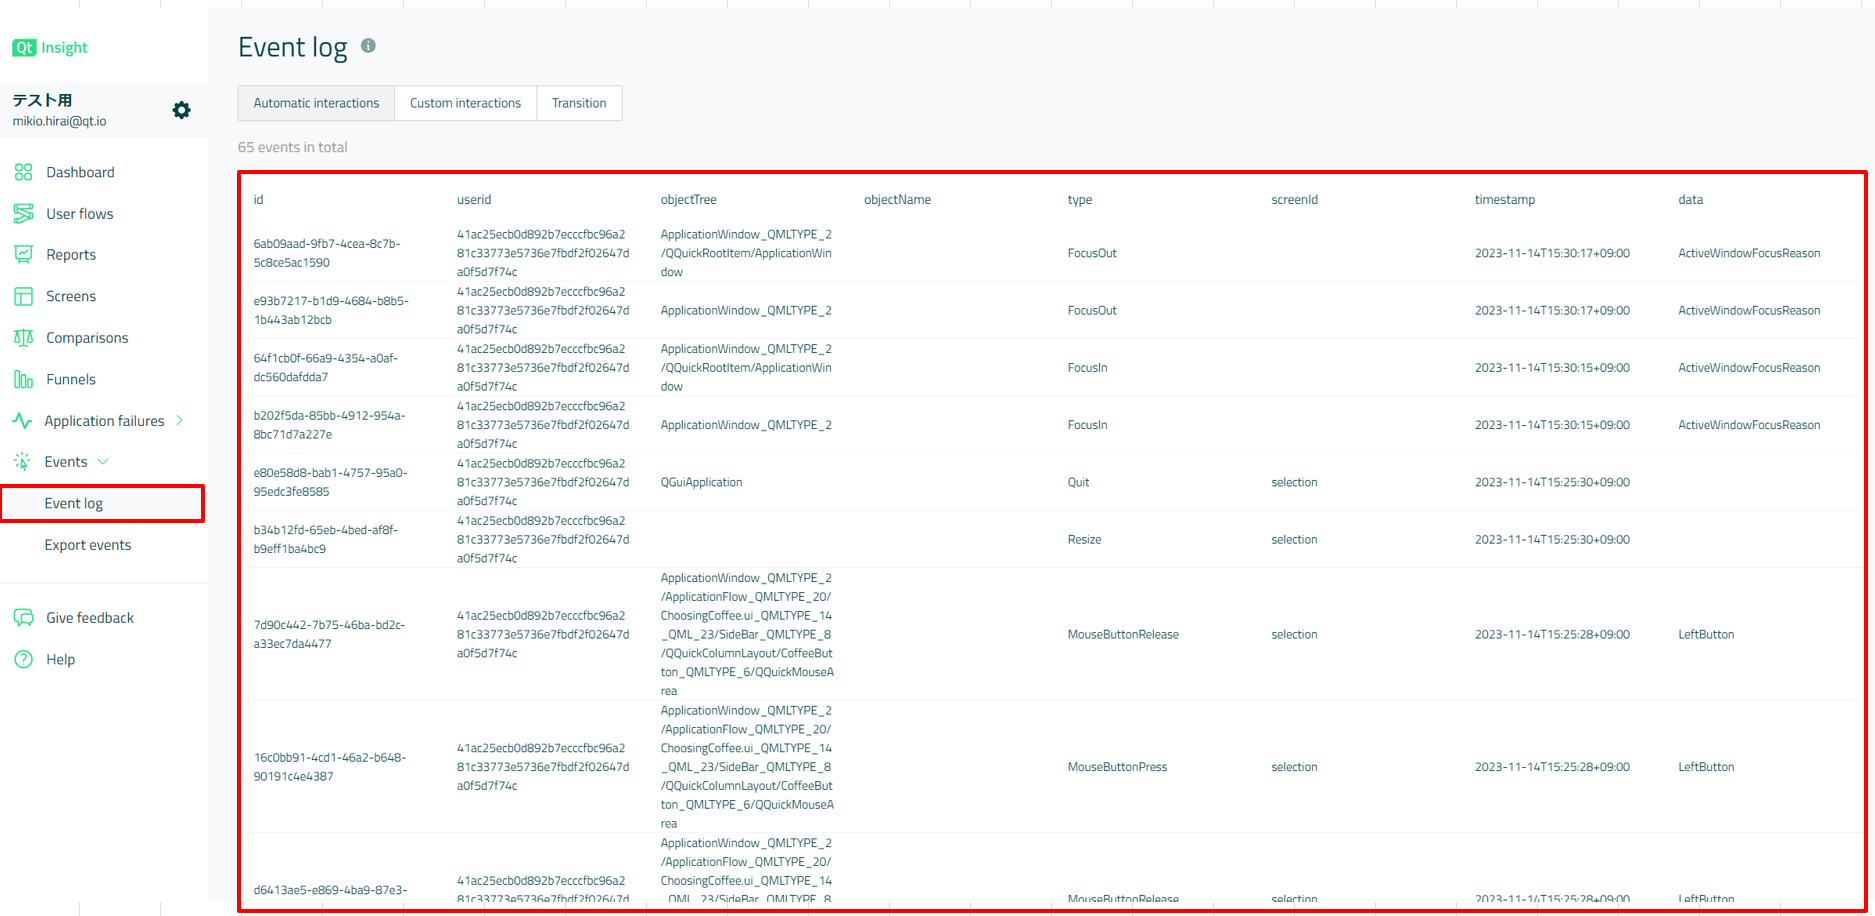
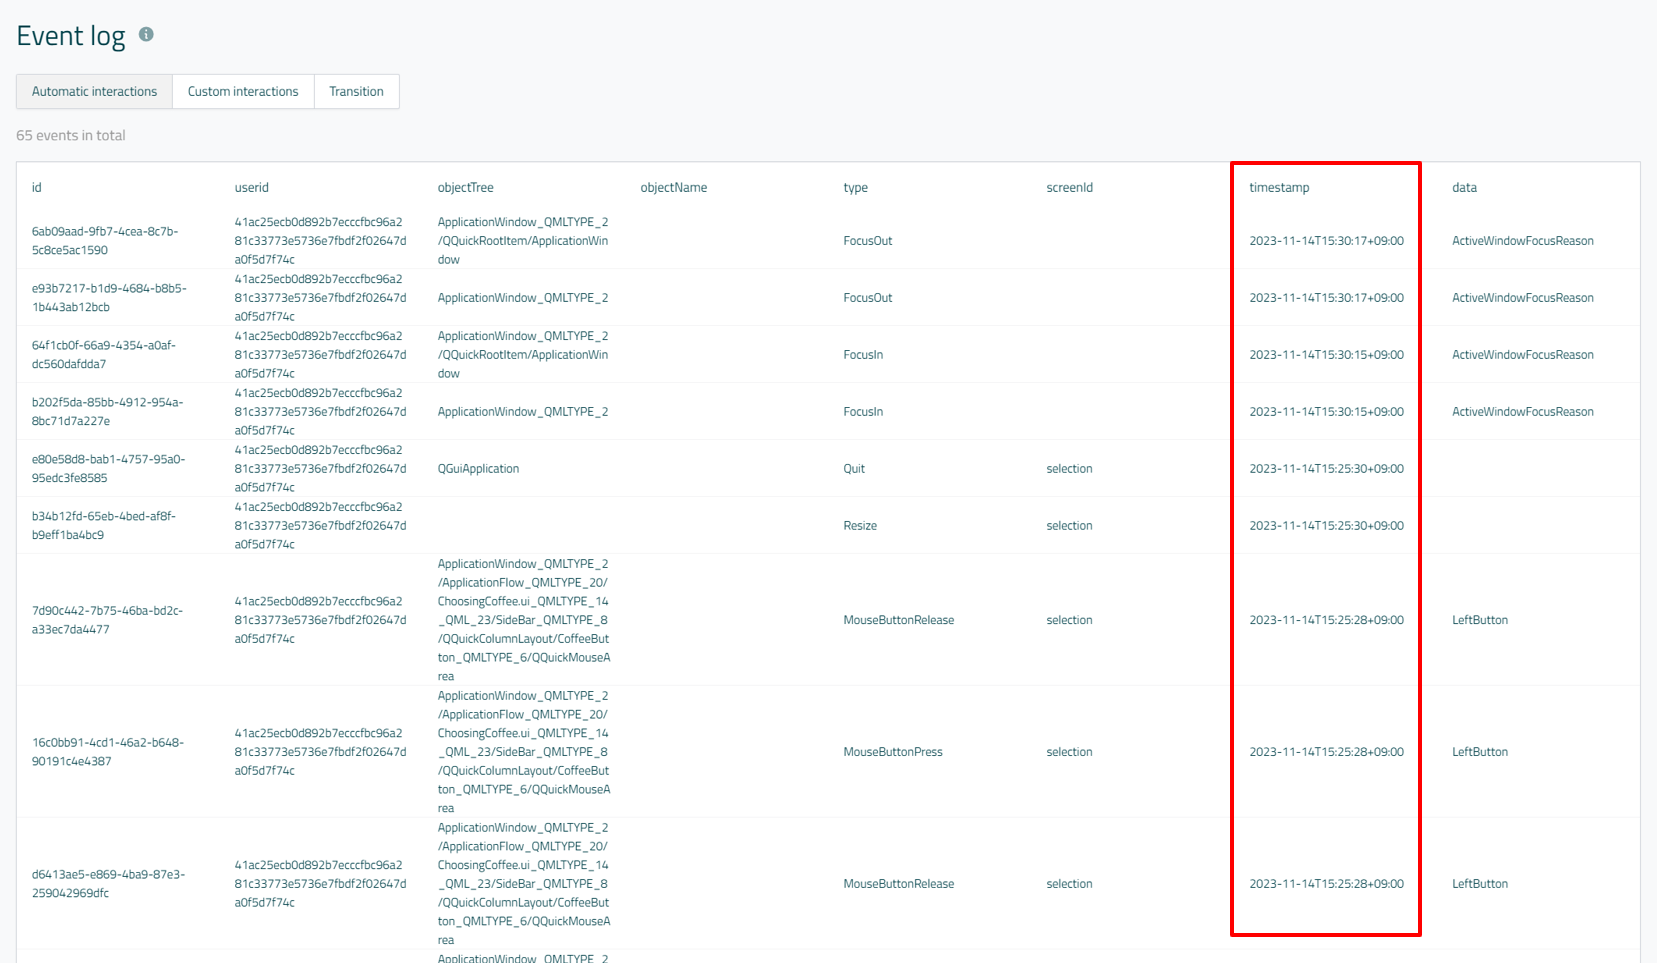
When checking the timestamp, it is evident that the events reflect the actual occurrence time rather than the time when they were uploaded using insightuploader.exe.
qtinsight.conf setting
If the device is not connected to the network, there is no need to periodically send events to the cloud. Instead, events will be stored in the InsightTracker.db file. To specify that events do not need to be sent, it is necessary to make the setting in the qtinsight.conf file as follows.
For this purpose, configure the setting to not specify anything for the interval. Alternatively, explicitly specifying 0 will have the same effect.
In the storage_size parameter, describe the maximum number of records to be stored in InsightTracker.db. For example, if you specify 1000 here, only the latest 1000 events will be kept in the database, preventing InsightTracker.db from expanding indefinitely. Setting it to 0 means there is no limit to the number of events stored, ensuring that all events are saved.
Automotive HVAC demo with Qt Insight
Finally, let's wrap up this article by introducing a more advanced demo that incorporates the Qt Insight Tracker. The demo we will be showcasing is the Automotive HVAC demo implemented in Qt with the Qt Insight Tracker API integrated.
Steps
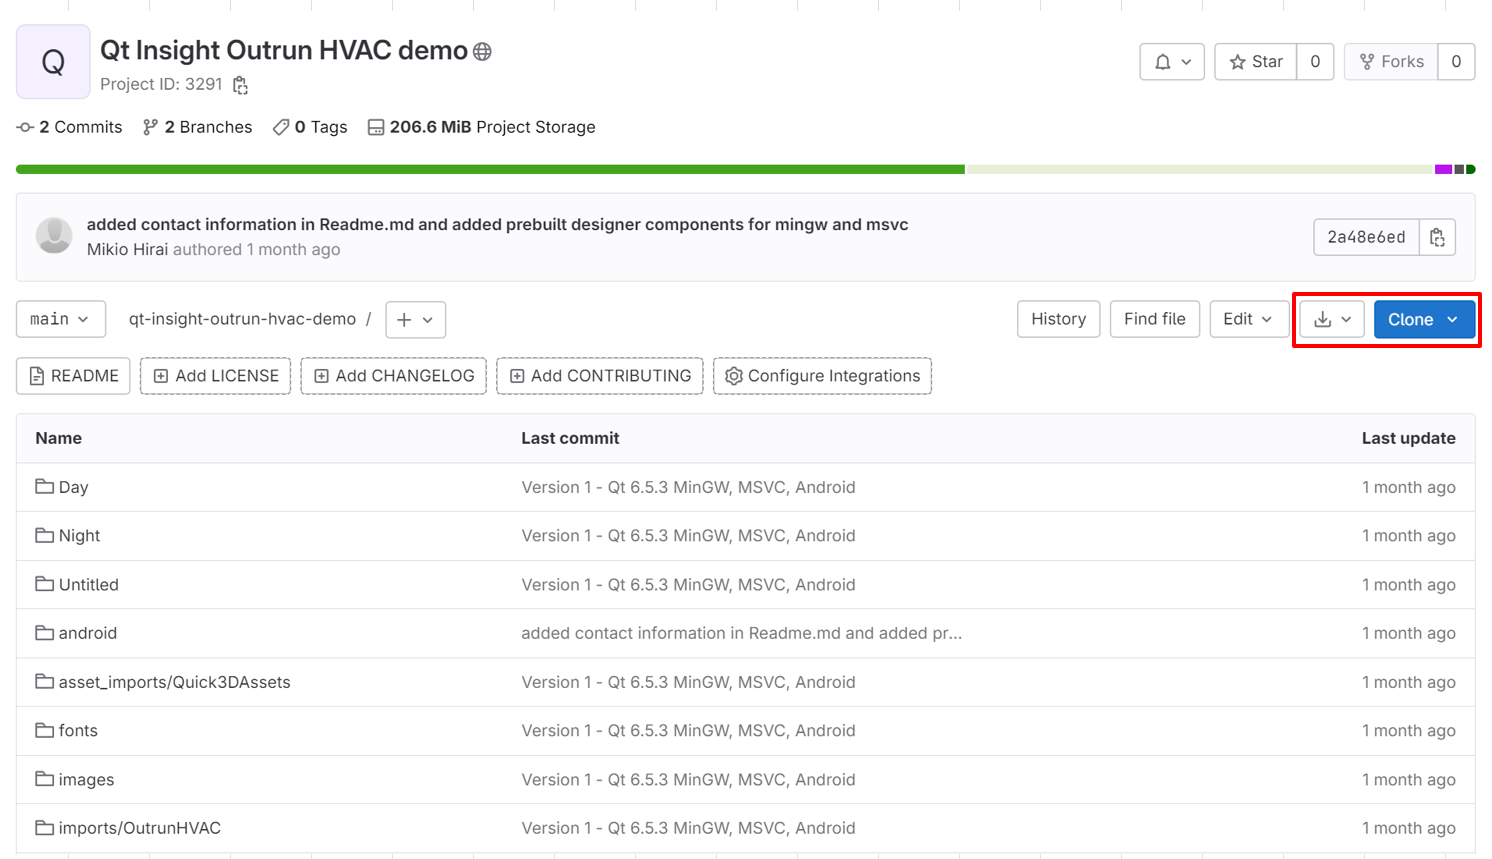
First, let's get hold of the project. You can access the GitLab page from the link below. Use the branch "English_version".
https://git.qt.io/se_japan_public/qt-insight/qt-insight-outrun-hvac-demo
If you have Git installed, you can obtain the compressed project folder either by clicking on the "Clone" button in blue, or for those who do not have Git, by clicking on the download button located next to it.
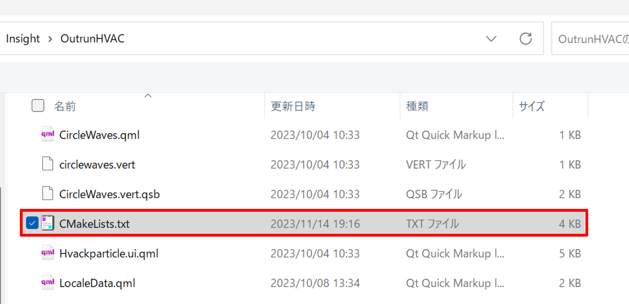
Once you have downloaded the project, open the CMakeLists.txt file located inside it with Qt Creator.
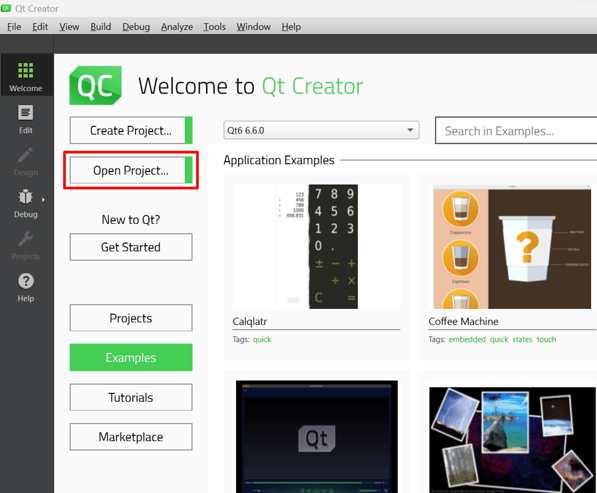
Select the file after clicking "Open Project".
Select "Desktop Qt 6.5.3 MinGW 64-bit" as the Qt kit.
Open qtinsightconf/MinGW/qtinsight.conf, and specify your Qt Insight Web Console token on the line 3 under "token".
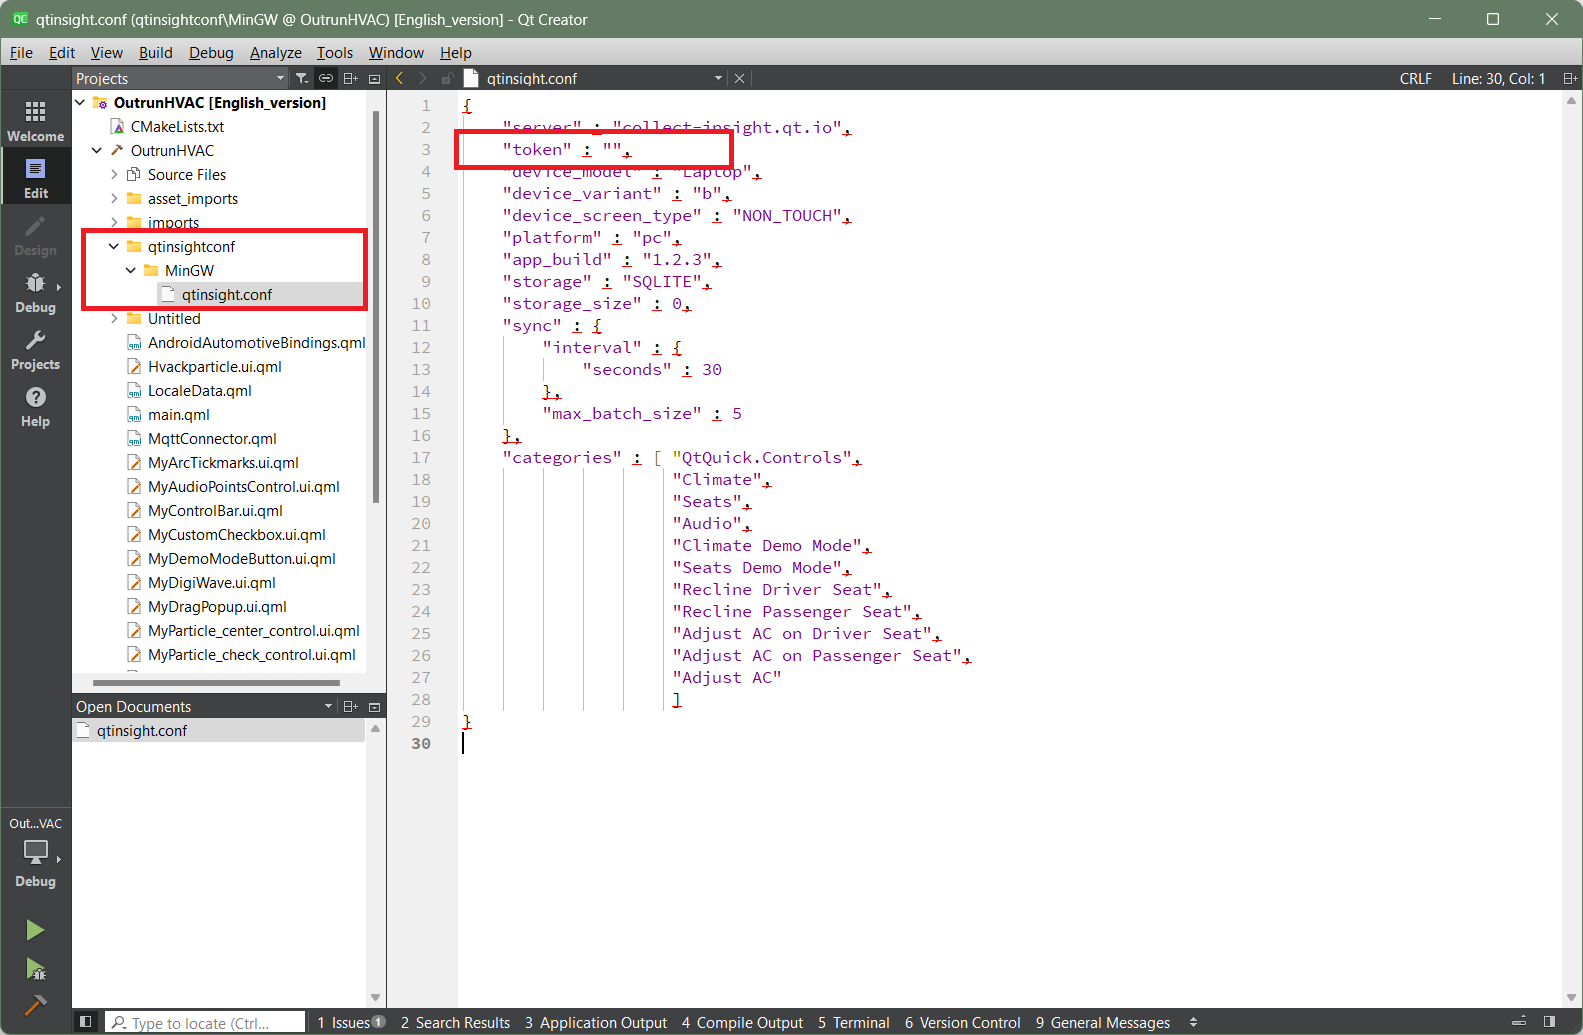
Once you have completed these steps, go ahead and run the application! Your actions will be sent to the cloud every 30 seconds, allowing you to view the data in the Qt Insight Web Console.
Summary
So how did it go? This article may be quite lengthy, but we hope it has helped deepen your understanding of how to utilize Qt Insight.
UI/UX is a factor that contributes to a product's competitive advantage and is a key differentiator. We would be very happy if Qt Insight can help you understand what users really want and create the best GUI possible!
Articles in this series
- Qt Insight Basics Part 1: Visualizing User Behavior for Optimal Product Design
- Qt Insight Basics Part 2: Getting Started 1 - Free Trial Registration
- Qt Insight Basics Part 3: Getting Started 2 - Analyzing User Flows
- Qt Insight Basics Part 4: Getting Started 3 - Funnel Analysis and Crash Analysis
- Qt Insight Basics Part 5: A/B Testing in Embedded Apps - User Behavior Analysis
- Qt Insight Basics Part 6: Sending Data to Qt Insight