Ho-ho-ho and happy holidays everyone! I noticed that I have done only a single blog post during this year, so what would be a better way to end the 2023 than a new post!
One thing that I have been asked more than once this year by designers and other Qt users is how to achieve UI with blurred panels? Besides being a nice effect, this has also usability aspect for allowing content of the panel to be readable over any background. So I'll explain how to do it easily using Qt Quick MultiEffect and then I can also next time just refer the questioner to check this post.
Traditionally at this point, we check a video of what we want to achieve. Like this:
Design-oriented persons sometimes first try to implement this by adding a semi-transparent panel (say QML Rectangle) and then applying a blur effect to this panel. This is however wrong, as blurring the rectangle doesn't actually do anything. You have to think of this in layers: we don't blur the panel but the content behind it. So either you take part of the background and blur that (like in our simple case) or you blur a bigger area and mask the blurred item (like in our advanced case).
Simple case
Let's start with a simple UI with 2 main parts: content and a blurred panel/toolbar. (Well it isn't that simple as I got carried away blasting Scooter & Armin van Buuren from headphones while implementing it...😆)
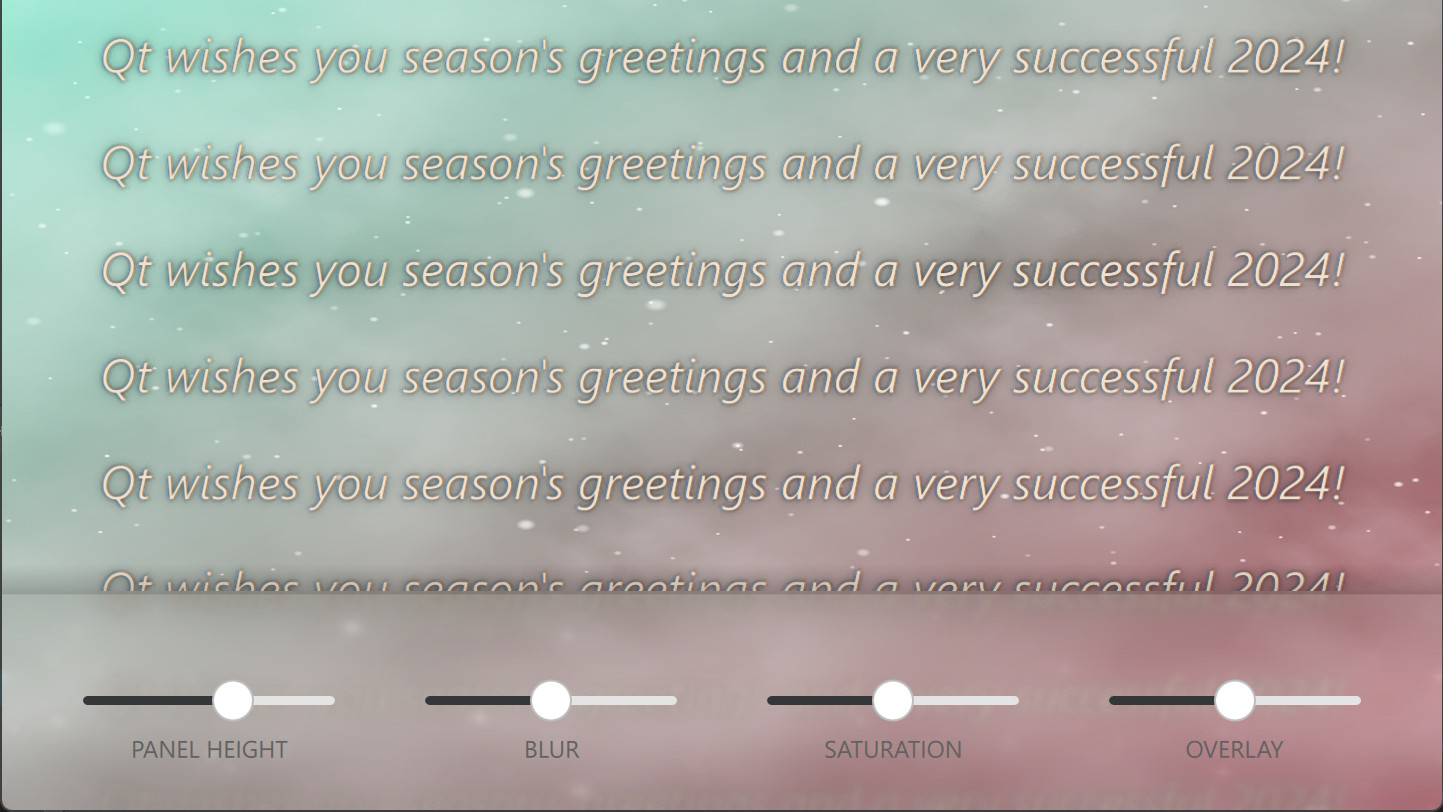
First, we have a snowy background effect to demonstrate dynamic blurring. This was created using QQEM and can be modified by opening SnowyEffect.qep in case you are interested. From this, we take a offscreen texture as a source for the blur.
ShaderEffectSource {
    id: effectSource
    anchors.fill: parent
    sourceItem: backgroundItem
    sourceRect: Qt.rect(0, backgroundItem.height - rootItem.panelHeight, backgroundItem.width, rootItem.panelHeight)
    visible: false
}
That sourceRect is important so that we blur just a part of the background. Also, fewer pixels to blur means more performance, which is important especially when targeting mobile/embedded hardware.
After this we do the blurring easily using MultiEffect
MultiEffect {
    anchors.fill: effectSource
    source: effectSource
    autoPaddingEnabled: false
    blurEnabled: true
    blurMax: 64
    blur: blurSlider.value
    saturation: saturationSlider.value
}
Autopadding is disabled, so that blurred item size doesn't grow. We could easily add also other effects here like colorization or contrast, but let's settle for blur and saturation this time. Those are adjusted using sliders on the toolbar.
Then we add overlay image on top of the toolbar, which gives us nice gradient and shadow.
Image {
    anchors.fill: parent
    // Extend up with the shadow amount
    anchors.topMargin: - rootItem.panelHeight / 8
    source: "toolbar_background.png"
    opacity: overlayOpacitySlider.value
}
The image is placed higher than the blurred toolbar by the shadow amount, and opacity is adjusted with a toolbar slider. That's it! Now we have a nice blurred panel at the bottom of our UI.
Advanced case
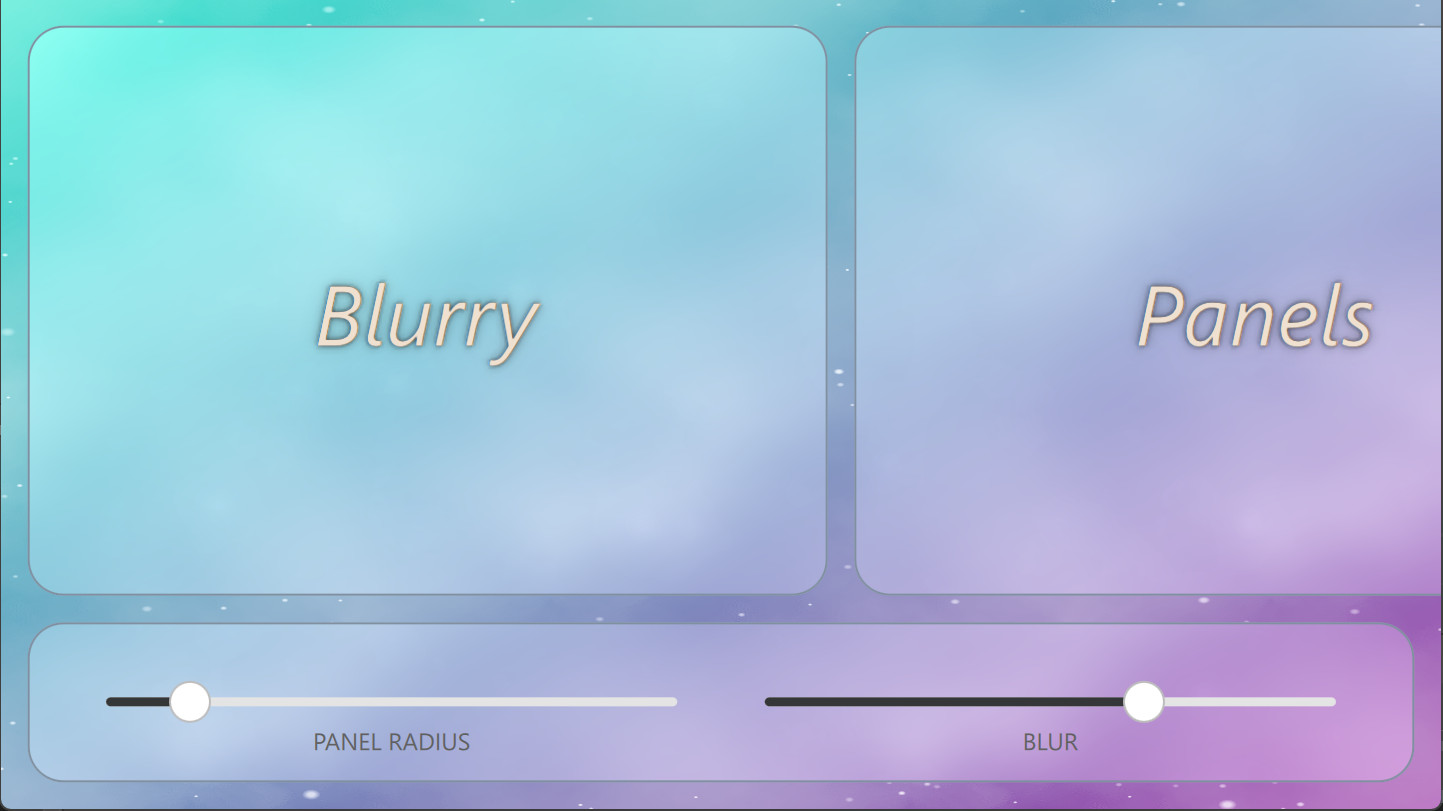
Sometimes the panels you want to blur need to be non-rectangular and animate. In this case, you can combine the blur and mask effects with the MultiEffect.
We start this by defining a separate masking item:
Item {
    id: maskItem
    anchors.fill: panelArea
    layer.enabled: true
    layer.smooth: true
    visible: false
    component PanelMask : Rectangle {
        required property Item item
        property real listPosX: flickable.contentX
        x: item.x - listPosX
        y: item.y
        width: item.width
        height: item.height
        radius: item.radius
    }
    PanelMask {
        item: toolbar
        listPosX: 0
    }
    PanelMask {
        item: panel1
    }
    PanelMask {
        item: panel2
    }
    PanelMask {
        item: panel3
    }
}
This masking item contains panels that follow the position, size and radius of the actual panels. The main reason to use a separate masking item instead of using panels view (panelArea) directly as a mask, is that this way the blur effect does not need to update whenever content on the panel's updates (say the text is scrolled or slider is moved). The mask source is only updated when the properties that affect the masking (size, position, radius) change.
MultiEffect is similar than in the previous simple example:
MultiEffect {
    anchors.fill: parent
    source: backgroundItem
    autoPaddingEnabled: false
    maskEnabled: true
    maskSource: maskItem
    maskThresholdMin: 0.5
    maskSpreadAtMin: 1.0
    blurEnabled: true
    blurMax: 80
    blur: blurSlider.value
    saturation: -0.1
    brightness: 0.1
}
The main difference is that this time we also use the masking feature. The way MultiEffect works is that masking is applied after the blurring. Those threshold and spread properties are used to take into account the mask item opacity (similar to GraphicalEffects OpacityMask) so we avoid aliasing.
Then we create our actual custom panel component:
component Panel: Rectangle {
    id: component
    property string text
    width: 600 * px
    height: rootItem.height - toolbar.height - 3 * marg
    y: marg
    radius: panelRadiusSlider.value
    color: "transparent"
    border.width: 1
    border.color: "#8090a0"
    Text {
        ...
    }
}
And use these panels in the toolbar and inside the Flickable item:
Flickable {
    id: flickable
    anchors.fill: parent
    anchors.bottomMargin: toolbar.height + 2 * marg
    contentWidth: panelRow.width
    leftMargin: marg
    rightMargin: marg
    Row {
        id: panelRow
        spacing: marg
        Panel {
            id: panel1
            text: "Blurry"
        }
        Panel {
            id: panel2
            text: "Panels"
        }
        Panel {
            id: panel3
            text: "Rock!"
        }
    }
}
This ends our advanced example. Feel free to look for more details from the example source codes.
Conclusion
The main conclusion is that it is easy to implement blurred panels using Qt Quick and MultiEffect. As long as you are mindful of the pixel amount and the frequency of the blurring updates, this effect can also be performant on modern GPUs.
You can find source codes of these examples at: https://git.qt.io/kagronho/blurredpanels
As the year comes to a close, we want to express our gratitude for your continued support. Happy holidays and a prosperous New Year!