In Qt 6.5 Qt Quick 3D gains a new QML type: ExtendedSceneEnvironment. See the pre-release documentation at doc-snapshots here. What's more, the existing contents of the QtQuick3D.Effects module is now mostly deprecated, including all the pre-made post-processing effects in there, while recommending alternatives, such as ExtendedSceneEnvironment for true 3D post-processing, MultiEffect / Qt Quick Effect Maker for 2D oriented effects, or a custom 3D post-processing effect via the Effect type (which, to be clear, continues to available and supported and is part of the main QtQuick3D module).
What is going on here?
In short, these new types together improve both the 2D and 3D post-processing effect story in Qt Quick and Qt Quick 3D. In this post we are going to look at some of the underlying details and some simple examples, focusing mostly on 3D post-processing, but also touching the world of 2D Qt Quick scenes to a degree, in order to show why these different APIs together make sense and how they provide a more consistent, more sensible story for 2D and 3D effect creation.
Simple porting overview
First, let's try to visualize how the various components map onto each other, i.e. what are the recommended APIs and tools for new projects built with Qt 6.5 and newer. At the same time, do note that all the components shown are present and fully functional in Qt 6.5, nothing is removed at this point.

Strictly speaking this is a bit simplified, because as we will soon see, any of the 2D effect approaches are usable with a typical View3D item. This means that the QtQuick3D.Effects box could also link to the Effect Maker application, or even to ShaderEffect as well. Whereas if something that was previously only possible to implement via a custom Effect is now in Qt 6.5 provided by ExtendedSceneEnvironment, it may make sense to switch over to using the built-in feature instead, thus Effect on the left could link to ExtendedSceneEnvironment on the right as well.
Let's talk about 2D for a moment
MultiEffect is another new type in Qt 6.5. It provides the most commonly used shader-based 2D effects for Qt Quick, effectively providing a replacement for the most used subset of Qt Graphical Effects. Qt Graphical Effects continues to be available in the Qt5Compat module, but should be treated as a porting aid for existing applications. New projects are encouraged to use MultiEffect for 2D effects, and for effects that are not covered by it, the new Qt Quick Effect Maker tool. On top, ShaderEffect continues to be available for those who prefer working directly with vertex and fragment shaders.
Unlike the old Graphical Effects, MultiEffect can efficiently combine multiple effects without the performance penalty of having to render each effect in the chain one by one, each working on the output of the previous one, involving a full render pass of its own. In addition, it provides an API that is better suited for visual design tools such as Qt Design Studio. (because it allows to easily state what effects are wanted, which can be as simple as ticking some checkboxes in the designer tool, instead of having to create and manage chains of standalone effect items that each live as individual objects in the Qt Quick scene)
The new 2D-oriented effect enablers are going to be covered in other posts. Here we are going to focus on Qt Quick 3D and the effects that are performed on the 3D content in a View3D item.
However, before moving on, let's quickly look at a question that tends to pop up quite often:
Q: How does one get 2D effects, such as blur or opacity mask, applied to the 3D scene as rendered by a View3D?
A: A View3D in its most commonly used form, that is with the default renderMode of Offscreen, is no different from any other QQuickItem when it comes to ShaderEffect, Graphical Effects, or MultiEffect.
(technically it would be more accurate to say that a View3D with the default Offscreen render mode is no different from texture-based items that are texture providers, such as Image, ShaderEffectSource or an Item with layer.enabled: true on it, but that's besides the point here)
For example, to get a 3D scene rendered by a View3D blurred, the same approach can be used as with any other item in the Qt Quick scene: apply a (2D) blur effect, for example via MultiEffect, to either the View3D or an ancestor of it.
Now, doing a similar effect using the 3D post-processing facilities of the 3D renderer is possible via a custom 3D post-processing Effect or the now-deprecated Blur or GaussianBlur effects from the QtQuick3D.Effects module, but this is unnecessary in the vast majority of cases since performing a 2D blur on the output of the 3D renderer provides the same result.
The same is true for a number of the now-deprecated effects in QtQuick3D.Effects, such as Flip or Emboss: they are really just 2D-oriented effects that are better performed via Qt Quick's facilities, instead of reinventing them with the 3D post-processing system.
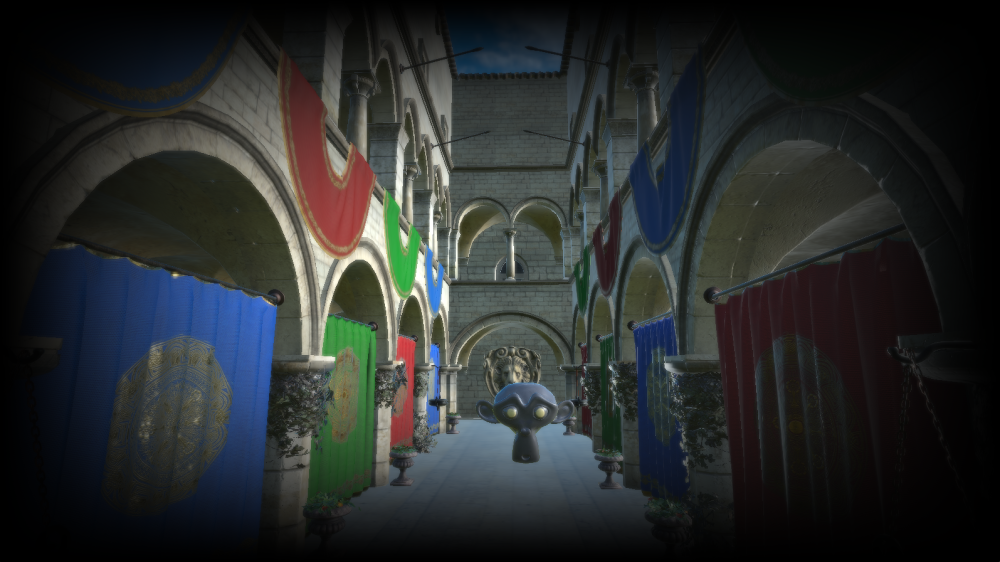
Let's see a short example. We will assume that the Sponza and Suzanne models are imported from the glTF 2.0 assets in the Khronos glTF Sample Models repository via the balsam tool (and so the generated Sponza.qml and Suzanne.qml components are available and instantiable). For simplicity, image based lighting is used.
import QtQuick
import QtQuick3D
import QtQuick3D.Helpers

Item {
    width: 1280
    height: 720

    View3D {
        id: v3d
        anchors.fill: parent
        environment: SceneEnvironment {
            backgroundMode: SceneEnvironment.SkyBox
            lightProbe: Texture { source: "00455_OpenfootageNET_field_low.hdr" }
        }

        Node {
            scale: Qt.vector3d(100, 100, 100)

            Sponza {
            }

            Suzanne {
                y: 1
                scale: Qt.vector3d(0.5, 0.5, 0.5)
                eulerRotation.y: -90
            }
        }

        PerspectiveCamera {
            id: camera
            y: 100
        }

        WasdController {
            controlledObject: camera
        }
    }
}
Running this with the qml tool gives us something like the following:

Now, what if we need to blur this, for example because we are implementing a background blur which becomes active when some UI elements are shown on top?
With Qt 6.5's MultiEffect this is easy, and no different from applying the blur to any other item in the 2D scene. First we add the import for QtQuick.Effects, where MultiEffect lives.
import QtQuick.Effects
Then the following is added to the root Item (after the View3D), inspired by the sample snippet in the MultiEffect documentation. As a bonus we make the blur toggleable with the Tab key.
    MultiEffect {
        id: effect
        source: v3d
        anchors.fill: v3d
        blurEnabled: true
        blurMax: 64
        blur: 1.0
        autoPaddingEnabled: false
    }

    focus: true
    Keys.onTabPressed: effect.blurEnabled = !effect.blurEnabled
This gives us:
It is all working as expected, which is splendid. Now let's move on to talk about 3D postprocessing with depth buffers, multiple passes, and the joys of tonemapping, i.e. things that Qt Quick does not typically deal with, or at least not in the same form.
Post-processing in the 3D world
Qt Quick 3D's new ExtendedSceneEnvironment provides an approach principally similar to MultiEffect for post-processing effects that are performed by the 3D renderer.
This includes effects such as:
-
glow and bloom,
-
depth of field,
-
lens flare,
-
vignette,
-
color grading via a lookup table,
-
color adjustments
-
and another antialiasing method (FXAA).
In addition, SceneEnvironment's existing tonemapping system is enhanced with a few new properties in ExtendedSceneEnvironment, giving more control over how the mapping of high dynamic range values to the 0-1 range is performed.
Qt 6.5 also introduces simple fog support via the new Fog type and SceneEnvironment's fog property. Technically, this type of fog is implemented within the materials (i.e. performed automatically, when enabled, by any PrincipledMaterial or CustomMaterial with shadingMode set to Shaded) and not done via post-processing, but from the API and a designer's perspective it falls into the same category.
The screen space ambient occlusion support already available via SceneEnvironment in previous Qt versions continues to be available as well.
Compared to the previous approach of listing instances of the pre-made Effect subtypes in the SceneEnvironment's effect list property, using ExtendedSceneEnvironment has the following benefits:
-
The enabled effects get combined efficiently, reducing the number of render passes involved, instead of processing the effect chain one-by-one.
-
Tonemapping is taken into account and handled correctly on every level in the post-processing stack. With the standalone post-processing effects built on top of Effect this was handled incorrectly in some cases.
-
The quality and the level of configurability for effects such as depth of field or glow/bloom is significantly better, because the implementation is quite different from the older effect shaders.
-
Lens flare!
To use ExtendedSceneEnvironment, import QtQuick3D.Helpers and add the word Extended before SceneEnvironment when creating the object that is going to be referenced by the View3D's environment property.
If we take the example application code from the previous section and replace the environment on the View3D to look like the following:
        environment: ExtendedSceneEnvironment {
            backgroundMode: SceneEnvironment.SkyBox
            lightProbe: Texture { source: "00455_OpenfootageNET_field_low.hdr" }

            tonemapMode: SceneEnvironment.TonemapModeFilmic
            sharpnessAmount: 0.4

            vignetteEnabled: true
            vignetteRadius: 1.5

            glowEnabled: true
            glowStrength: 1.25
            glowBloom: 0.25
            glowBlendMode: ExtendedSceneEnvironment.GlowBlendMode.Additive
        }
the result is something like this:
We will refrain from diving into each and every property here. Instead, check out the pre-release documentation. It now comes with screenshots for many properties, to better illustrate what they do.
The sceneeffects example
In some cases it may not always be obvious how a slightly different value for a given property is going to affect the rendering results, and if the development workflow consists of 1. change property value in .qml file 2. run application 3. goto 1, that can then quickly become a frustrating experience. This is why it is recommended to perform such tuning interactively.
Designers working within Qt Design Studio will typically adjust a few sliders in the properties panel and see the results live, right away. When a design tool is not involved, it can be helpful to experiment with the help of a testbed application first. Qt 6.5 comes with a new example, called sceneeffects. This offers interactive controls for every new property in ExtendedSceneEnvironment, and also offers the settings for the new depth/height fog.
As there are limitations for shipping with large assets, the best way to use this example is to load assets via the Import button, for example from the Khronos glTF Sample Models repository. Pictured here is the Sponza model loaded directly from the glTF 2.0 assets in the mentioned repository, with a few effects, such as an obligatory lens flare enabled and some parameters altered.
It is recommended to play and experiment with this application first when getting started with using ExtendedSceneEnvironment.
Performance and resource usage investigation: DebugView
In later phases of development it will likely become important to better understand the cost of doing post-processing on the 3D scene. The amount of resources used, and especially the number of additional render passes will depend on the exact settings. While the various effects are combined together as much as possible, some of them involve multiple render passes and intermediate buffers by nature.
In Qt 6.5 there is now an easy way to get some quick insights. Notice the "Click here for DebugView" label in the top-right corner. Clicking this makes a DebugView item visible. While it is built in to some of the Quick 3D examples, any application can place a DebugView in the Qt Quick scene, associate it with a View3D, and then control its visibility as seen fit.
In addition to the typical timing information, it shows live lists of textures, meshes, and the render passes it takes to render the final output of the View3D.
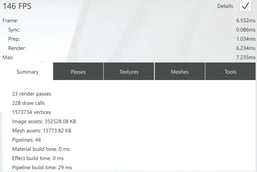

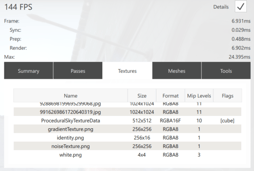
A View3D with the default renderMode of Offscreen would report one render pass. With post-processing effects added, more passes will appear, the number and render target size of which can depend on a number of factors and often affected by the effect's properties in ExtendedSceneEnvironment, and additional textures may get loaded.
Custom 3D post-processing effects
How does all this affect custom effects implemented via the Effect QML type? In most ways it does not. Custom effects will continue to work like before. One important things to keep in mind is that any Effect added to the effects list of the environment gets to run before the built-in post-processing steps.
Effect {
    id: simpleEffect
    property real someUniformValue
    property TextureInput someTexture: TextureInput {
        texture: Texture { source: "image.png" }
    }
    passes: Pass {
       shaders: Shader {
           stage: Shader.Fragment
           shader: "effect.frag"
       }
    }
}

environment: ExtendedSceneEnvironment {
    effects: [ simpleEffect ]
    vignetteEnabled: true
}
Here the custom 'simpleEffect' will get to do its processing before the vignette effect. When it comes to tonemapping, the custom effect can assume its output is in linear space (HDR), tonemapping is performed automatically at the end of the pipeline.
Summary
-
When it comes to 2D effects, get familiar with MultiEffect. For the most common effects, such as blur or drop shadow, this should be the primary choice
-
...even if the goal is to apply the effect on the 3D scene. As shown above, using MultiEffect on a typical View3D is no different from applying the effect to other Items.
-
Avoid pulling in the legacy Qt Graphical Effects types from the Qt5Compat module. MultiEffect and/or Qt Quick Effect Maker should enable implementing the same effects in a better way.
-
-
When MultiEffect is not sufficient, take a look at the Qt Quick Effect Maker tool, before considering implementing a ShaderEffect with custom shader code.
-
In the 3D world, always consider using the post-processing features of ExtendedSceneEnvironment first.
-
Avoid using the old, standalone post-processing effects from the QtQuick3D.Effects module.
-
Some of these, e.g. Blur, GaussianBlur, Emboss, Flip, etc. can (and should) be implemented as a 2D effect via MultiEffect or Qt Quick Effect Maker instead.
-
A number of them, such as DepthOfFieldHQBlur, HDRBloomTonemap, ColorMaster, Fxaa, or Vignette have better alternatives in ExtendedSceneEnvironment.
-
Some other effects are present solely for historical reasons (e.g. inherited from older products as-is), with limited practical value. These continue to be available in Qt 6 for the time being, but it can be advisable to pull these in to the application instead, as a custom Effect so that the application has full control over them now and in the future.
-
-
When getting familiar with post-processing effects and their parameters, it can be hugely helpful to experiment with them in an interactive environment first. This can be the sceneeffects example, Qt Design Studio, or Qt Quick Effect Maker.
-
Be aware of the DebugView enhancements in Qt 6.5. Whereas in earlier versions it displayed only a few timings, it now has asset and renderer information as well.
That's it for now, and thanks for reading this far. It is not unlikely that more blog posts will surface in the coming months around the topic of effects in Qt Quick and Qt Quick 3D, so stay tuned.


