In Android 7.0 namespaces for native libraries were introduced. What this means is that apps can only access the public libraries provided with the Android NDK and the ones in their own native library directory. This is why, by default, every Qt Android app deploys with its own set of Qt libraries which get extracted to the app's native library directory. Due to the aforementioned restrictions, these libraries can't be used by other apps. For most user apps, this is OK - the app can be installed on a number of devices, with no guarantees that the Qt libraries could be found there, or that they would be the correct version!
However, if you are an OEM planning to use Qt to implement your IVI system on top of Android Automotive, this is not ideal. The thought of having to deploy the same libraries with each app may not sound appealing. The more Qt apps you have, the bigger the problem becomes, those multiple sets of libraries take up space.
The good news is that system apps have looser restrictions placed on them - they can use all the native libraries under the system library directory. So in this blog post, we will have a look at how to build an Android image with Qt libraries installed as shared system libraries. We will also learn how to use the new Unbundled deployment, introduced in Qt 6.4.0, to help make it easier to build and deploy apps that will link to Qt libraries present on the target device instead of bundling all the libraries with the APK.
Note that due to the restrictions placed by Android, these libraries will only be available to system apps installed on the system partition.
Adding the libraries
Since the apps do not come with their own set of libraries, we need to make sure the Qt libraries can be found on the device. To add them, we need to modify the AOSP build tree. If you would like a refresher on how to build an Android Automotive emulator image, take a look here! For this post, we build an Android Automotive 12 x86_64 image that can be run on an Android emulator as a virtual device, with the Qt libraries and an example app included.
After we have set up the AOSP build environment as described in the link above, we create a directory named "qt" under <aosp-root>/external. Here we will add the Qt libraries our app(s) use - you can copy them from under your Qt for Android installation. We need to also create an Android.mk or Android.bp file to let the AOSP build know what we want to include. Here, we use the former. Let's add the Android.mk file under the same folder. Now, our directory structure would look like this: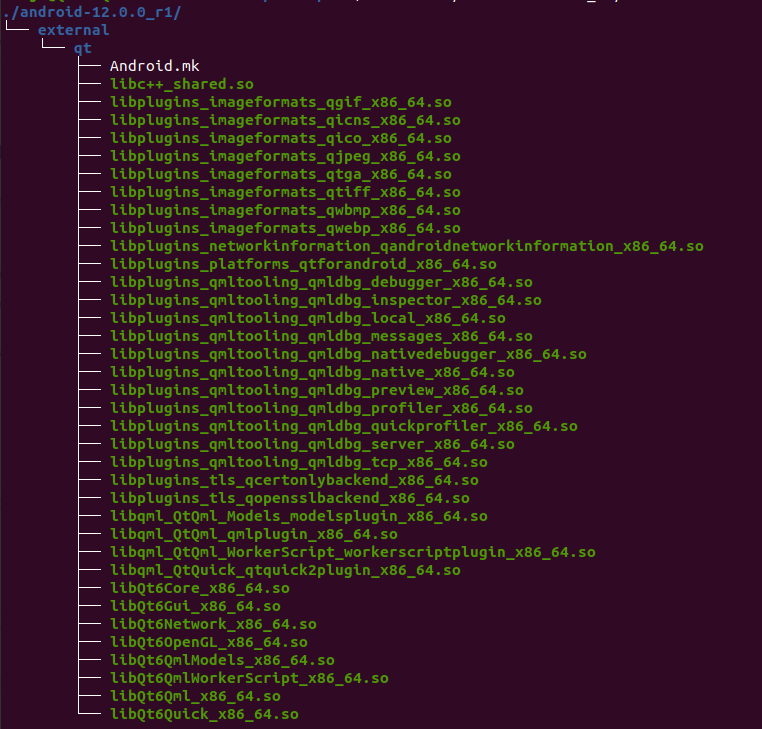
You could also add a subdirectory for e.g. the target architecture (x86_64 in this case) and place the libraries there. Just make sure LOCAL_SRC_FILES points to the source file in relation to Android.mk file's location. Also note that the actual list of libraries you need to add will depend on your app, here we have added the libraries our example app for this post uses.
In the Android.mk file, we first set the LOCAL_PATH to the current working directory. This needs to be done only once at the beginning of the file. Then, an entry is added for each library we want to install.
LOCAL_PATH := $(call my-dir)

# One entry for each library
include $(CLEAR_VARS)
LOCAL_MODULE_TAGS := optional
# The name should match the library name without the .so suffix
LOCAL_MODULE := libQt6Quick_x86_64
LOCAL_MODULE_SUFFIX := .so

LOCAL_MODULE_CLASS := SHARED_LIBRARIES
# Path to the library, relative to LOCAL_PATH
LOCAL_SRC_FILES := $(LOCAL_MODULE)$(LOCAL_MODULE_SUFFIX)
# Relative path to install location -
# this will result in the libraries being installed under system/lib(64)/qt/
LOCAL_MODULE_RELATIVE_PATH := qt
LOCAL_CHECK_ELF_FILES := false
include $(BUILD_PREBUILT)

# And the rest of the entries
 ...
In the example above, we say we want to add a module called libQt6Quick_x86_64, which is a prebuilt C++ shared library, and the prebuilt .so which has the same name as the module can be found in the same directory as the Android.mk file.
We use:
LOCAL_MODULE_RELATIVE_PATH:= qtto tell we want the libraries installed under a subdirectory called "qt" under the system library directory. By default, the AOSP build will check ELF files to make sure all the library's dependencies have been listed appropriately in its LOCAL_SHARED_LIBRARIES entry. This can be disabled by adding a line inside the module declaration to tell it to skip the check:
LOCAL_CHECK_ELF_FILES := falseNotice that in this case, the AOSP build will not install the library's dependencies with it, as it does not know them. In this case, you will need to tell it explicitly to add each of them. This can be achieved by listing them all as installable modules under the product's make file. For example, we can modify the file <aosp-root>/packages/services/Car/car_product/build/car.mk and list all the libraries we want to install under PRODUCT_PACKAGES:
# Append to existing packages, using the name you gave the library module
PRODUCT_PACKAGES += \
    ... \
    libQt6Core_x86_64 \
    libQt6Quick_x86_64 \
    # The rest of the libraries...
    ...
After all the libraries have been added, we can move on to including the app!
Building the app
Next, let's create a simple Qt app - the one created by Qt Creator when you choose "New project - Qt Quick Application" will work just fine for this purpose. Let's call it simply QtApp.
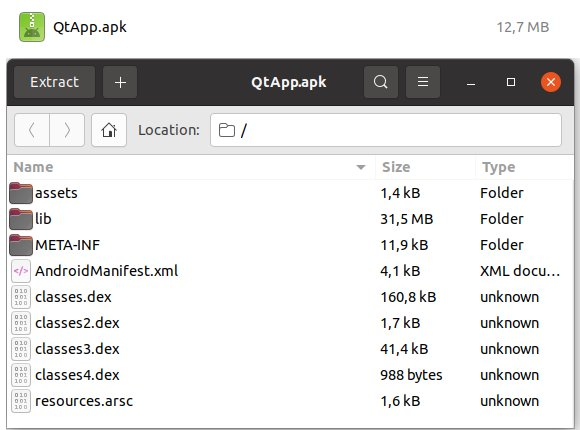
Now if we build it using a Qt for Android kit and the default deployment and take a look at the APK contents, we can see it has included all of its Qt dependencies inside it, under the "lib" directory.
Since we will be providing the libraries as system libraries, we do not need this. So, to take advantage of Unbundled deployment, we set a couple of Qt CMake properties in the app's CMakeLists.txt:
set_target_properties(${target_name} PROPERTIES
    QT_ANDROID_NO_DEPLOY_QT_LIBS True
    QT_ANDROID_SYSTEM_LIBS_PREFIX /system/lib64/qt/
)
Setting QT_ANDROID_NO_DEPLOY_QT_LIBS to true tells the deployment tool not to package the C++ libraries into the APK; and we use QT_ANDROID_SYSTEM_LIBS_PREFIX to tell the app where to search for them on the device, instead. Here, we set the path to point to /system/lib64/qt/, as the image we are building is a 64-bit one. If you are targeting a 64-bit architecture like arm64 or x86_64 this is the default directory for the libraries. If building a 32-bit image, x86 or armv7, swap it for /system/lib/qt/ instead.
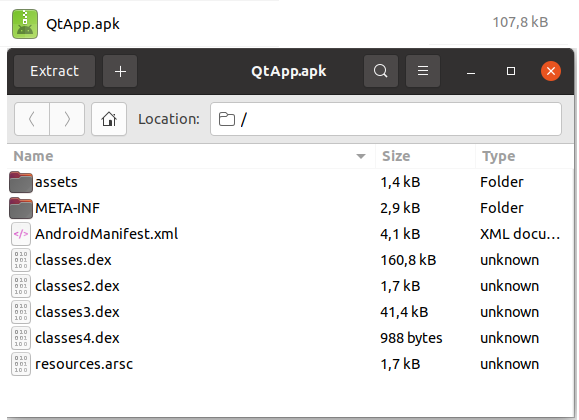
If we do a fresh build after setting the properties, you may notice straight away the APK size is much smaller than a usual Qt Android app - for this simple app the size drops from over 12 MB to just over 100 kB! If you take a peek inside the APK, you will notice the lib folder is missing.
Next, it's time to include the app in the image. As mentioned in the beginning, only apps installed under the system partition can use the libraries we are installing, so we need to add the app we just built as a system app. So again, we create a folder under the AOSP tree - let's call it QtApp and place it under <aosp-root>/packages/apps/Car/.
Under the folder we created, we then copy the APK we just built and its own library. The library can be found under the app's build directory and will by default be called libapp<app-name>_<target-arch>.so. So if our app would be called QtApp, we would copy the library libappQtApp_x86_64.so. Again, we also create an Android.mk file. This time the contents look a bit different:
LOCAL_PATH := $(call my-dir)
include $(CLEAR_VARS)

LOCAL_MODULE_TAGS := optional
# Module name should match apk name to be installed (without the .apk extension)
LOCAL_MODULE := QtApp
LOCAL_SRC_FILES := $(LOCAL_MODULE).apk
LOCAL_MODULE_CLASS := APPS
LOCAL_MODULE_SUFFIX := $(COMMON_ANDROID_PACKAGE_SUFFIX)
# Adds listed files under app's native library dir
LOCAL_PREBUILT_JNI_LIBS := \
    # Replace with the name of your app's library
    libQtApp_x86_64.so \

LOCAL_CERTIFICATE := platform
include $(BUILD_PREBUILT)
This time we let the build know we want to add a prebuilt app.
We also list the libraries we are providing with the app, and want to be installed under the app's own native library directory - here the app's own library, libappQtApp_x86_64.so:
LOCAL_PREBUILT_JNI_LIBS := \
    # Replace with the name of your app's library
    libappQtApp_x86_64.so \
The prebuilt JNI libraries for the app do not need to be declared as modules before including them. Instead, we provide the path to the library, suffix included, in relation to the Android.mk file.
Now that both the libraries and app have been added to the AOSP tree, we can build our image! For that, we follow the directions listed here.
Once we've created an Android Virtual Device based on the image we built, we can launch it on the emulator and have a look. We can see there is a folder /system/app/QtApp, the contents of which will look like this: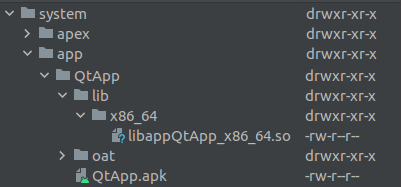
So the app's own library is now the only one found from under the app's own directory. Meanwhile, all the other Qt libraries are now installed under /system/lib64/qt/.
Now QtApp, and all the other Qt system apps installed on the device can use that single set of shared libraries - no need for each app to bring its own!