Sep 23, 2026
Comments
In the previous blog post I introduced Canvas2D, the new QML item in Qt 6.12 that lets you paint with JavaScript using the GPU through Qt Canvas Painter. That post was about the API: what it is, how it compares to Qt Quick Canvas and to the QCanvasPainter C++ API, and how fast it is. But that post might have left someone wondering what a real UI built with it could actually look like.
So, while testing Canvas2D (and QQEM) in preparation for the Qt 6.12.0 release, I spent a few days building a demo application to give some ideas. WatchUI is a smartwatch demo with six swipeable views, running on a 3D watch model. This is based on the smartwatch demo that was built a while back for the Qt 6.5 release. But the content of the watch screen has been reimplemented using not just QQEM effects but also Canvas2D. The demo looks like this:
Everything you see inside the watch face is painted by Canvas2D, shaded by Qt Quick Effect Maker effects, or plain Qt Quick items — and there is not a single line of C++ in it.
That is worth pausing on, because before Canvas2D and QQEM existed, it wasn't as easy as this to achieve high-performance UIs like these without writing custom C++ code. Custom 2D visualizations in Qt have traditionally meant low-level QSG* nodes or a QQuickPaintedItem-based item in C++, or accepting the per-frame texture upload cost of Quick Canvas. Here the entire visual layer is data: QML files, JS functions and shaders. You can edit ViewWater.qml, hit reload (or use hot reload, new in Qt 6.12!), and the water sloshes differently a second later. For prototyping a watch face, an instrument cluster or a dashboard, this iteration speed is a big deal.
Canvas2D and Qt Quick Effect Maker: a perfect combo
The interesting part of building WatchUI was not Canvas2D on its own — it was discovering how cleanly it divides labor with shader effects. The two are good at different things.
Canvas2D is good at geometry you can describe. A clock hand of a certain length at a certain angle. A bezier through three control points. Text at a baseline. A polyline through samples of heart data. Anything where you know where the ink goes, an imperative path API expresses in a few lines, and Canvas Painter turns into cached vertex buffers and a couple of draw calls.
Shader effects are good at everything per-pixel. Bloom and glow. Procedural noise, clouds, rain. Refraction and distortion. Bending a straight strip of bars into a ring. These are the things that are painful to fake with paths — a glow drawn as 30 concentric translucent strokes is both slow and ugly — but that are a handful of lines in a fragment shader and essentially free on any GPU that can run the UI at all.
Combining them works in multiple ways in this demo:
-
Shader behind canvas: The TIME & DATE view puts a procedural nebula effect under the clock face, and the WEATHER view puts animated rain and clouds under the temperature graph. The canvas sits on top with `fillColor: "transparent"` and `alphaBlending: true`, so the shader shows through everywhere the canvas did not paint.
-
Canvas as shader input: The WATER view paints the glass and its wavy surface with Canvas2D, keeps that item `visible: false`, and hands it to a bubbles shader as source. The shader then adds rising bubbles and refraction on top of geometry that would be hopeless to compute per-pixel.
-
Only Canvas2D: The MUSIC and HEARTBEAT views don't use any shader effects, as their content is painted with Canvas2D only.
-
Only shaders: The ACTIVITY view contains no Canvas2D at all. It is glowing bars bent into rings, which can be achieved effectively with pure shaders.
The reason this composes so well is that both of these are first-class Qt Quick scene graph citizens. A Canvas2D item renders directly into the scene graph — there is no intermediate QImage, no texture upload per frame — and a ShaderEffect consumes scene graph textures. Stacking them costs what stacking any two Qt Quick items costs.
Qt Quick unified 2D & 3D rendering
The demo uses an actual 3D view and a watch model, not a 2D mockup. The watch body, the strap and the glass are a Qt Quick 3D scene with real materials and lighting, and the WatchUI item — the whole six-view 2D UI — is mapped onto the display surface as the watch's screen.
This is where Qt Quick's unified 2D & 3D rendering architecture shows its strengths. Qt Quick and Qt Quick 3D share one renderer and one graphics abstraction (QRhi), which means a 2D subtree can be used as a texture in a 3D scene, and 3D content can be embedded inside a 2D scene, without any hand-rolled render-to-texture plumbing on your side. In practice that gives three things in this demo:
-
The 2D UI stays interactive. Swiping between views, tapping the play/pause button, tapping the water buttons — all of it works through the 3D surface, because it is still a live Qt Quick item tree, not a baked image.
-
One frame, one renderer. The 3D watch, the 2D views, the Canvas2D painting and the shader effects are all part of the same frame graph, submitted to the same GPU pipeline. There is no synchronization problem between a "2D layer" and a "3D layer" because they are part of the same rendering architecture.
-
The 2D work is reusable as-is. The exact same WatchUI.qml runs full-screen on a 2D window during development — and then goes onto the 3D model unchanged for the demo. Nothing about the views knows or cares which one they are in.
For anyone building automotive clusters, appliance UIs or product visualizations, this is a valid pattern: author the interactive surface as a normal 2D Qt Quick UI, then place it in the 3D product. And with Canvas2D in the mix, that interactive surface can now be a fully animated, per-frame-repainted custom visualization without dropping to C++.
The following sections describe, one by one, how the essential parts of each of the six watch views have been implemented.
TIME & DATE
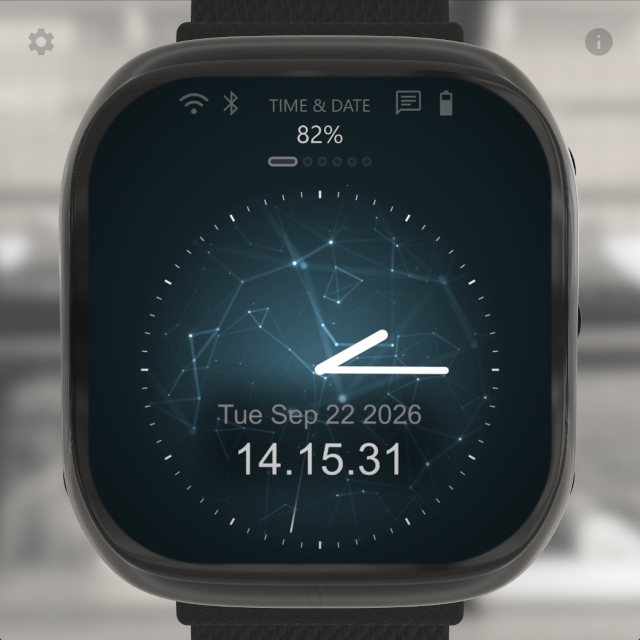
The first view, in the screenshot above, is the clearest example of the shader-behind-canvas split.
The blue web of dots and lines drifting behind the clock is a UniverseWithin shader effect by Martijn Steinrucken brought into Qt Quick Effect Maker and customized slightly. Changes include removing the start fade, masking the content into a circular area using the distance from the center point, and exposing the highlight color as a parameter that can then be adjusted easily with a QML property.
Everything crisp is painted with a single Canvas2D element:
-
The rim ticks. Minor and major ticks in separate paths as they have different `lineWidth`. Two `beginPath()`/`stroke()` pairs for 72 marks — one of the nice properties of an imperative path API is that batching is the natural way to write it, not an optimization you add later.
-
The hands. `drawHand()` is six lines: `rotate()`, `moveTo(0,0)`, `lineTo(0,-length)`, `stroke()`, rotate back. The hour and the minute hands use a solid color, but the second hand uses a `createRadialGradient()` from fully transparent at the center to opaque white at the tip, which gives it a tapered fade that would otherwise need a custom polygon.
-
The date and time text. `fillText()` with the date string and locale time string, over a `createBoxShadow()` with a large blur — the soft dark pool that lifts the text off the busy nebula. As covered in the new features post, box shadows are an SDF calculation rather than a blur pass, so this only costs one quad. These texts could just as well use Quick Text elements, but I decided to do them on the Canvas2D side this time.
The animations are the fun part. The second hand reads `getMilliseconds()`, so with a per-frame repaint it sweeps smoothly instead of ticking. And when the view slides in and out, the ticks animate so the dial assembles itself as you swipe to it. Just watch the video in slow motion to appreciate these small details that become possible when the painting is dynamic instead of using static images.
WEATHER
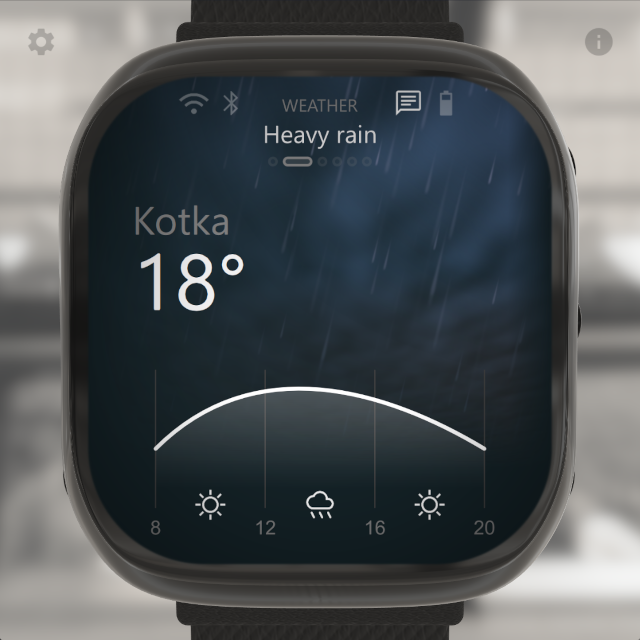
The weather view, above, splits the screen between the two techniques by area rather than by layer.
The upper two thirds — the overcast sky, the slanted streaks of rain — are the `WeatherRainEffect` shader, assembled in Qt Quick Effect Maker from its built-in rain and clouds nodes. Internally, it layers four scrolling copies of a rain texture at different scales for parallax, and renders clouds with a perspective distortion so the horizon reads as far away. But with QQEM you don't need to know this: just drop in the effect nodes, adjust them and export the effect.
The effect element is deliberately positioned at the top so the rain falls through the status bar too. This is what makes the weather feel like it belongs to the whole watch rather than to a widget.
My favorite small touch here is the property binding from the view swipe animation state into the rain effect's wind direction. The shader's wind direction is driven by the view transition, so the rain slants one way as the view arrives and the other way as it leaves. A physical effect wired to a scroll position like this is a nice touch for users.
Canvas2D handles the bottom half, the forecast graph:
-
The temperature curve is a `bezierCurveTo()` through three control points. It is drawn twice from the same coordinates: first closed down to the baseline and filled with a vertical `createLinearGradient()` running from translucent white to fully transparent, then as an open path stroked in white with `lineCap = "round"`.
-
The hour axis is `fillText()` for "8", "12", "16", "20" plus four vertical grid lines batched into one path.
-
The weather icons are `drawImage()` calls on PNGs preloaded with `loadImage()` in `Component.onCompleted`. These could just as well use Canvas2D path2d with SVG paths, but as the icons don't need to scale, using images is also just fine.
The location and temperature texts on the top-left corner are this time using ordinary Qt Quick `Text` items. There is no reason to paint this static text on a canvas, and mixing declarative items with canvas painting in the same view costs nothing.
MUSIC
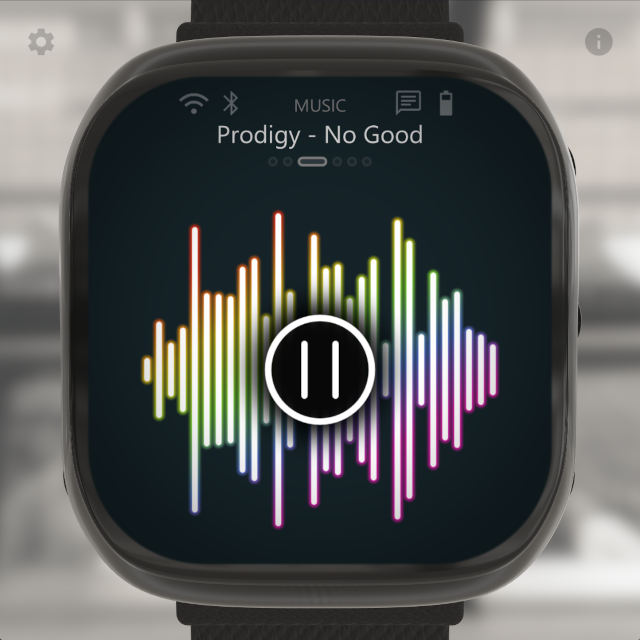
The music view, above, shows fantastic taste in '90s music. It is also 100% Canvas2D — no shader effect at all. This view is here to make a point about adjustable antialiasing feature.
The bar spectrum is a synthetic waveform of dummy audio data, with a fade applied to the first and last few bars so the shape tapers. All bars go into one path as `moveTo()`/`lineTo()` pairs with `lineCap = "round"`, and then that single path is stroked twice:
That is the whole glow. The first pass is a wider stroke with a 10-pixel antialiasing width, which spreads the gradient edge into a soft halo; the second is a crisp white core on top. Two draw calls, no blur pass, no extra render target. Adjustable antialiasing is one of those Canvas2D additions that sounds like a technicality until you realize it doubles as a free glow brush for line art.
The colors come from a diagonal `createLinearGradient()` with five stops, so the rainbow runs across the whole bar field rather than per bar. During a view transition `globalSaturation` and `globalBrightness` are both animated, so the spectrum drains to grey and darkens as you swipe away — again, two lines, and no layer effects involved.
The play/pause button in the middle is a `ctx.circle()` with a white stroke and a boxshadow2d with a suitable radius and blur behind it for a circular shadow effect. The icon inside is two line segments whose four endpoints are linearly interpolated between the pause and play positions by `playingAnimated`. A `Behavior { SmoothedAnimation { velocity: 2 } }` on that property makes the pause bars fold into a triangle and back. Morphing an icon by interpolating path endpoints is trivial when you redraw every frame — you just compute the in-between shape.
ACTIVITY
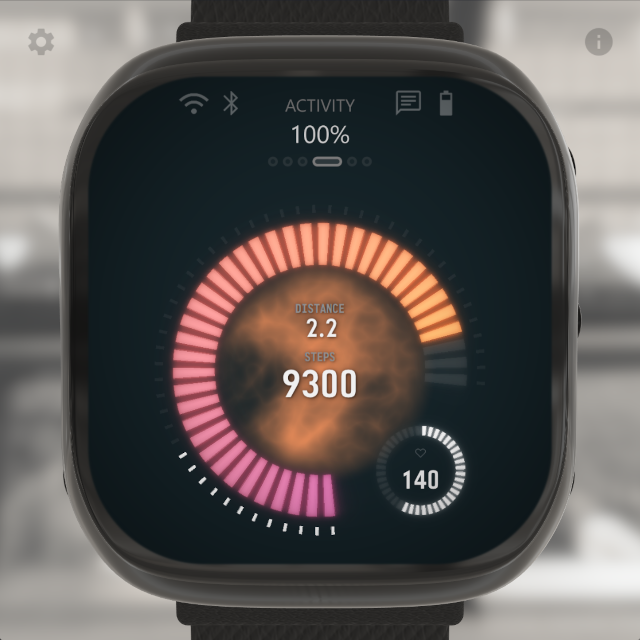
The activity view, above, contains no Canvas2D whatsoever. We could achieve somewhat similar circle bars using Canvas2D, but this view was deliberately made to highlight how powerful plain shader effects can be for this kind of UI component.
The view contains three concentric rings of small bars, each bar glowing in its own color. Every characteristic of that is per-pixel. So `CircleBar.qml` is a three-stage shader pipeline, each stage using an effect made with Qt Quick Effect Maker:
-
BarsEffect draws the bars procedurally into a straight horizontal strip — bar width, count, smoothness and distribution are uniforms, and `barsAmount` is simply `value * barsAmount`, so the "progress" of a ring is just a float. Two colors blend along the strip, and bars past the current value are drawn in a dim `barsColorOff`.
-
GlowEffect takes that strip and adds bloom. It uses a QQEM `BlurHelper` node, which is how you get a wide, cheap glow; `glowBloom`, `glowBlurAmount` and `glowColor` are per-ring.
-
BendEffect bends the glowing strip into an arc with a polar UV lookup: `circleBendStartAngle`, `circleBendSpanAngle` and `circleBendRingWidth` map the ring's pixels back into the straight strip's texture coordinates.
Note that all three of these effects that create a circular bar are built-in effect nodes of QQEM, so there is no need to implement them by hand.
The numeric readouts are QML `Text` items in a `monofonto` font with a `MultiEffect` drop shadow. Behind them, `BackgroundEffect` renders the orange "electric clouds" — fractal noise, colored from the ring's own bar color so the background and the bars always have a matching ambience. Electric clouds is also available in QQEM as a built-in node, ready for customization.
WATER
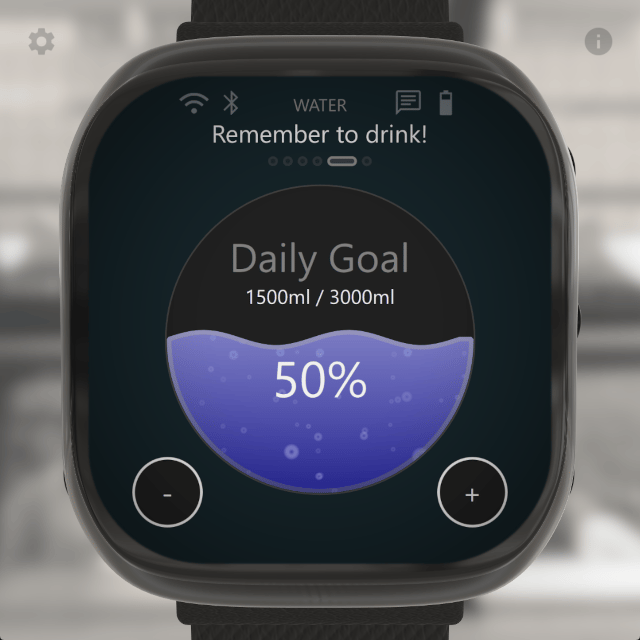
The water view, above, is the demo's example of Canvas2D output feeding a shader effect, rather than keeping the canvas and the effects separate.
The glass is painted by Canvas2D. First a dark filled `ctx.circle()` with a lighter stroke for the container. Then the water, which is one continuous path built from two pieces: a `ctx.arc()` sweeping the round bottom of the glass, and a path of `lineTo()` points along the top forming the wave surface, closed with `closePath()`. That path gets filled with one vertical gradient and stroked with another.
Then the trick:
The canvas is invisible. Its rendered result is the shader's input, and the shader adds the drifting bubbles and refraction you can see inside the water. This is exactly the division of labor to aim for: the shape of the liquid — which depends on the level, the wave phase and the glass radius — is geometry, so use Canvas2D; the texture of the liquid is per-pixel, so GLSL handles it. Neither side has to do the other's job badly.
Side note: Canvas Painter has support for custom shader brushes which Canvas2D doesn't yet support. The custom brush class is still technology preview in Qt 6.12 and we will be fine tuning it to be more powerful. But ideally it could be used in this example to fill the water in the glass directly with a bubble brush, so a separate render step would not be required. Let's see, that might be an option later on.
The animations are worth a look because they are all in the painting code rather than in `Behavior` blocks on visual properties. `waveSpeed` comes from `FrameAnimation.elapsedTime`, and the wave amplitude is scaled by `Math.sin(waterLevel * Math.PI)` — so the surface is at its most active when the glass is half full and calms down as it approaches empty or full, which is both physically sensible and a nice detail you get for one `Math.sin()` call. The level itself animates through a `SmoothedAnimation` on `animatedValue`, so tapping "+" pours rather than jumps, and the wave amplitude re-derives from the new level automatically. During view transitions `globalSaturation` and `globalContrast` are animated, washing the water out as you swipe away. The "Daily Goal", milliliter and percentage readouts are `Text` items above the shader, so they stay perfectly sharp and are not refracted along with the bubbles.
HEARTBEAT
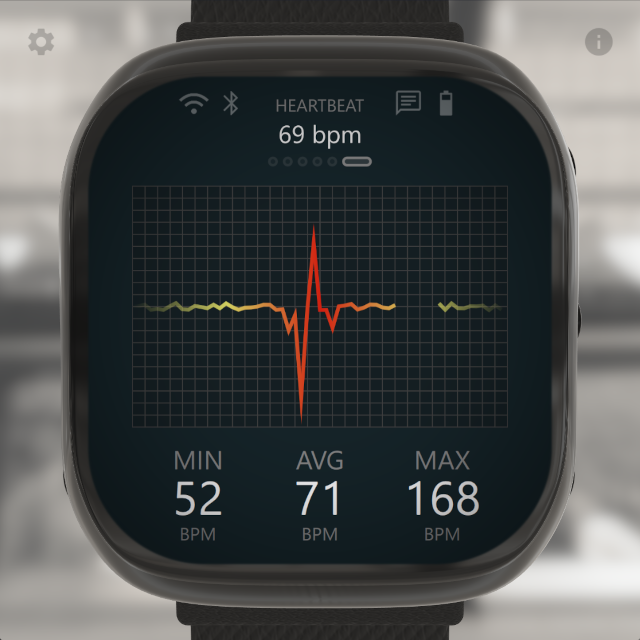
The last view, above, is pure Canvas2D again, and it is the one that most resembles real-world data visualization work. Visually it might not fully match the other views, but that's not important, as the main point of this demo is just to give different ideas on how to use Canvas2D.
The ECG graph background grid is very easy to achieve with Canvas2D:
A 30×20 grid — 52 antialiased lines — drawn as one `fillRect()` with a gridpattern2d brush. The cost is constant regardless of the grid density, because the pattern is evaluated in the fragment shader rather than tessellated into geometry. Grids and bar patterns show up in every chart, gauge and instrument UI, and this is why grid patterns are a first-class brush in Canvas Painter.
The ECG itself is a simple line graph. It is stroked as a single path or as two subpaths in the same `beginPath()`, when the gap wraps around the end of the buffer. That gap is what produces the scanning break that sweeps across the screen, like a real heart monitor.
Two details in that stroke are worth copying:
-
The `strokeStyle` is a horizontal `createLinearGradient()` that is `transparent` at both ends and red in the middle. So the trace fades out at the left and right edges of the graph without any clipping, mask or extra item — the fade is in the brush.
-
`ctx.miterLimit = 100` keeps the sharp graph spikes from being blunted into a bevel where the line reverses direction almost vertically. With the default limit those corners get cut, and a flat-topped ECG spike looks wrong.
The data is synthetic, but properly shaped and randomized. No two heartbeats are the same, and it would be trivial to replace this synthetic data with real data coming from sensors.
Summary
WatchUI is a demo I built while working on Canvas2D, and it exists mostly to answer that "what could a real UI look like?" question with something more convincing than a benchmark. If you want to experiment with the API itself, the Canvas 2D Tester example that ships with the module is still the best starting point.
But the takeaway from WatchUI is the combination, not any single piece. Canvas2D for the geometry you can describe, Qt Quick Effect Maker shaders for the pixels you cannot, ordinary Qt Quick items for text and layout, and Qt Quick's unified 2D & 3D renderer to put the whole thing onto a product — all of it in QML, JavaScript and GLSL, without having to touch C++ at all.
Canvas2D is a technology preview in Qt 6.12, which means now is when your feedback actually changes the API. If you build something with it, or hit a wall with it, tell us — through the Qt bug tracker, or the forum thread.
Blog Topics
Related Articles
Qt for Python Release: 6.12 is here!
Qt for Python 6.12 is here, alongside the Qt 6.12 LTS release. This is the..
Read Article
Introducing the QML Live Preview MCP Tool for Agentic Development of Embedded Devices
Agents Edit QML, But Don’t See the Result Without Building, Compiling, and..
Read Article
Qt for MCUs 2.12.3 LTS Released
Qt for MCUs 2.12.3 LTS has been released and is available for download...
Read Article