# Positioning Elements
There are a number of QML elements used to position items. These are called positioners, of which the Qt Quick module provides the following: Row, Column, Grid and Flow. They can be seen showing the same contents in the illustration below.
TIP
Before we go into details, let me introduce some helper elements: the red, blue, green, lighter and darker squares. Each of these components contains a 48x48 pixel colorized rectangle. As a reference, here is the source code for the RedSquare:
// RedSquare.qml

import QtQuick

Rectangle {
    width: 48
    height: 48
    color: "#ea7025"
    border.color: Qt.lighter(color)
}
Please note the use of Qt.lighter(color) to produce a lighter border color based on the fill color. We will use these helpers in the next examples to make the source code more compact and readable. Please remember, each rectangle is initially 48x48 pixels.
The Column element arranges child items into a column by stacking them on top of each other. The spacing property can be used to distance each of the child elements from each other.

// ColumnExample.qml

import QtQuick

DarkSquare {
    id: root
    width: 120
    height: 240

    Column {
        id: column
        anchors.centerIn: parent
        spacing: 8
        RedSquare { }
        GreenSquare { width: 96 }
        BlueSquare { }
    }
}
The Row element places its child items next to each other, either from the left to the right, or from the right to the left, depending on the layoutDirection property. Again, spacing is used to separate child items.

// RowExample.qml

import QtQuick

BrightSquare {
    id: root
    width: 400; height: 120

    Row {
        id: row
        anchors.centerIn: parent
        spacing: 20
        BlueSquare { }
        GreenSquare { }
        RedSquare { }
    }
}
The Grid element arranges its children in a grid. By setting the rows and columns properties, the number of rows or columns can be constrained. By not setting either of them, the other is calculated from the number of child items. For instance, setting rows to 3 and adding 6 child items will result in 2 columns. The properties flow and layoutDirection are used to control the order in which the items are added to the grid, while spacing controls the amount of space separating the child items.

// GridExample.qml

import QtQuick

BrightSquare {
    id: root
    width: 160
    height: 160

    Grid {
        id: grid
        rows: 2
        columns: 2
        anchors.centerIn: parent
        spacing: 8
        RedSquare { }
        RedSquare { }
        RedSquare { }
        RedSquare { }
    }

}
The final positioner is Flow. It adds its child items in a flow. The direction of the flow is controlled using flow and layoutDirection. It can run sideways or from the top to the bottom. It can also run from left to right or in the opposite direction. As the items are added in the flow, they are wrapped to form new rows or columns as needed. In order for a flow to work, it must have a width or a height. This can be set either directly, or though anchor layouts.

// FlowExample.qml

import QtQuick

BrightSquare {
    id: root
    width: 160
    height: 160

    Flow {
        anchors.fill: parent
        anchors.margins: 20
        spacing: 20
        RedSquare { }
        BlueSquare { }
        GreenSquare { }
    }
}
An element often used with positioners is the Repeater. It works like a for-loop and iterates over a model. In the simplest case a model is just a value providing the number of loops.
// RepeaterExample.qml
import QtQuick
DarkSquare {
id: root
width: 252
height: 252
property variant colorArray: ["#00bde3", "#67c111", "#ea7025"]
Grid{
anchors.fill: parent
anchors.margins: 8
spacing: 4
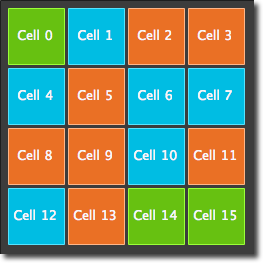
Repeater {
model: 16
delegate: Rectangle {
required property int index
property int colorIndex: Math.floor(Math.random()*3)
width: 56; height: 56
color: root.colorArray[colorIndex]
border.color: Qt.lighter(color)
Text {
anchors.centerIn: parent
color: "#f0f0f0"
text: "Cell " + parent.index
}
}
}
}
}In this repeater example, we use some new magic. We define our own colorArray property, which is an array of colors. The repeater creates a series of rectangles (16, as defined by the model). For each loop, it creates the rectangle as defined by the child of the repeater. In the rectangle we chose the color by using JS math functions: Math.floor(Math.random()*3). This gives us a random number in the range from 0..2, which we use to select the color from our color array. As noted earlier, JavaScript is a core part of Qt Quick, and as such, the standard libraries are available to us.
A repeater injects the index property into the repeater. It contains the current loop-index. (0,1,..15). We can use this to make our own decisions based on the index, or in our case to visualize the current index with the Text element.
TIP
While the index property is dynamically injected into the Rectangle, it is a good practice to declare it as a required property to ease readability and help tooling. This is achieved by the required property int index line.
TIP
More advanced handling of larger models and kinetic views with dynamic delegates is covered in its own model-view chapter. Repeaters are best used when having a small amount of static data to be presented.