# Models in C++
One of the most common ways to integrate C++ and QML is through models. A model provides data to a view such as ListViews, GridView, PathViews, and other views which take a model and create an instance of a delegate for each entry in the model. The view is smart enough to only create these instances which are visible or in the cache range. This makes it possible to have large models with tens of thousands of entries but still have a very slick user interface. The delegate acts like a template to be rendered with the model entries data. So in summary: a view renders entries from the model using a delegate as a template. The model is a data provider for views.
When you do not want to use C++ you can also define models in pure QML. You have several ways to provide a model for the view. For handling of data coming from C++ or a large amount of data, the C++ model is more suitable than this pure QML approach. But often you only need a few entries then these QML models are well suited.
ListView {
    // using a integer as model
    model: 5
    delegate: Text { text: 'index: ' + index }
}

ListView {
    // using a JS array as model
    model: ['A', 'B', 'C', 'D', 'E']
    delegate: Text { 'Char['+ index +']: ' + modelData }
}

ListView {
    // using a dynamic QML ListModel as model
    model: ListModel {
        ListElement { char: 'A' }
        ListElement { char: 'B' }
        ListElement { char: 'C' }
        ListElement { char: 'D' }
        ListElement { char: 'E' }
    }
    delegate: Text { 'Char['+ index +']: ' + model.char }
}
The QML views know how to handle these different types of models. For models coming from the C++ world, the view expects a specific protocol to be followed. This protocol is defined in the API defined in QAbstractItemModel, together with documentation describing the dynamic behavior. The API was developed for driving views in the desktop widget world and is flexible enough to act as a base for trees, or multi-column tables as well as lists. In QML, we usually use either the list variant of the API, QAbstractListModel or, for the TableView element, the table variant of the API, QAbstractTableModel. The API contains some functions that have to be implemented and some optional ones that extend the capabilities of the model. The optional parts mostly handle the dynamic use cases for changing, adding or deleting data.
# A simple model
A typical QML C++ model derives from QAbstractListModel and implements at least the data and rowCount function. In the example below, we will use a series of SVG color names provided by the QColor class and display them using our model. The data is stored into a QList<QString> data container.
Our DataEntryModel is derived form QAbstractListModel and implements the mandatory functions. We can ignore the parent in rowCount as this is only used in a tree model. The QModelIndex class provides the row and column information for the cell, for which the view wants to retrieve data. The view is pulling information from the model on a row/column and role-based. The QAbstractListModel is defined in QtCore but QColor in QtGui. That is why we have the additional QtGui dependency. For QML applications it is okay to depend on QtGui but it should normally not depend on QtWidgets.
#ifndef DATAENTRYMODEL_H
#define DATAENTRYMODEL_H

#include <QtCore>
#include <QtGui>

class DataEntryModel : public QAbstractListModel
{
    Q_OBJECT
public:
    explicit DataEntryModel(QObject *parent = 0);
    ~DataEntryModel();

public: // QAbstractItemModel interface
    virtual int rowCount(const QModelIndex &parent) const;
    virtual QVariant data(const QModelIndex &index, int role) const;
private:
    QList<QString> m_data;
};

#endif // DATAENTRYMODEL_H
On the implementation side, the most complex part is the data function. We first need to make a range check to ensure that we've been provided a valid index. Then we check that the display role is supported. Each item in a model can have multiple display roles defining various aspects of the data contained. The Qt::DisplayRole is the default text role a view will ask for. There is a small set of default roles defined in Qt which can be used, but normally a model will define its own roles for clarity. In the example, all calls which do not contain the display role are ignored at the moment and the default value QVariant() is returned.
#include "dataentrymodel.h"

DataEntryModel::DataEntryModel(QObject *parent)
    : QAbstractListModel(parent)
{
    // initialize our data (QList<QString>) with a list of color names
    m_data = QColor::colorNames();
}

DataEntryModel::~DataEntryModel()
{
}

int DataEntryModel::rowCount(const QModelIndex &parent) const
{
    Q_UNUSED(parent);
    // return our data count
    return m_data.count();
}

QVariant DataEntryModel::data(const QModelIndex &index, int role) const
{
    // the index returns the requested row and column information.
    // we ignore the column and only use the row information
    int row = index.row();

    // boundary check for the row
    if(row < 0 || row >= m_data.count()) {
        return QVariant();
    }

    // A model can return data for different roles.
    // The default role is the display role.
    // it can be accesses in QML with "model.display"
    switch(role) {
        case Qt::DisplayRole:
            // Return the color name for the particular row
            // Qt automatically converts it to the QVariant type
            return m_data.value(row);
    }

    // The view asked for other data, just return an empty QVariant
    return QVariant();
}
The next step would be to register the model with QML using the qmlRegisterType call. This is done inside the main.cpp before the QML file was loaded.
#include <QtGui>
#include <QtQml>

#include "dataentrymodel.h"

int main(int argc, char *argv[])
{
    QGuiApplication app(argc, argv);

    // register the type DataEntryModel
    // under the url "org.example" in version 1.0
    // under the name "DataEntryModel"
    qmlRegisterType<DataEntryModel>("org.example", 1, 0, "DataEntryModel");

    QQmlApplicationEngine engine;
    engine.load(QUrl(QStringLiteral("qrc:/main.qml")));

    return app.exec();
}
Now you can access the DataEntryModel using the QML import statement import org.example 1.0 and use it just like other QML item DataEntryModel {}.
We use this in this example to display a simple list of color entries.
import org.example 1.0

ListView {
    id: view
    anchors.fill: parent
    model: DataEntryModel {}
    delegate: ListDelegate {
        // use the defined model role "display"
        text: model.display
    }
    highlight: ListHighlight { }
}
The ListDelegate is a custom type to display some text. The ListHighlight is just a rectangle. The code was extracted to keep the example compact.
The view can now display a list of strings using the C++ model and the display property of the model. It is still very simple, but already usable in QML. Normally the data is provided from outside the model and the model would act as an interface to the view.
TIP
To expose a table of data instead of a list, the QAbstractTableModel is used. The only difference compared to implementing a QAbstractListModel is that you must also provide the columnCount method.
# More Complex Data
In reality, the model data is often much more complex. So there is a need to define custom roles so that the view can query other data via properties. For example, the model could provide not only the color as a hex string but maybe also the hue, saturation, and brightness from the HSV color model as “model.hue”, “model.saturation” and “model.brightness” in QML.
#ifndef ROLEENTRYMODEL_H
#define ROLEENTRYMODEL_H

#include <QtCore>
#include <QtGui>

class RoleEntryModel : public QAbstractListModel
{
    Q_OBJECT
public:
    // Define the role names to be used
    enum RoleNames {
        NameRole = Qt::UserRole,
        HueRole = Qt::UserRole+2,
        SaturationRole = Qt::UserRole+3,
        BrightnessRole = Qt::UserRole+4
    };

    explicit RoleEntryModel(QObject *parent = 0);
    ~RoleEntryModel();

    // QAbstractItemModel interface
public:
    virtual int rowCount(const QModelIndex &parent) const override;
    virtual QVariant data(const QModelIndex &index, int role) const override;
protected:
    // return the roles mapping to be used by QML
    virtual QHash<int, QByteArray> roleNames() const override;
private:
    QList<QColor> m_data;
    QHash<int, QByteArray> m_roleNames;
};

#endif // ROLEENTRYMODEL_H
In the header, we added the role mapping to be used for QML. When QML tries now to access a property from the model (e.g. “model.name”) the listview will lookup the mapping for “name” and ask the model for data using the NameRole. User-defined roles should start with Qt::UserRole and need to be unique for each model.
#include "roleentrymodel.h"

RoleEntryModel::RoleEntryModel(QObject *parent)
    : QAbstractListModel(parent)
{
    // Set names to the role name hash container (QHash<int, QByteArray>)
    // model.name, model.hue, model.saturation, model.brightness
    m_roleNames[NameRole] = "name";
    m_roleNames[HueRole] = "hue";
    m_roleNames[SaturationRole] = "saturation";
    m_roleNames[BrightnessRole] = "brightness";

    // Append the color names as QColor to the data list (QList<QColor>)
    for(const QString& name : QColor::colorNames()) {
        m_data.append(QColor(name));
    }

}

RoleEntryModel::~RoleEntryModel()
{
}

int RoleEntryModel::rowCount(const QModelIndex &parent) const
{
    Q_UNUSED(parent);
    return m_data.count();
}

QVariant RoleEntryModel::data(const QModelIndex &index, int role) const
{
    int row = index.row();
    if(row < 0 || row >= m_data.count()) {
        return QVariant();
    }
    const QColor& color = m_data.at(row);
    qDebug() << row << role << color;
    switch(role) {
    case NameRole:
        // return the color name as hex string (model.name)
        return color.name();
    case HueRole:
        // return the hue of the color (model.hue)
        return color.hueF();
    case SaturationRole:
        // return the saturation of the color (model.saturation)
        return color.saturationF();
    case BrightnessRole:
        // return the brightness of the color (model.brightness)
        return color.lightnessF();
    }
    return QVariant();
}

QHash<int, QByteArray> RoleEntryModel::roleNames() const
{
    return m_roleNames;
}
The implementation now has changed only in two places. First in the initialization. We now initialize the data list with QColor data types. Additionally, we define our role name map to be accessible for QML. This map is returned later in the ::roleNames function.
The second change is in the ::data function. We extend the switch to cover the other roles (e.g hue, saturation, brightness). There is no way to return an SVG name from a color, as a color can take any color and SVG names are limited. So we skip this. Storing the names would require to create a structure struct { QColor, QString } to be able to identify the named color.
After registering the type we can use the model and its entries in our user interface.
ListView {
    id: view
    anchors.fill: parent
    model: RoleEntryModel {}
    focus: true
    delegate: ListDelegate {
        text: 'hsv(' +
              Number(model.hue).toFixed(2) + ',' +
              Number(model.saturation).toFixed() + ',' +
              Number(model.brightness).toFixed() + ')'
        color: model.name
    }
    highlight: ListHighlight { }
}
We convert the returned type to a JS number type to be able to format the number using fixed-point notation. The code would also work without the Number call (e.g. plain model.saturation.toFixed(2)). Which format to choose, depends how much you trust the incoming data.
# Dynamic Data
Dynamic data covers the aspects of inserting, removing and clearing the data from the model. The QAbstractListModel expect a certain behavior when entries are removed or inserted. The behavior is expressed in signals which need to be called before and after the manipulation. For example to insert a row into a model you need first to emit the signal beginInsertRows, then manipulate the data and then finally emit endInsertRows.
We will add the following functions to our headers. These functions are declared using Q_INVOKABLE to be able to call them from QML. Another way would be to declare them as public slots.
// inserts a color at the index (0 at begining, count-1 at end)
Q_INVOKABLE void insert(int index, const QString& colorValue);
// uses insert to insert a color at the end
Q_INVOKABLE void append(const QString& colorValue);
// removes a color from the index
Q_INVOKABLE void remove(int index);
// clear the whole model (e.g. reset)
Q_INVOKABLE void clear();
Additionally, we define a count property to get the size of the model and a get method to get a color at the given index. This is useful when you would like to iterate over the model content from QML.
// gives the size of the model
Q_PROPERTY(int count READ count NOTIFY countChanged)
// gets a color at the index
Q_INVOKABLE QColor get(int index);
The implementation for insert checks first the boundaries and if the given value is valid. Only then do we begin inserting the data.
void DynamicEntryModel::insert(int index, const QString &colorValue)
{
    if(index < 0 || index > m_data.count()) {
        return;
    }
    QColor color(colorValue);
    if(!color.isValid()) {
        return;
    }
    // view protocol (begin => manipulate => end]
    emit beginInsertRows(QModelIndex(), index, index);
    m_data.insert(index, color);
    emit endInsertRows();
    // update our count property
    emit countChanged(m_data.count());
}
Append is very simple. We reuse the insert function with the size of the model.
void DynamicEntryModel::append(const QString &colorValue)
{
    insert(count(), colorValue);
}
Remove is similar to insert but it calls according to the remove operation protocol.
void DynamicEntryModel::remove(int index)
{
    if(index < 0 || index >= m_data.count()) {
        return;
    }
    emit beginRemoveRows(QModelIndex(), index, index);
    m_data.removeAt(index);
    emit endRemoveRows();
    // do not forget to update our count property
    emit countChanged(m_data.count());
}
The helper function count is trivial. It just returns the data count. The get function is also quite simple.
QColor DynamicEntryModel::get(int index)
{
    if(index < 0 || index >= m_data.count()) {
        return QColor();
    }
    return m_data.at(index);
}
You need to be careful that you only return a value which QML understands. If it is not one of the basic QML types or types known to QML you need to register the type first with qmlRegisterType or qmlRegisterUncreatableType. You use qmlRegisterUncreatableType if the user shall not be able to instantiate its own object in QML.
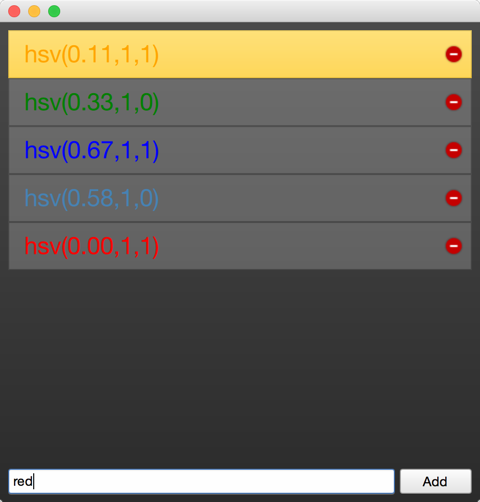
Now you can use the model in QML and insert, append, remove entries from the model. Here is a small example which allows the user to enter a color name or color hex value and the color is then appended onto the model and shown in the list view. The red circle on the delegate allows the user to remove this entry from the model. After the entry is to remove the list view is notified by the model and updates its content.
And here is the QML code. You find the full source code also in the assets for this chapter. The example uses the QtQuick.Controls and QtQuick.Layout module to make the code more compact. These controls module provides a set of desktop related UI elements in Qt Quick and the layouts module provides some very useful layout managers.
import QtQuick
import QtQuick.Window
import QtQuick.Controls
import QtQuick.Layouts

// our module
import org.example 1.0

Window {
    visible: true
    width: 480
    height: 480

    Background { // a dark background
        id: background
    }

    // our dyanmic model
    DynamicEntryModel {
        id: dynamic
        onCountChanged: {
            // we print out count and the last entry when count is changing
            print('new count: ' + dynamic.count)
            print('last entry: ' + dynamic.get(dynamic.count - 1))
        }
    }

    ColumnLayout {
        anchors.fill: parent
        anchors.margins: 8
        ScrollView {
            Layout.fillHeight: true
            Layout.fillWidth: true
            ListView {
                id: view
                // set our dynamic model to the views model property
                model: dynamic
                delegate: ListDelegate {
                    required property var model
                    width: ListView.view.width
                    // construct a string based on the models proeprties
                    text: 'hsv(' +
                          Number(model.hue).toFixed(2) + ',' +
                          Number(model.saturation).toFixed() + ',' +
                          Number(model.brightness).toFixed() + ')'
                    // sets the font color of our custom delegates
                    color: model.name

                    onClicked: {
                        // make this delegate the current item
                        view.currentIndex = model.index
                        view.focus = true
                    }
                    onRemove: {
                        // remove the current entry from the model
                        dynamic.remove(model.index)
                    }
                }
                highlight: ListHighlight { }
                // some fun with transitions :-)
                add: Transition {
                    // applied when entry is added
                    NumberAnimation {
                        properties: "x"; from: -view.width;
                        duration: 250; easing.type: Easing.InCirc
                    }
                    NumberAnimation { properties: "y"; from: view.height;
                        duration: 250; easing.type: Easing.InCirc
                    }
                }
                remove: Transition {
                    // applied when entry is removed
                    NumberAnimation {
                        properties: "x"; to: view.width;
                        duration: 250; easing.type: Easing.InBounce
                    }
                }
                displaced: Transition {
                    // applied when entry is moved
                    // (e.g because another element was removed)
                    SequentialAnimation {
                        // wait until remove has finished
                        PauseAnimation { duration: 250 }
                        NumberAnimation { properties: "y"; duration: 75
                        }
                    }
                }
            }
        }
        TextEntry {
            id: textEntry
            onAppend: function (color) {
                // called when the user presses return on the text field
                // or clicks the add button
                dynamic.append(color)
            }

            onUp: {
                // called when the user presses up while the text field is focused
                view.decrementCurrentIndex()
            }
            onDown: {
                // same for down
                view.incrementCurrentIndex()
            }
        }
    }
}
Model view programming is one of the more complex development tasks in Qt. It is one of the very few classes where you have to implement an interface as a normal application developer. All other classes you just use normally. The sketching of models should always start on the QML side. You should envision how your users would use your model inside QML. For this, it is often a good idea to create a prototype first using the ListModel to see how this best works in QML. This is also true when it comes to defining QML APIs. Making data available from C++ to QML is not only a technology boundary it is also a programming paradigm change from imperative to declarative style programming. So be prepared for some setbacks and aha moments:-).