# Materials and Light
Up until now, we've only worked with basic materials. To create a convincing 3D scene, proper materials and more advanced lighting is needed. Qt Quick 3D supports a number of techniques to achieve this, and in this section we will look at a few of them.
# The Built-in Materials
First up, we will look at the built in materials. Qt Quick 3D comes with three material types: DefaultMaterial, PrincipledMaterial, and CustomMaterial. In this chapter we will touch on the two first, while the latter allows you to create truly custom material by providing your own vertex and fragment shaders.
The DefaultMaterial lets you control the appearance of the material through the specular, roughness, and diffuseColor properties. The PrincipledMaterial lets you control the appearache through the metalness, roughness, and baseColor properties.
Examples of the two material types can be seen below, with the PrincipledMaterial to the left, and the DefaultMaterial to the right.
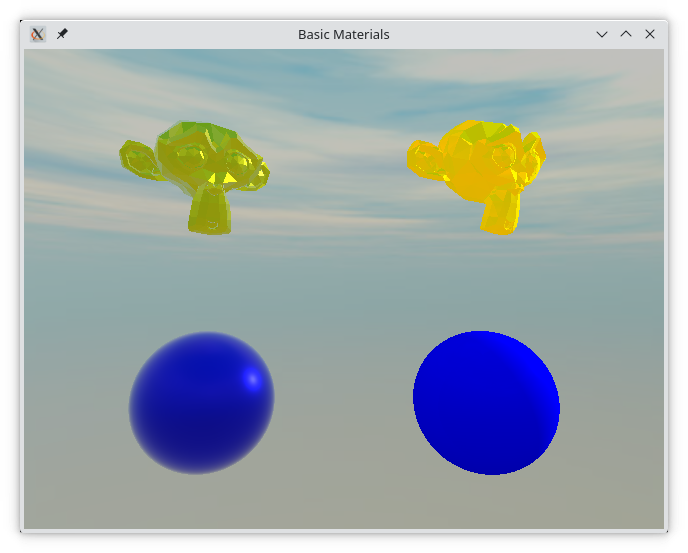
Comparing the two Suzannes, we can see how the two materials are set up.
For the DefaultMaterial, we use the diffuseColor, specularTint, and specularAmount properties. We will look at how variations of these properties affect the appearance of the objects later in this section.
Model {
    source: "meshes/suzanne.mesh"

    position: Qt.vector3d(5, 4, 0)
    scale: Qt.vector3d(2, 2, 2)
    rotation: Quaternion.fromEulerAngles(Qt.vector3d(-80, 30, 0))

    materials: [ DefaultMaterial {
            diffuseColor: "yellow";
            specularTint: "red";
            specularAmount: 0.7
        } ]
}
For the PrincipledMaterial, we tune the baseColor, metalness, and roughnessproperties. Again, we will look at how variations of these properties affect the appearance later in this section.
Model {
    source: "meshes/suzanne.mesh"

    position: Qt.vector3d(-5, 4, 0)
    scale: Qt.vector3d(2, 2, 2)
    rotation: Quaternion.fromEulerAngles(Qt.vector3d(-80, 30, 0))

    materials: [ PrincipledMaterial {
            baseColor: "yellow";
            metalness: 0.8
            roughness: 0.3
        } ]
}
# Default Material Properties
The figure below shows the default material with various values for the specularAmount and the specularRoughness properties.
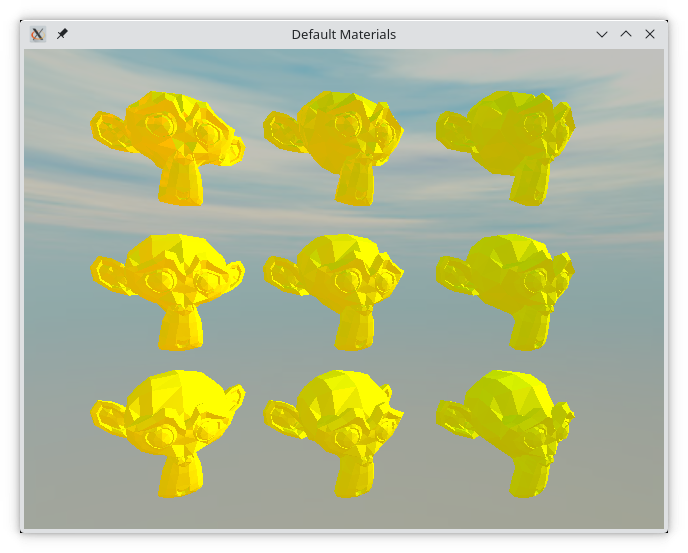
The specularAmount varies from 0.8 (left-most), through 0.5 (center), to 0.2 (right-most).
The specularRoughness varies from 0.0 (top), through 0.4 (middle), to 0.8 (bottom).
The code for the middle Model is shown below.
Model {
    source: "meshes/suzanne.mesh"

    position: Qt.vector3d(0, 0, 0)
    scale: Qt.vector3d(2, 2, 2)
    rotation: Quaternion.fromEulerAngles(Qt.vector3d(-80, 30, 0))

    materials: [ DefaultMaterial {
            diffuseColor: "yellow";
            specularTint: "red";
            specularAmount: 0.5
            specularRoughness: 0.4
        } ]
}
# Principled Material Properties
The figure below shows the principled material with various values for the metalness and roughnessproperties.
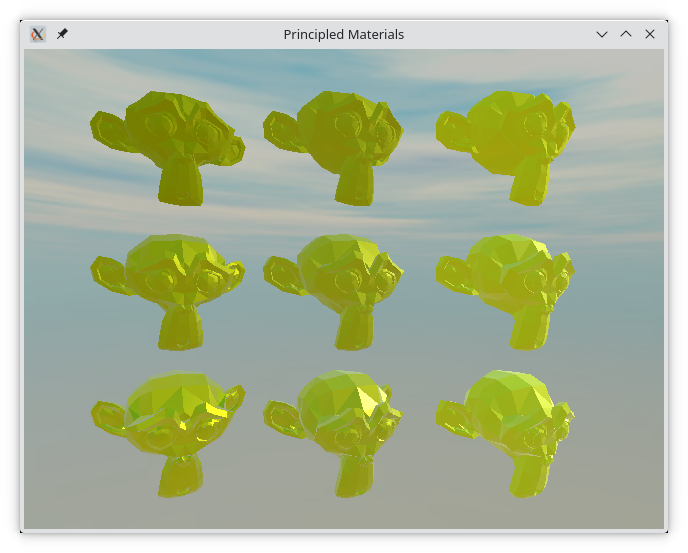
The metalness varies from 0.8 (left-most), through 0.5 (center), to 0.2 (right-most).
The roughness varies from 0.9 (top), through 0.6 (middle), to 0.3 (bottom).
Model {
    source: "meshes/suzanne.mesh"

    position: Qt.vector3d(0, 0, 0)
    scale: Qt.vector3d(2, 2, 2)
    rotation: Quaternion.fromEulerAngles(Qt.vector3d(-80, 30, 0))

    materials: [ PrincipledMaterial {
            baseColor: "yellow";
            metalness: 0.5
            roughness: 0.6
        } ]
}
# Image-based Lighting
One final detail in the main example in this section is the skybox. For this example, we are using an image as skybox, instead of a single colour background.
To provide a skybox, assign a Textureto the lightProbe property of the SceneEnvironment as shown in the code below. This means that the scene receives image-based light, i.e. that the skybox is used to light the scene. We also adjust the probeExposure which is used to control how much light is exposed through the probe, i.e. how brightly the scene will be lit. In this scene, we combine the light probe with a DirectionalLight for the final lighting.
environment: SceneEnvironment {
    clearColor: "#222222"
    backgroundMode: SceneEnvironment.SkyBox
    lightProbe: Texture {
        source: "maps/skybox.jpg"
    }
    probeExposure: 0.75
}
In addition to what we show, the orientation of the light probe can be adjusted using the probeOrientation vector, and the probeHorizon property can be used to darken the bottom half of the environment, simulating that the light comes from above, i.e. from the sky, rather than from all around.